> ## Documentation Index
> Fetch the complete documentation index at: https://docs.safesquid.com/llms.txt
> Use this file to discover all available pages before exploring further.
# VPN Integration
> Configure and manage VPN settings for SafeSquid Web Security Clients via Self-Service Portal, including FQDN setup and verification.
# Secure proxy access with WireGuard VPN
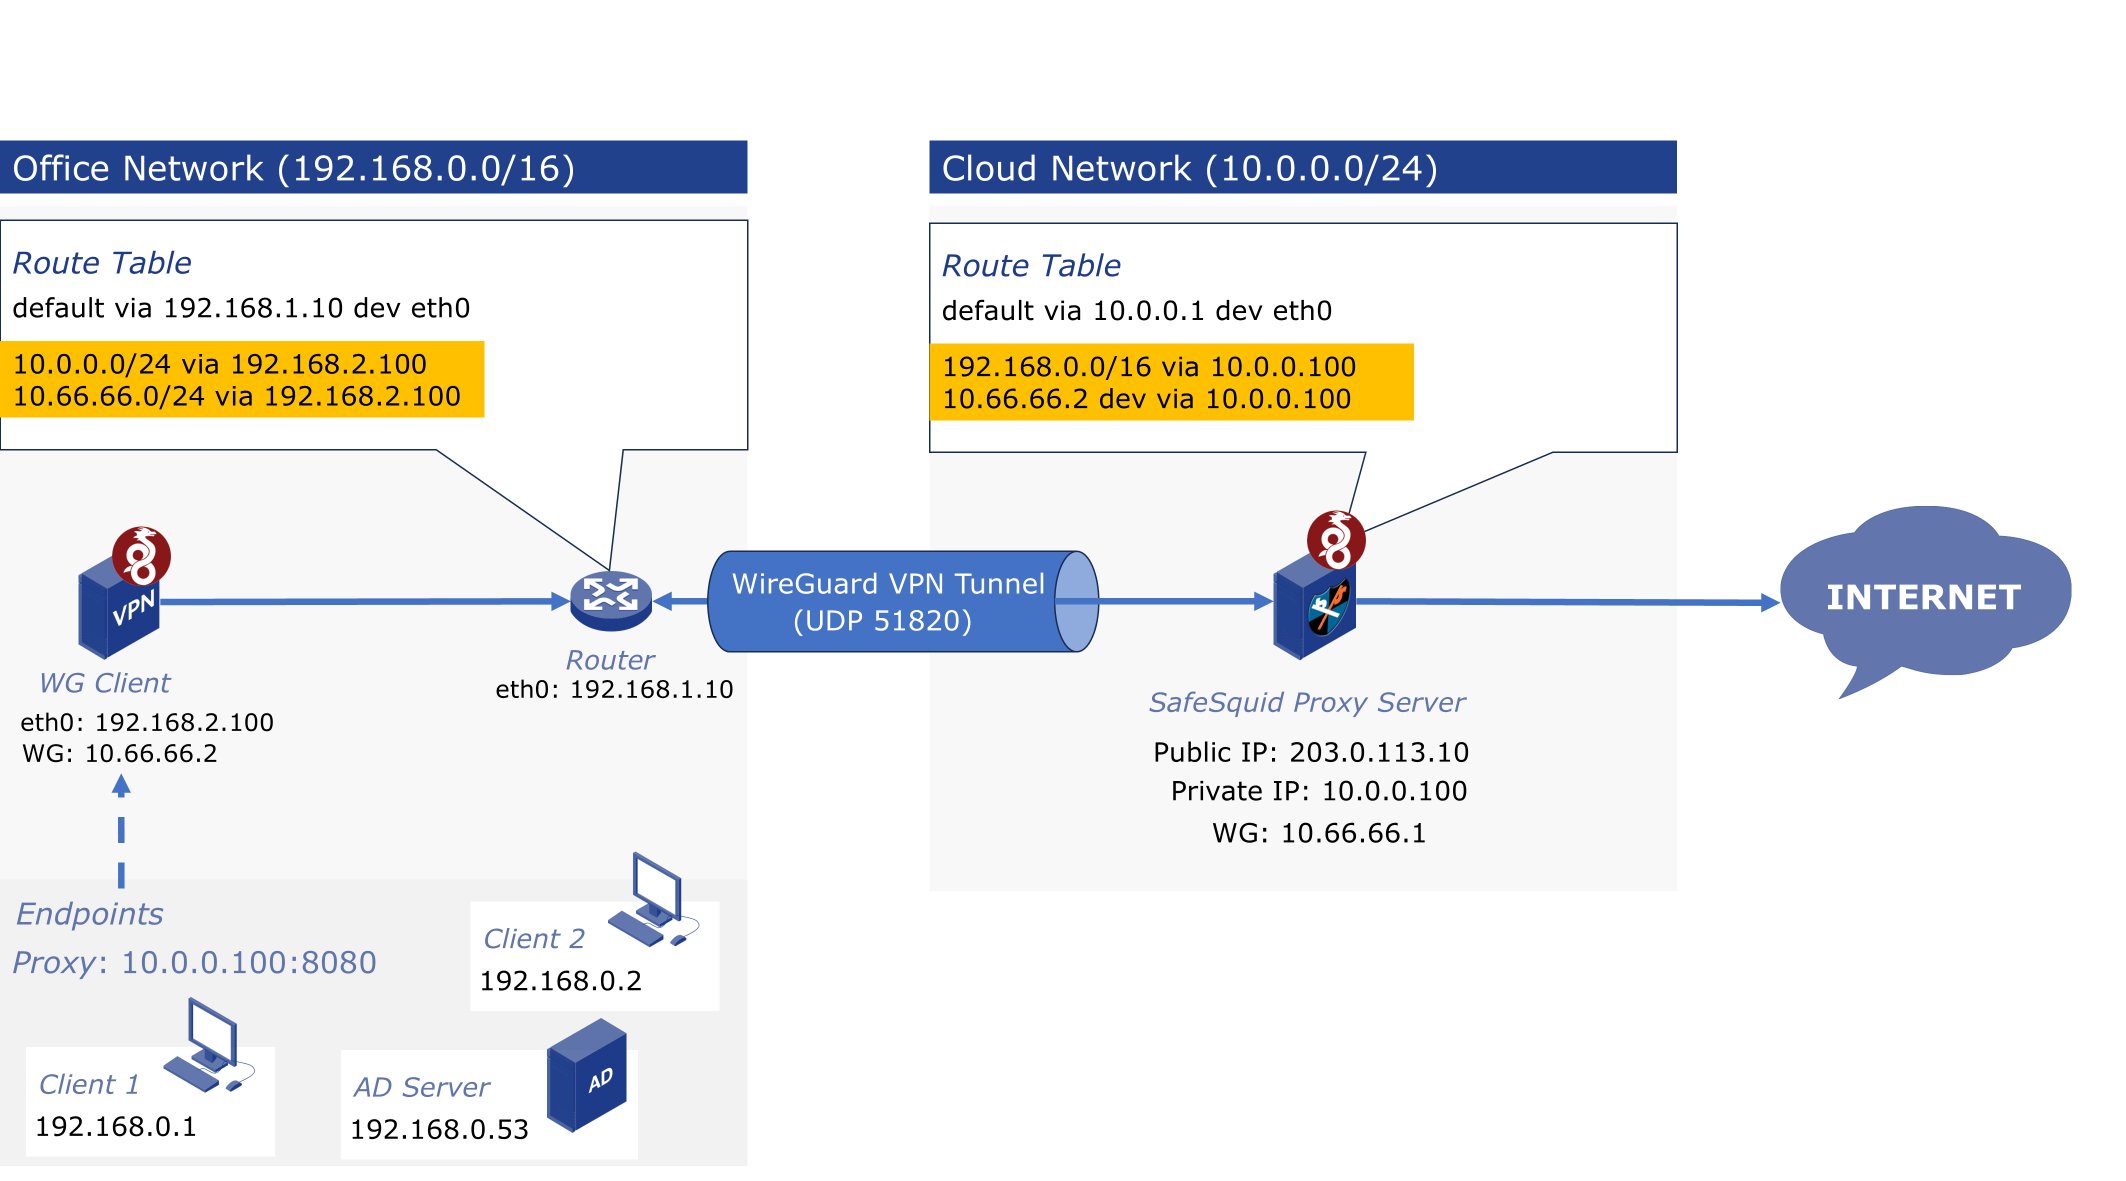
Directly exposing a SafeSquid proxy in the cloud to office or remote users is insecure. A dedicated, encrypted [WireGuard](https://www.wireguard.com/) VPN tunnel enables secure transport from enterprise networks or remote endpoints to the cloud without public exposure. This isolates the proxy, limits attack surface, and supports zero-trust connectivity with SafeSquid inspection and access control.
The following diagram depicts the VPN tunnel:
 ## Prerequisites
**Cloud VPS (WireGuard + SafeSquid Host)**
* Ubuntu 24.04 LTS
* Public IPv4 address (e.g., 203.0.113.10)
* UDP port 51820 open in the cloud firewall
* Root or sudo privileges
* curl utility installed
**Office LAN or Remote Endpoint (WireGuard Client)**
* WireGuard installed
* Root or sudo-level access
* Access to client configuration files
* Internet connectivity to initiate outbound VPN tunnel
## Example cloud and office network topology
| Element | Address | Description |
| ------------------------------------- | ------------- | -------------------------------------------------------- |
| Public IP | 203.0.113.10 | External IP of Cloud VPS |
| Private Subnet | 10.0.0.0/24 | Internal cloud network |
| WireGuard Server / SafeSquid Proxy IP | 10.0.0.100 | Internal IP of cloud VPS running WireGuard and SafeSquid |
| VPN Tunnel Subnet | 10.66.66.1/24 | IP pool for WireGuard interfaces |
| Element | Address | Description |
| -------------------- | ------------- | ------------------------------------------------------- |
| Office Subnet | 10.200.2.0/24 | Internal network of office LAN |
| WireGuard Client1 IP | 10.200.2.100 | Office client behind NAT, initiates VPN tunnel to cloud |
| VPN Tunnel Subnet | 10.66.66.2/24 | IP pool for WireGuard interfaces |
## Setup Procedure
### 1. Deploy WireGuard on cloud VPS
#### Download Setup Script
Fetch the automated installation script provided by SafeSquid to simplify WireGuard server setup.
```bash theme={null}
curl -O https://raw.githubusercontent.com/SafeSquid-Github/wireguard/refs/heads/main/wireguard-setup.sh
```
#### Execute Script
Run the script to initiate the WireGuard server configuration.
```bash theme={null}
bash wireguard-setup.sh --install
```
**During execution, provide:**
* Public IP: 203.0.113.10
* Port: 51820
* VPN Subnet: 10.66.66.0/24
* Peer Name: Client1
**Outputs:**
* Server config: **/etc/wireguard/wg0.conf**
* Client config: **/etc/wireguard/wg0-client-client1.conf**
### 2. Install WireGuard on the office endpoint
Install WireGuard on the office client to enable VPN connectivity.
```bash theme={null}
apt update
```
```bash theme={null}
apt install wireguard -y
```
This provides the necessary tools: wg for tunnel management and wg-quick for service control.
### 3. Configure office endpoint
#### Retrieve Client Configuration from Server
Display the client configuration generated by the cloud-side script.
```bash theme={null}
cat /etc/wireguard/wg0-client-client1.conf
```
Copy the output.
#### Save Configuration Locally
Create the required directory and apply the configuration on the office client.
```bash theme={null}
mkdir -p /etc/wireguard
```
```bash theme={null}
vim /etc/wireguard/wg0.conf
```
Paste the copied output from the previous step and save the file.
### 4. Set peer routing rules
#### On Cloud VPS
Modify the peer section in wg0.conf to allow routing to the office subnet and the client's tunnel IP.
**AllowedIPs = 10.66.66.2/32,10.200.2.0/24**
* 10.66.66.2/32: IP assigned to Client1
* 10.200.2.0/24: Entire office LAN behind Client1
#### On Office Client
Ensure routing towards the server and internal cloud subnet.
**AllowedIPs = 10.66.66.1/32,10.0.0.0/24**
* 10.66.66.1/32: Server tunnel endpoint
* 10.0.0.0/24: Internal cloud LAN accessible via VPN
### 5. Restart and enable services
#### Cloud VPS
Restart the interface to apply changes and enable persistence at boot.
```bash theme={null}
systemctl restart wg-quick@wg0
```
```bash theme={null}
systemctl enable wg-quick@wg0
```
#### Office Client
Restart the VPN tunnel with updated config and ensure service autostarts.
```bash theme={null}
wg-quick down wg0 && wg-quick up wg0
```
```bash theme={null}
systemctl enable wg-quick@wg0
```
### 6. Enable IP Forwarding
Edit the system control file to enable IPv4 packet forwarding.
```bash theme={null}
vim /etc/sysctl.conf
```
Uncomment or append:
```bash theme={null}
net.ipv4.ip_forward = 1
```
Apply the new setting:
```bash theme={null}
sysctl -p
```
### 7. Configure Routing
#### Cloud VPS Route
Route traffic destined for the office LAN via the WireGuard server's internal IP.
```bash theme={null}
ip route add 10.200.2.0/24 via 10.0.0.100
```
This ensures cloud workloads can reach the office network securely via VPN.
#### Office Router Configuration
Direct cloud-bound traffic from office LAN through Client1 (WireGuard client).
```bash theme={null}
ip route add 10.0.0.0/24 via 10.200.2.100
```
Guarantees LAN devices access cloud services routed through the VPN tunnel.
### 8. Enforce One-Way Tunnel Security
#### Block Unsolicited Traffic from Cloud to Office
Insert a firewall rule to drop unsolicited packets targeting the office subnet from the tunnel.
```bash theme={null}
iptables -A FORWARD -i wg0 -d 10.200.2.0/24 -j DROP
```
#### Persist Firewall Rules Across Reboots
Install the persistence utility and save the current rule set.
```bash theme={null}
apt install iptables-persistent -y
```
```bash theme={null}
netfilter-persistent save
```
## Validate VPN Connectivity
Confirm tunnel and office endpoint reachability.
```bash theme={null}
ping 10.66.66.2
```
```bash theme={null}
ping 10.200.2.100
```
Ensure reverse reachability to server and cloud LAN.
```bash theme={null}
ping 10.66.66.1
```
```bash theme={null}
ping 10.0.0.100
```
Display active peers and session statistics.
```bash theme={null}
wg show
```
## Post-Deployment Considerations
### 1. Multi-Client Deployment (Office & Remote Users)
If you plan to support **remote employees**, not just a single office, you must:
#### On the WireGuard Server:
* Generate separate peer configurations for each user or location
* Assign **unique tunnel IPs** to each client (e.g., 10.66.66.3/32, 10.66.66.4/32, etc.)
* Use a separate AllowedIPs per peer
Example server config for two clients:
```bash theme={null}
[Peer]
Office LAN
PublicKey = OFFICE_PUBLIC_KEY
AllowedIPs = 10.66.66.2/32,10.200.2.0/24
[Peer]
Remote User1
PublicKey = REMOTE_USER1_KEY
AllowedIPs = 10.66.66.3/32
```
#### On the Remote User
* Use AllowedIPs = 0.0.0.0/0 if they want **all their traffic** routed through the VPN
* Or use 10.0.0.0/24 if they only need access to internal cloud resources
### 2. Directory Server Integration
SafeSquid requires directory services (e.g., Active Directory) for identity-based policy enforcement. Ensure:
* Proxy initiates LDAP/LDAPS requests from its WireGuard tunnel IP
* Directory server accepts and routes responses to VPN subnet (e.g., 10.66.66.1)
This guarantees seamless identity resolution and policy mapping inside the VPN-secured cloud perimeter.
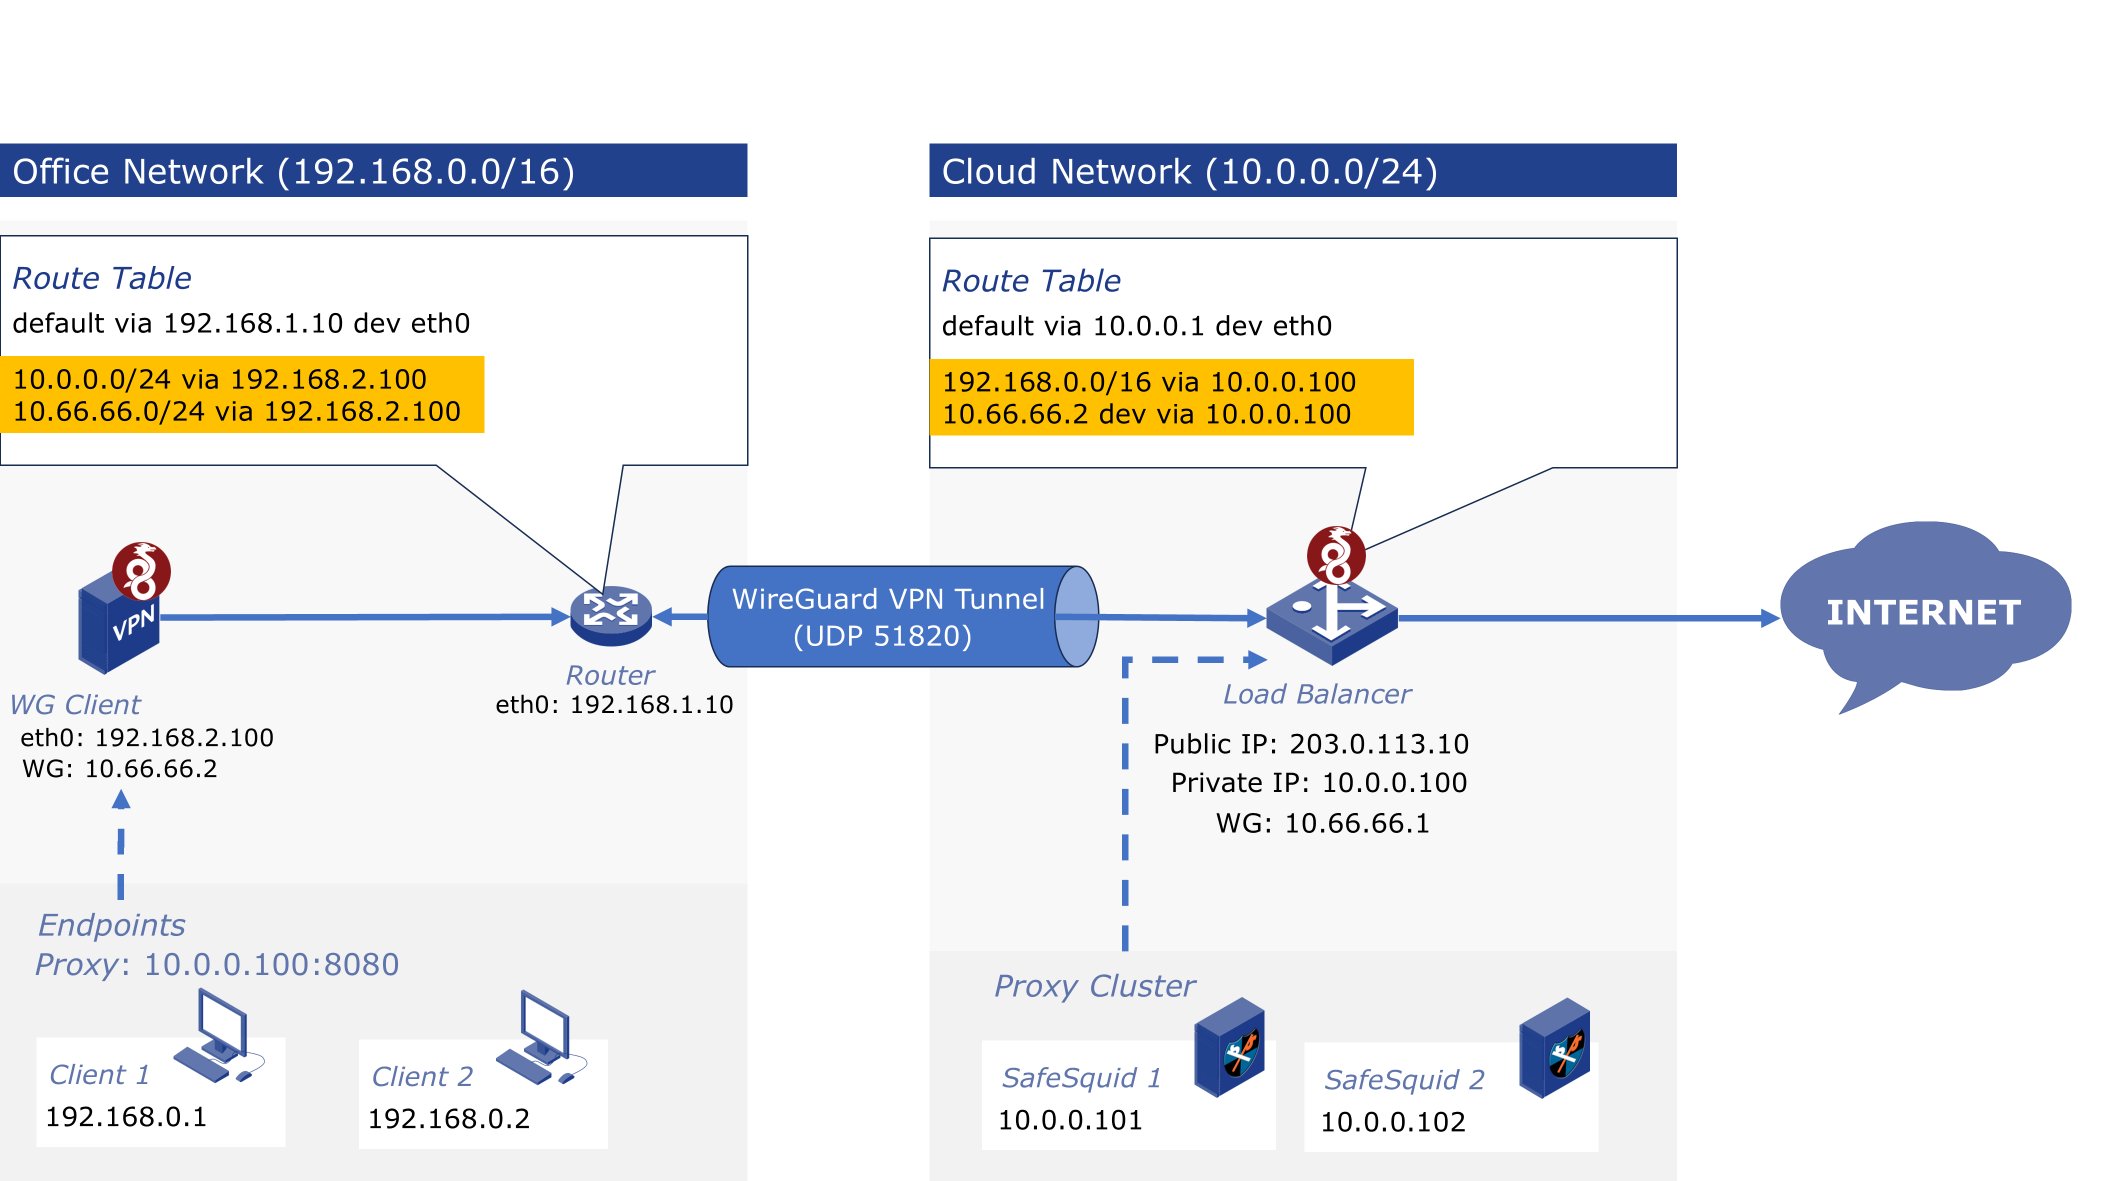
### 3. Proxy Cluster with Centralized Load Balancer
When deploying multiple SafeSquid instances as a cluster:
* Place a central load balancer between the office VPN ingress and the proxy layer
* The load balancer handles all incoming WireGuard traffic
* Distributes requests to proxy nodes for inspection and filtering
* Routes sanitized output to the internet
The architecture shown in maintains performance, simplifies scale-out, and centralizes VPN and external access controls.
## Prerequisites
**Cloud VPS (WireGuard + SafeSquid Host)**
* Ubuntu 24.04 LTS
* Public IPv4 address (e.g., 203.0.113.10)
* UDP port 51820 open in the cloud firewall
* Root or sudo privileges
* curl utility installed
**Office LAN or Remote Endpoint (WireGuard Client)**
* WireGuard installed
* Root or sudo-level access
* Access to client configuration files
* Internet connectivity to initiate outbound VPN tunnel
## Example cloud and office network topology
| Element | Address | Description |
| ------------------------------------- | ------------- | -------------------------------------------------------- |
| Public IP | 203.0.113.10 | External IP of Cloud VPS |
| Private Subnet | 10.0.0.0/24 | Internal cloud network |
| WireGuard Server / SafeSquid Proxy IP | 10.0.0.100 | Internal IP of cloud VPS running WireGuard and SafeSquid |
| VPN Tunnel Subnet | 10.66.66.1/24 | IP pool for WireGuard interfaces |
| Element | Address | Description |
| -------------------- | ------------- | ------------------------------------------------------- |
| Office Subnet | 10.200.2.0/24 | Internal network of office LAN |
| WireGuard Client1 IP | 10.200.2.100 | Office client behind NAT, initiates VPN tunnel to cloud |
| VPN Tunnel Subnet | 10.66.66.2/24 | IP pool for WireGuard interfaces |
## Setup Procedure
### 1. Deploy WireGuard on cloud VPS
#### Download Setup Script
Fetch the automated installation script provided by SafeSquid to simplify WireGuard server setup.
```bash theme={null}
curl -O https://raw.githubusercontent.com/SafeSquid-Github/wireguard/refs/heads/main/wireguard-setup.sh
```
#### Execute Script
Run the script to initiate the WireGuard server configuration.
```bash theme={null}
bash wireguard-setup.sh --install
```
**During execution, provide:**
* Public IP: 203.0.113.10
* Port: 51820
* VPN Subnet: 10.66.66.0/24
* Peer Name: Client1
**Outputs:**
* Server config: **/etc/wireguard/wg0.conf**
* Client config: **/etc/wireguard/wg0-client-client1.conf**
### 2. Install WireGuard on the office endpoint
Install WireGuard on the office client to enable VPN connectivity.
```bash theme={null}
apt update
```
```bash theme={null}
apt install wireguard -y
```
This provides the necessary tools: wg for tunnel management and wg-quick for service control.
### 3. Configure office endpoint
#### Retrieve Client Configuration from Server
Display the client configuration generated by the cloud-side script.
```bash theme={null}
cat /etc/wireguard/wg0-client-client1.conf
```
Copy the output.
#### Save Configuration Locally
Create the required directory and apply the configuration on the office client.
```bash theme={null}
mkdir -p /etc/wireguard
```
```bash theme={null}
vim /etc/wireguard/wg0.conf
```
Paste the copied output from the previous step and save the file.
### 4. Set peer routing rules
#### On Cloud VPS
Modify the peer section in wg0.conf to allow routing to the office subnet and the client's tunnel IP.
**AllowedIPs = 10.66.66.2/32,10.200.2.0/24**
* 10.66.66.2/32: IP assigned to Client1
* 10.200.2.0/24: Entire office LAN behind Client1
#### On Office Client
Ensure routing towards the server and internal cloud subnet.
**AllowedIPs = 10.66.66.1/32,10.0.0.0/24**
* 10.66.66.1/32: Server tunnel endpoint
* 10.0.0.0/24: Internal cloud LAN accessible via VPN
### 5. Restart and enable services
#### Cloud VPS
Restart the interface to apply changes and enable persistence at boot.
```bash theme={null}
systemctl restart wg-quick@wg0
```
```bash theme={null}
systemctl enable wg-quick@wg0
```
#### Office Client
Restart the VPN tunnel with updated config and ensure service autostarts.
```bash theme={null}
wg-quick down wg0 && wg-quick up wg0
```
```bash theme={null}
systemctl enable wg-quick@wg0
```
### 6. Enable IP Forwarding
Edit the system control file to enable IPv4 packet forwarding.
```bash theme={null}
vim /etc/sysctl.conf
```
Uncomment or append:
```bash theme={null}
net.ipv4.ip_forward = 1
```
Apply the new setting:
```bash theme={null}
sysctl -p
```
### 7. Configure Routing
#### Cloud VPS Route
Route traffic destined for the office LAN via the WireGuard server's internal IP.
```bash theme={null}
ip route add 10.200.2.0/24 via 10.0.0.100
```
This ensures cloud workloads can reach the office network securely via VPN.
#### Office Router Configuration
Direct cloud-bound traffic from office LAN through Client1 (WireGuard client).
```bash theme={null}
ip route add 10.0.0.0/24 via 10.200.2.100
```
Guarantees LAN devices access cloud services routed through the VPN tunnel.
### 8. Enforce One-Way Tunnel Security
#### Block Unsolicited Traffic from Cloud to Office
Insert a firewall rule to drop unsolicited packets targeting the office subnet from the tunnel.
```bash theme={null}
iptables -A FORWARD -i wg0 -d 10.200.2.0/24 -j DROP
```
#### Persist Firewall Rules Across Reboots
Install the persistence utility and save the current rule set.
```bash theme={null}
apt install iptables-persistent -y
```
```bash theme={null}
netfilter-persistent save
```
## Validate VPN Connectivity
Confirm tunnel and office endpoint reachability.
```bash theme={null}
ping 10.66.66.2
```
```bash theme={null}
ping 10.200.2.100
```
Ensure reverse reachability to server and cloud LAN.
```bash theme={null}
ping 10.66.66.1
```
```bash theme={null}
ping 10.0.0.100
```
Display active peers and session statistics.
```bash theme={null}
wg show
```
## Post-Deployment Considerations
### 1. Multi-Client Deployment (Office & Remote Users)
If you plan to support **remote employees**, not just a single office, you must:
#### On the WireGuard Server:
* Generate separate peer configurations for each user or location
* Assign **unique tunnel IPs** to each client (e.g., 10.66.66.3/32, 10.66.66.4/32, etc.)
* Use a separate AllowedIPs per peer
Example server config for two clients:
```bash theme={null}
[Peer]
Office LAN
PublicKey = OFFICE_PUBLIC_KEY
AllowedIPs = 10.66.66.2/32,10.200.2.0/24
[Peer]
Remote User1
PublicKey = REMOTE_USER1_KEY
AllowedIPs = 10.66.66.3/32
```
#### On the Remote User
* Use AllowedIPs = 0.0.0.0/0 if they want **all their traffic** routed through the VPN
* Or use 10.0.0.0/24 if they only need access to internal cloud resources
### 2. Directory Server Integration
SafeSquid requires directory services (e.g., Active Directory) for identity-based policy enforcement. Ensure:
* Proxy initiates LDAP/LDAPS requests from its WireGuard tunnel IP
* Directory server accepts and routes responses to VPN subnet (e.g., 10.66.66.1)
This guarantees seamless identity resolution and policy mapping inside the VPN-secured cloud perimeter.
### 3. Proxy Cluster with Centralized Load Balancer
When deploying multiple SafeSquid instances as a cluster:
* Place a central load balancer between the office VPN ingress and the proxy layer
* The load balancer handles all incoming WireGuard traffic
* Distributes requests to proxy nodes for inspection and filtering
* Routes sanitized output to the internet
The architecture shown in maintains performance, simplifies scale-out, and centralizes VPN and external access controls.
 ### 4. Key Pair Management
Each peer device must independently generate cryptographic keys:
```bash theme={null}
wg genkey | tee privatekey | wg pubkey > publickey
```
* Only the public key is shared with the server
* The private key is stored securely on the client system
* Key rotation is recommended for long-term deployments
## Verification and Evidence
* **Interface Checks**: Confirm [WireGuard](https://www.wireguard.com/) interface is up (`wg show`); SafeSquid listens on the expected ports and is reachable over the VPN tunnel from clients.
* **Log Analysis**: VPN peer handshakes and traffic appear in system logs; SafeSquid access logs show requests from VPN client IPs when traffic is routed through the proxy.
* **Performance Validation**: From a client connected via VPN, browse through SafeSquid; traffic is inspected and policies apply. Load balancer (if used) distributes connections correctly.
## Related topics
- [Integrations](/use_cases/integrations/integrations.md)
- [startup.ini tunables](/admin_guide/start_here/startup_ini.md)
- [ICAP Integration](/use_cases/integrations/icap.md)
- [Deployment Checklist](/getting_started/install_safesquid/prerequisites.md)
### 4. Key Pair Management
Each peer device must independently generate cryptographic keys:
```bash theme={null}
wg genkey | tee privatekey | wg pubkey > publickey
```
* Only the public key is shared with the server
* The private key is stored securely on the client system
* Key rotation is recommended for long-term deployments
## Verification and Evidence
* **Interface Checks**: Confirm [WireGuard](https://www.wireguard.com/) interface is up (`wg show`); SafeSquid listens on the expected ports and is reachable over the VPN tunnel from clients.
* **Log Analysis**: VPN peer handshakes and traffic appear in system logs; SafeSquid access logs show requests from VPN client IPs when traffic is routed through the proxy.
* **Performance Validation**: From a client connected via VPN, browse through SafeSquid; traffic is inspected and policies apply. Load balancer (if used) distributes connections correctly.
## Related topics
- [Integrations](/use_cases/integrations/integrations.md)
- [startup.ini tunables](/admin_guide/start_here/startup_ini.md)
- [ICAP Integration](/use_cases/integrations/icap.md)
- [Deployment Checklist](/getting_started/install_safesquid/prerequisites.md)