> ## Documentation Index
> Fetch the complete documentation index at: https://docs.safesquid.com/llms.txt
> Use this file to discover all available pages before exploring further.
# Configure HTTPS Inspection
> Prerequisites, certificate generation, enabling SSL inspection, client certificate import, bypass rules, and verification for SafeSquid HTTPS inspection.
# Configure HTTPS Inspection
This guide covers the complete HTTPS inspection setup: generate or import a Root CA certificate, enable inspection in SafeSquid, deploy the certificate to clients, and configure bypass rules for sensitive domains.
**Time to complete (Draft):** Plan **30–60 minutes** including client trust rollout; duration varies by fleet size and MDM maturity.
## Prerequisites
:::note
**Before You Start**
**SafeSquid side:**
* SafeSquid installed and licensed
* Access to [Self-Service Portal](https://key.safesquid.com) (for certificate generation)
* Access to SafeSquid Configuration Portal (`http://safesquid.cfg/`—embedded Rest UI interface built into SafeSquid; accessible only when your client uses the proxy, but NOT resolved by SafeSquid's DNS resolver—or `https://SERVER-IP:8443/` for direct access)
**Client side:**
* List of domains to bypass (banking, healthcare, SSL-pinned apps)
* Method to deploy Root CA to all clients (GPO, MDM, or manual)
* Administrative access to client systems (for certificate import)
* Pilot scope for rollout testing before enterprise-wide enablement
:::
## Why this preparation matters
* Certificate generation is required because clients must trust SafeSquid during interception.
* Bypass planning is required because some applications and destinations are not inspection-safe.
* Client deployment planning is required because one missed trust store can create a widespread certificate-warning incident.
* A pilot scope is required because HTTPS inspection can break business-critical traffic if enabled too broadly.
***
## Step 1: Generate or Import Root CA Certificate
You have three options for the Root CA certificate:
| **Option** | **When to Use** | **Pros** | **Cons** |
| -------------------------------------- | --------------------------- | ------------------------------- | ---------------------------------------- |
| **Self-Signed** | Testing, small deployments | Quick, no external dependencies | Not trusted by default, harder to revoke |
| **Enterprise CA (with passphrase)** | Production with existing CA | Centralized trust, auditable | Requires CA infrastructure |
| **Enterprise CA (without passphrase)** | Production, new passphrase | Same as above | Need to set new passphrase |
**Recommended:** Use self-signed for testing/pilot. Use enterprise CA for production.
Treat the passphrase and certificate material as recovery assets, not only as setup files.
***
### Generate Certificate in Self-Service Portal
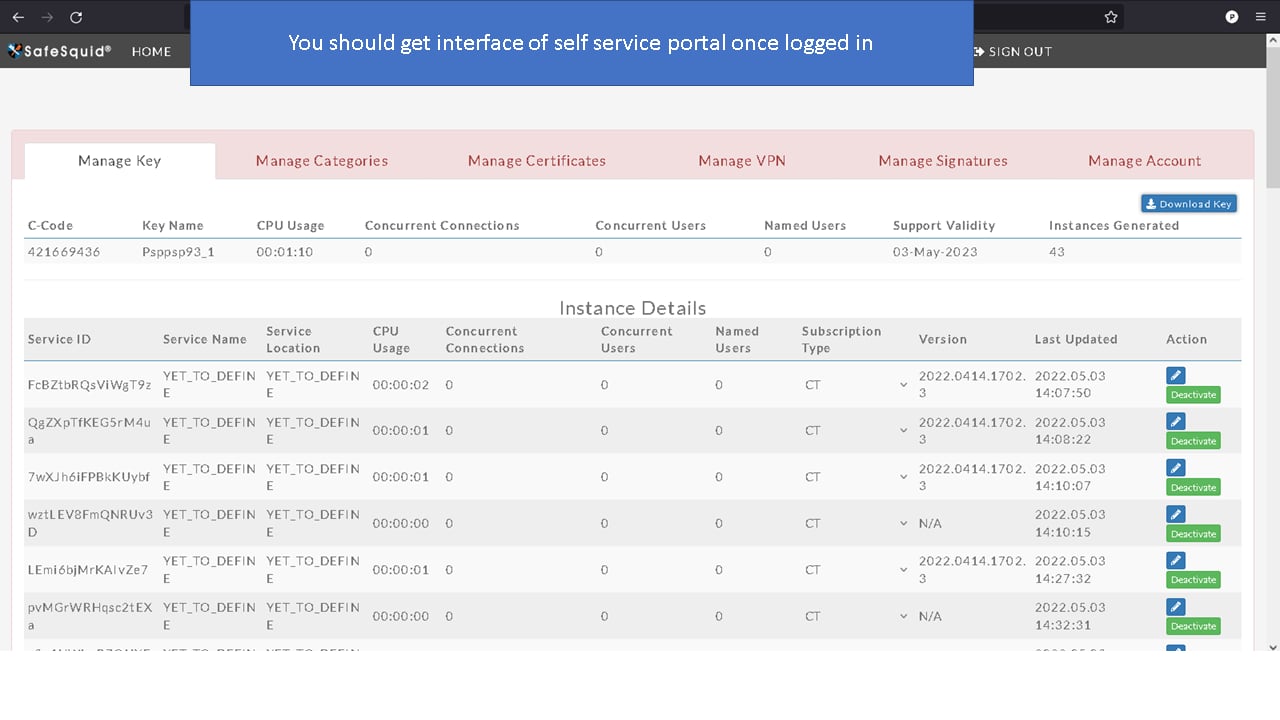
1. **Log in** to the [Self-Service Portal](https://key.safesquid.com/)
 2. **Navigate to Certificate Management**
In the dashboard → find your deployment → click **Manage Certificate**
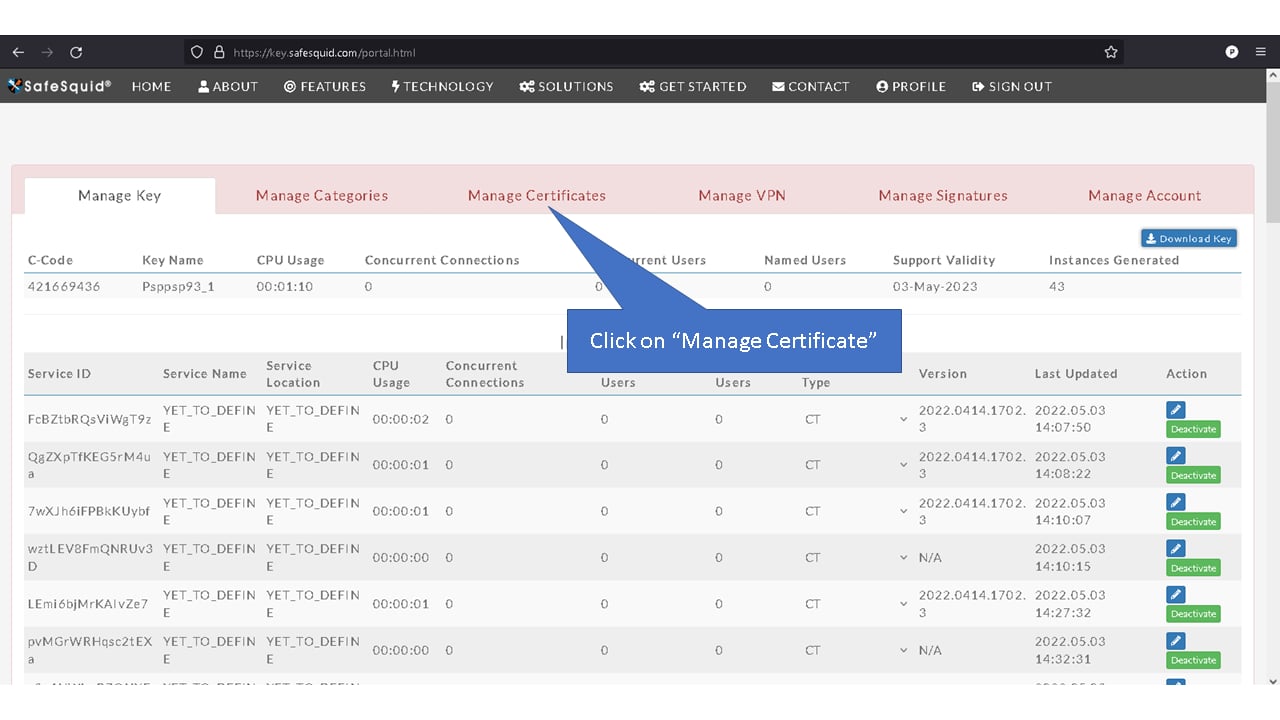
2. **Navigate to Certificate Management**
In the dashboard → find your deployment → click **Manage Certificate**
 ***
### Option A: Self-Signed Certificate
3. **Click Generate** (appears if no certificate exists yet)
***
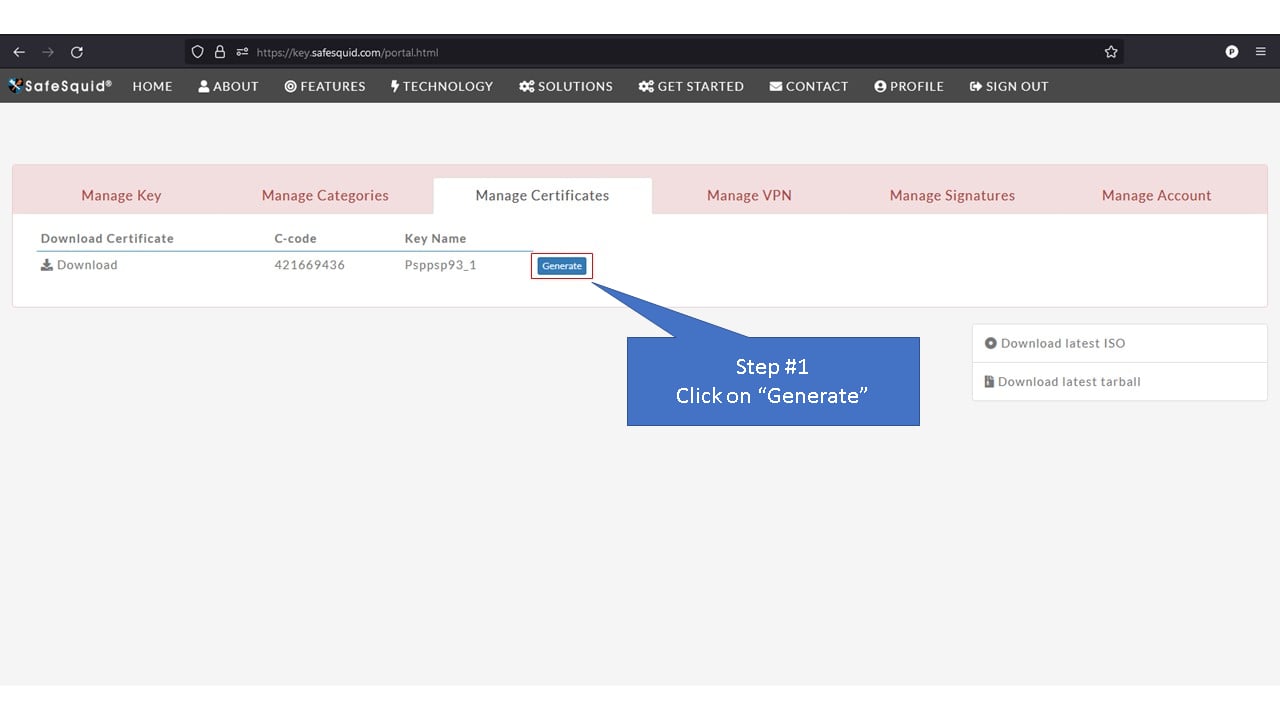
### Option A: Self-Signed Certificate
3. **Click Generate** (appears if no certificate exists yet)
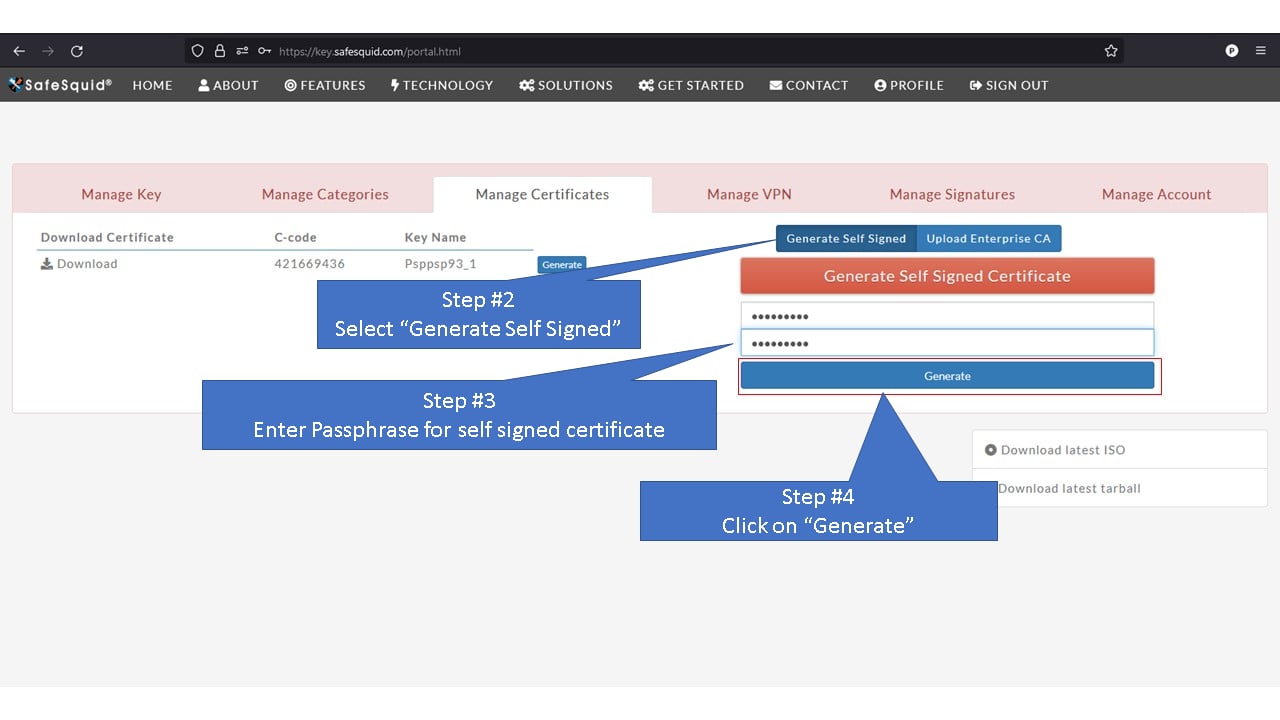
 4. **Select "General self-signed"** → **Enter passphrase** → **Generate**
:::caution
**Save Your Passphrase**
The passphrase is **non-recoverable**. Save it securely—you'll need it to reuse the certificate with different activation keys.
:::
4. **Select "General self-signed"** → **Enter passphrase** → **Generate**
:::caution
**Save Your Passphrase**
The passphrase is **non-recoverable**. Save it securely—you'll need it to reuse the certificate with different activation keys.
:::
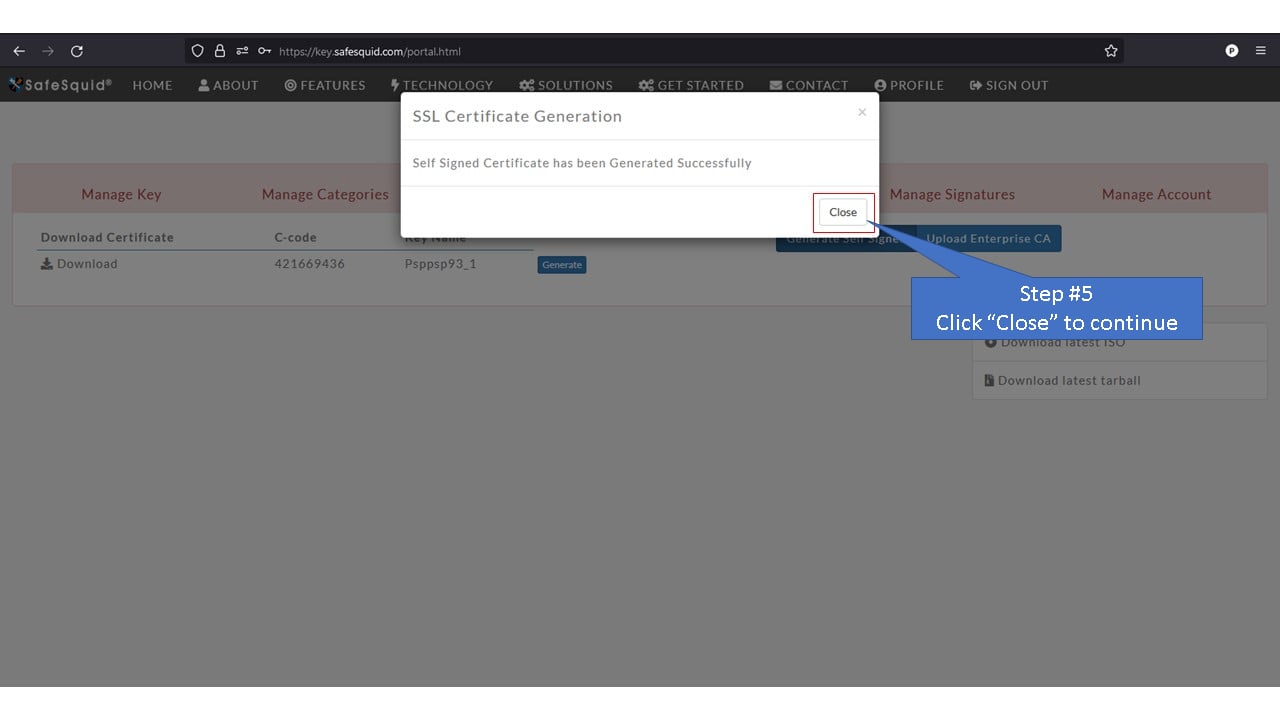
 5. **Click Close** to continue
 ***
### Option B: Enterprise CA with Existing Passphrase
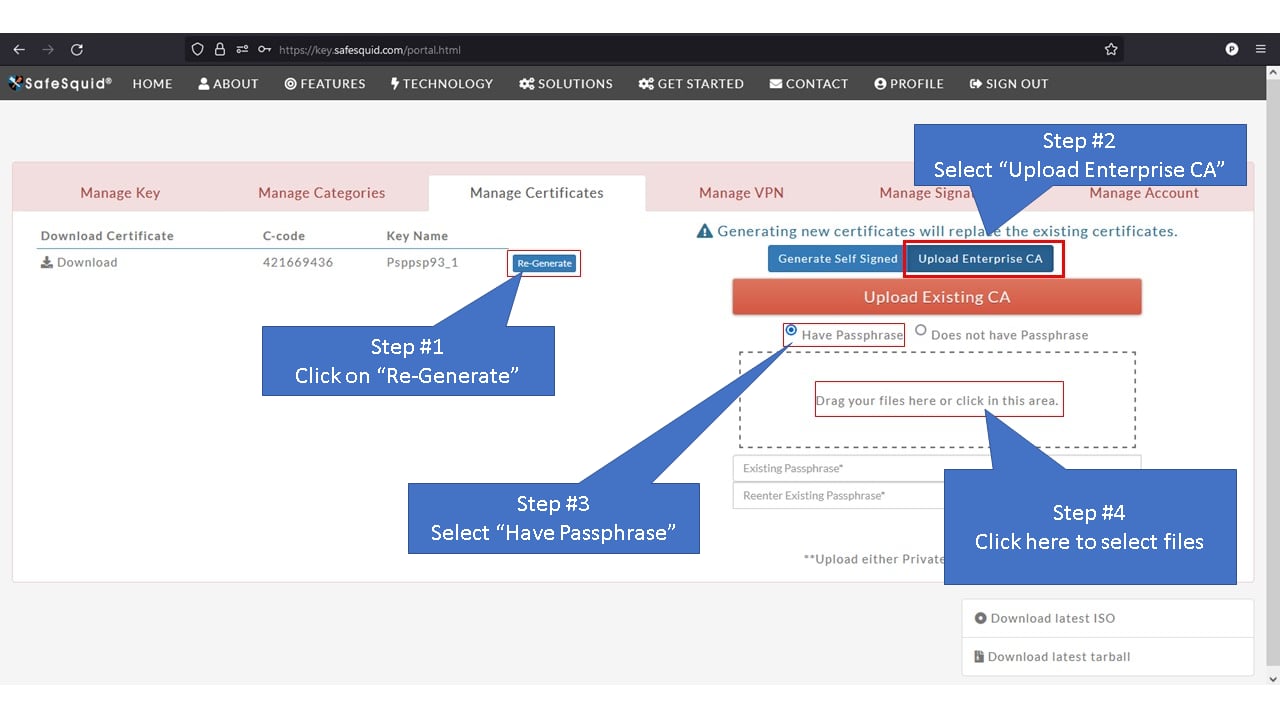
3. **Click Regenerate** → **Upload enterprise CA files** → **Select "has passphrase"**
***
### Option B: Enterprise CA with Existing Passphrase
3. **Click Regenerate** → **Upload enterprise CA files** → **Select "has passphrase"**
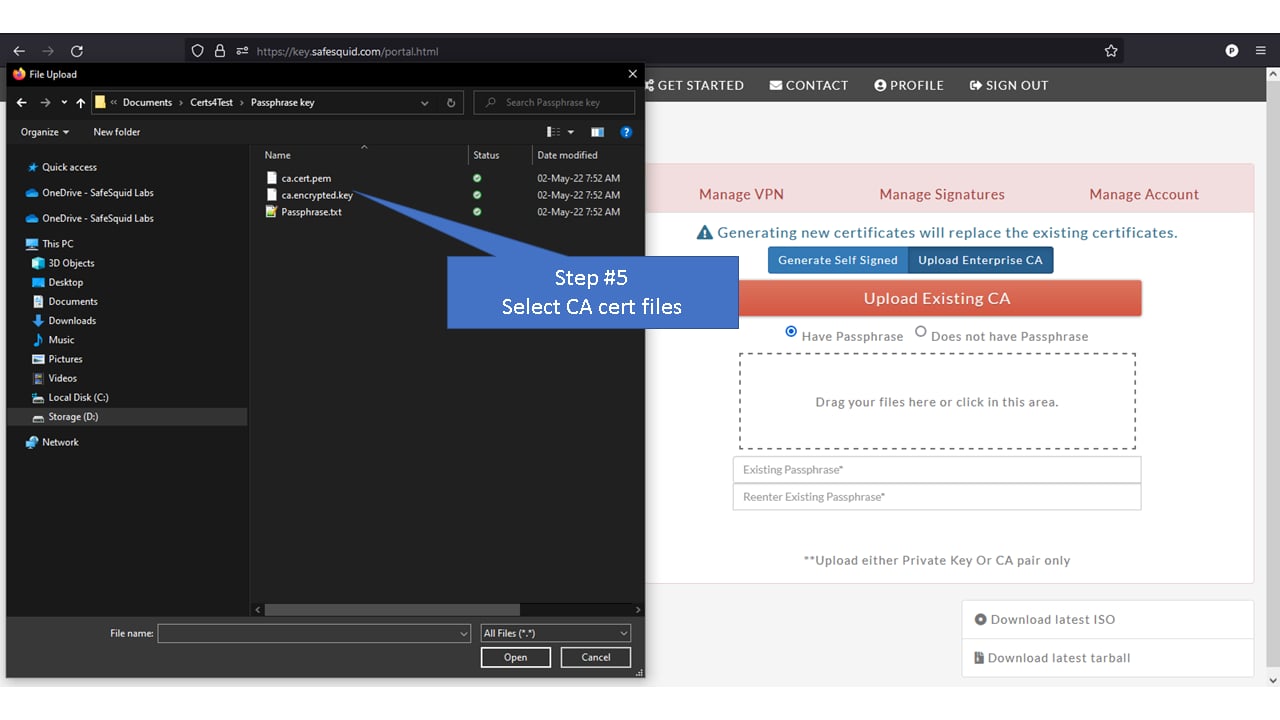
 4. **Select CA certificate files** (`.crt` and `.key`)
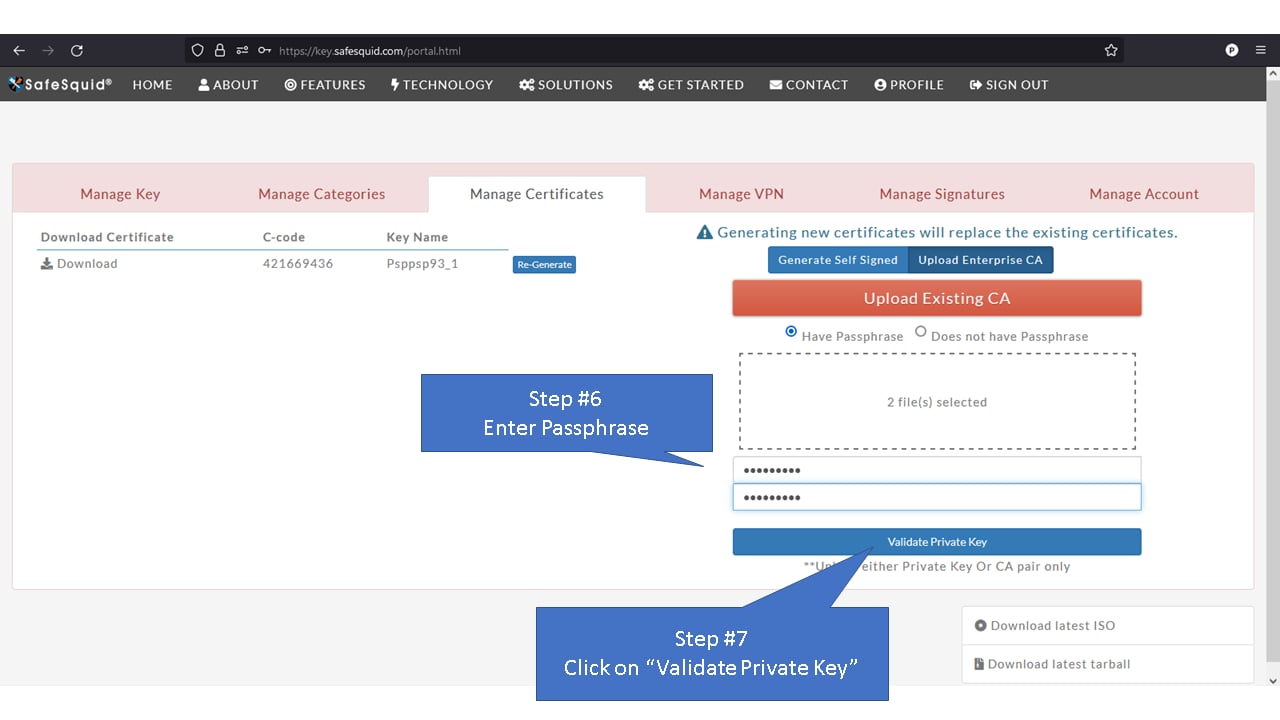
 5. **Enter passphrase** → **Click "Validate private key"**
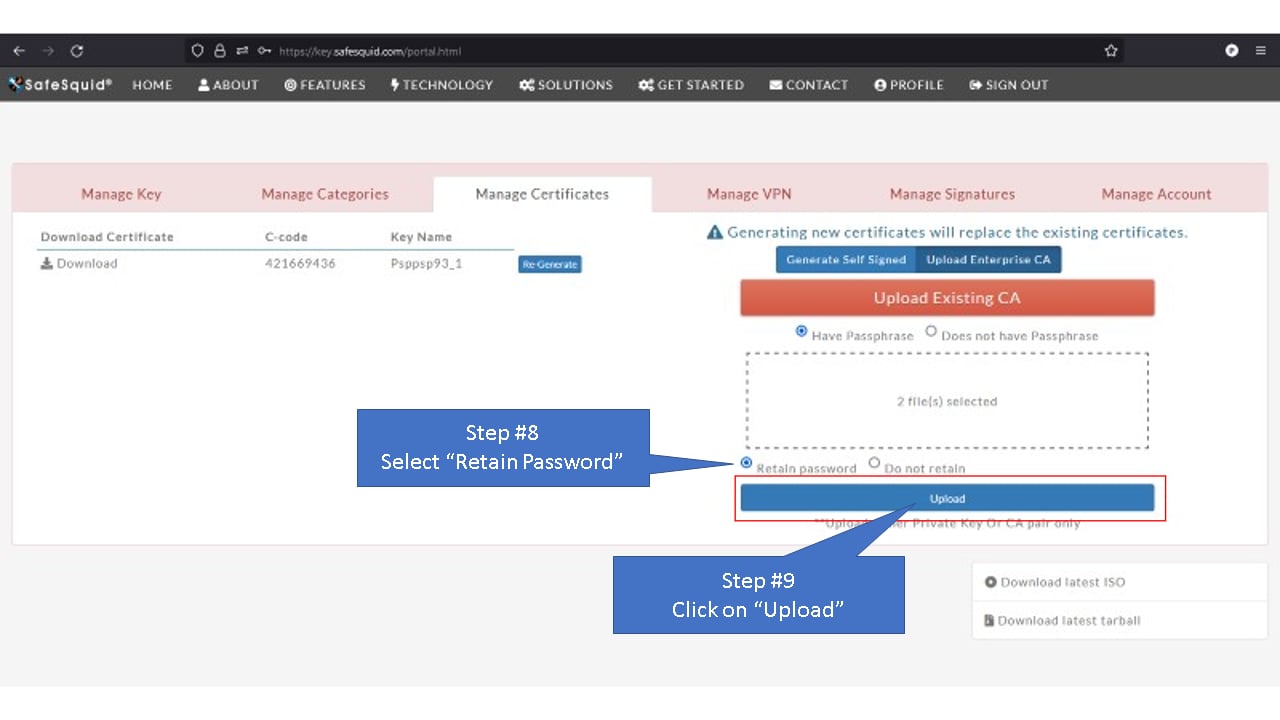
 6. **Select "Retain password"** → **Upload**
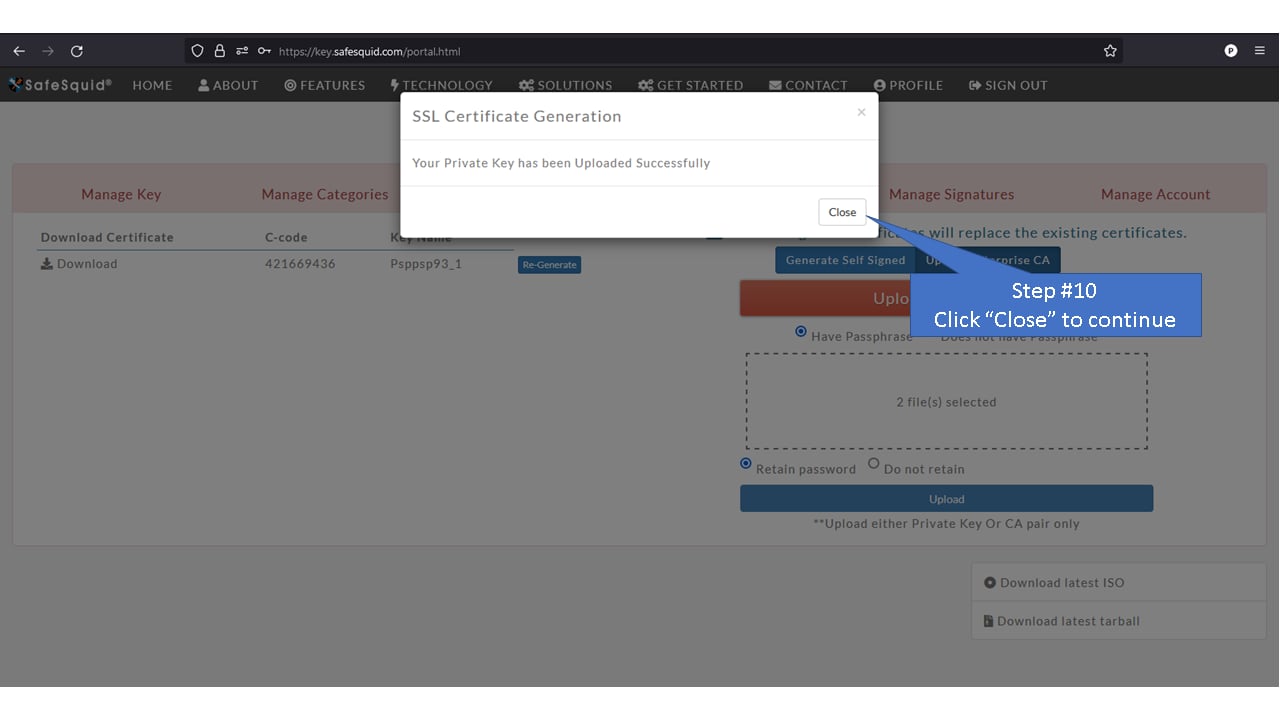
 7. **Click Close**
 ***
### Option C: Enterprise CA Without Passphrase (Set New One)
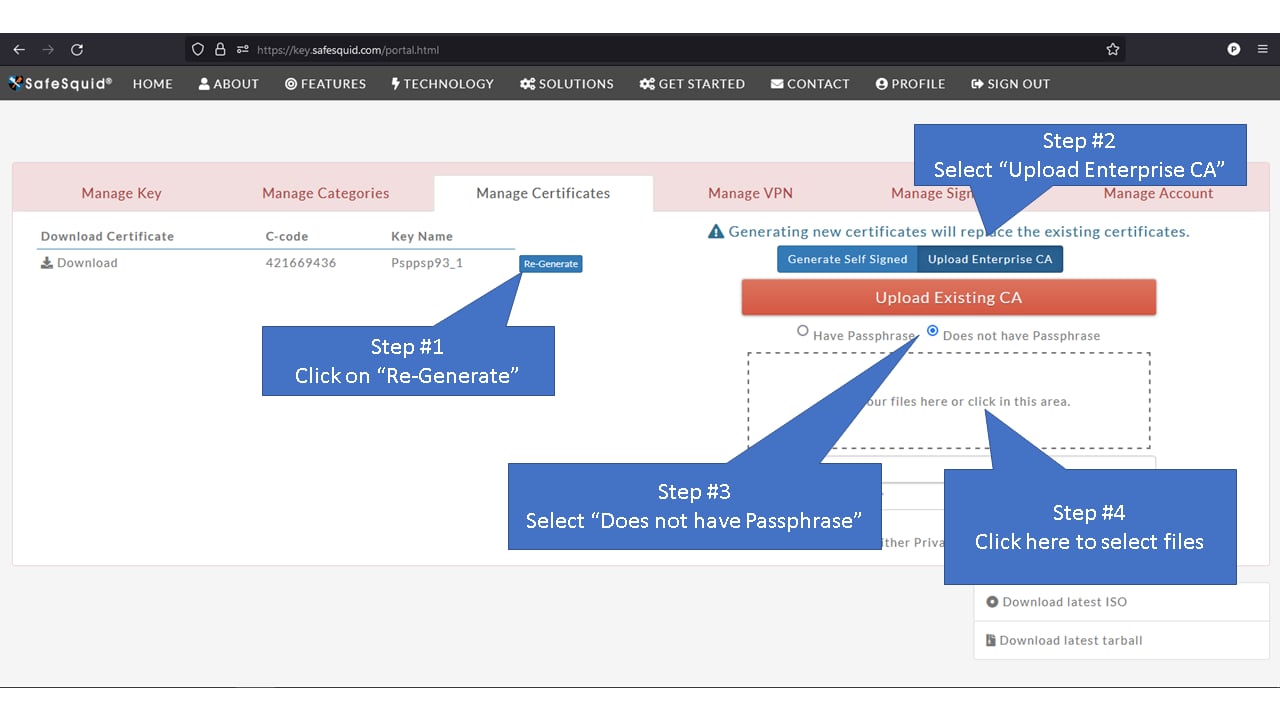
3. **Click Regenerate** → **Upload enterprise CA** → **Select "does not have passphrase"**
***
### Option C: Enterprise CA Without Passphrase (Set New One)
3. **Click Regenerate** → **Upload enterprise CA** → **Select "does not have passphrase"**
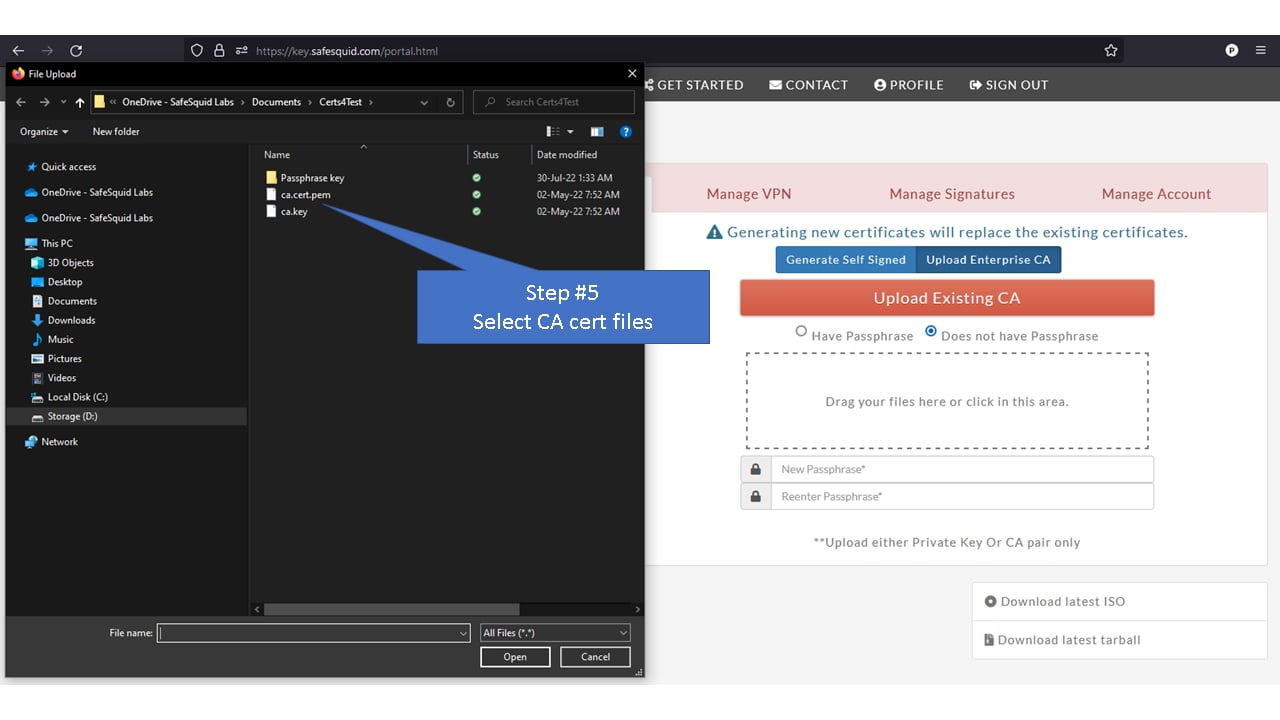
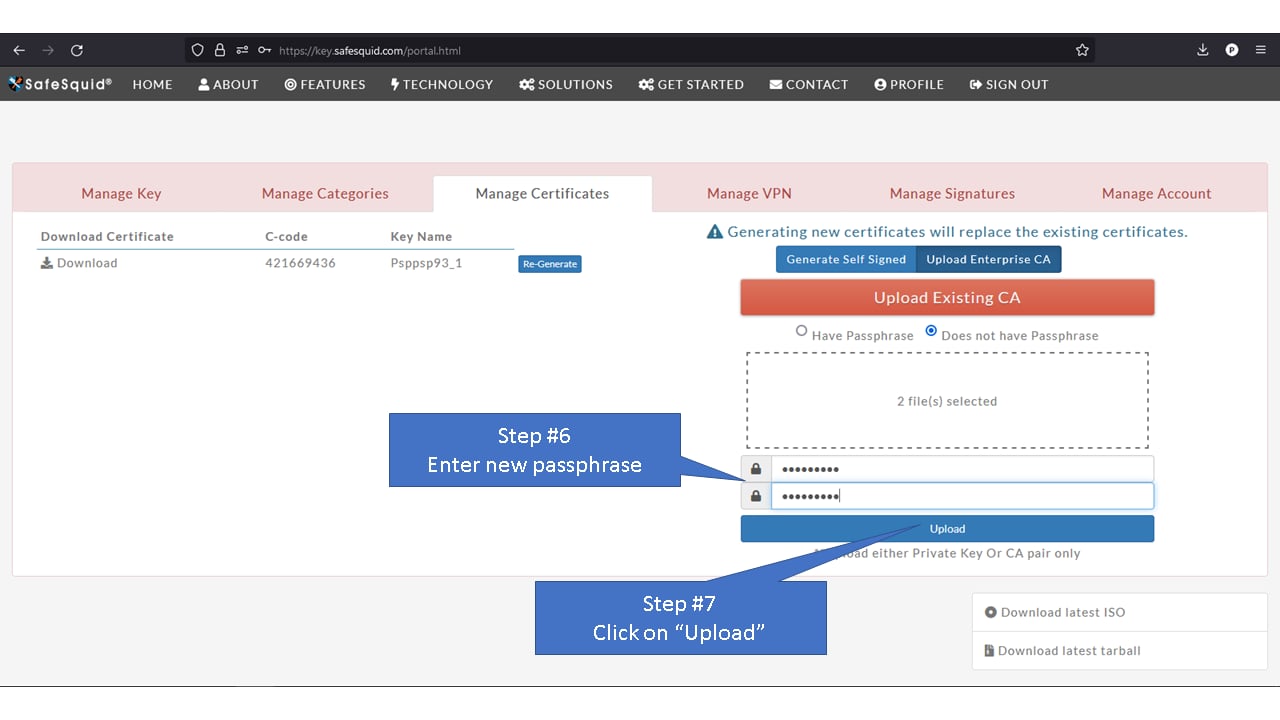
 4. **Select CA certificate files**
 5. **Enter new passphrase** → **Upload**
:::caution
**Save Your Passphrase**
This new passphrase is **non-recoverable**. Save it securely.
:::
5. **Enter new passphrase** → **Upload**
:::caution
**Save Your Passphrase**
This new passphrase is **non-recoverable**. Save it securely.
:::
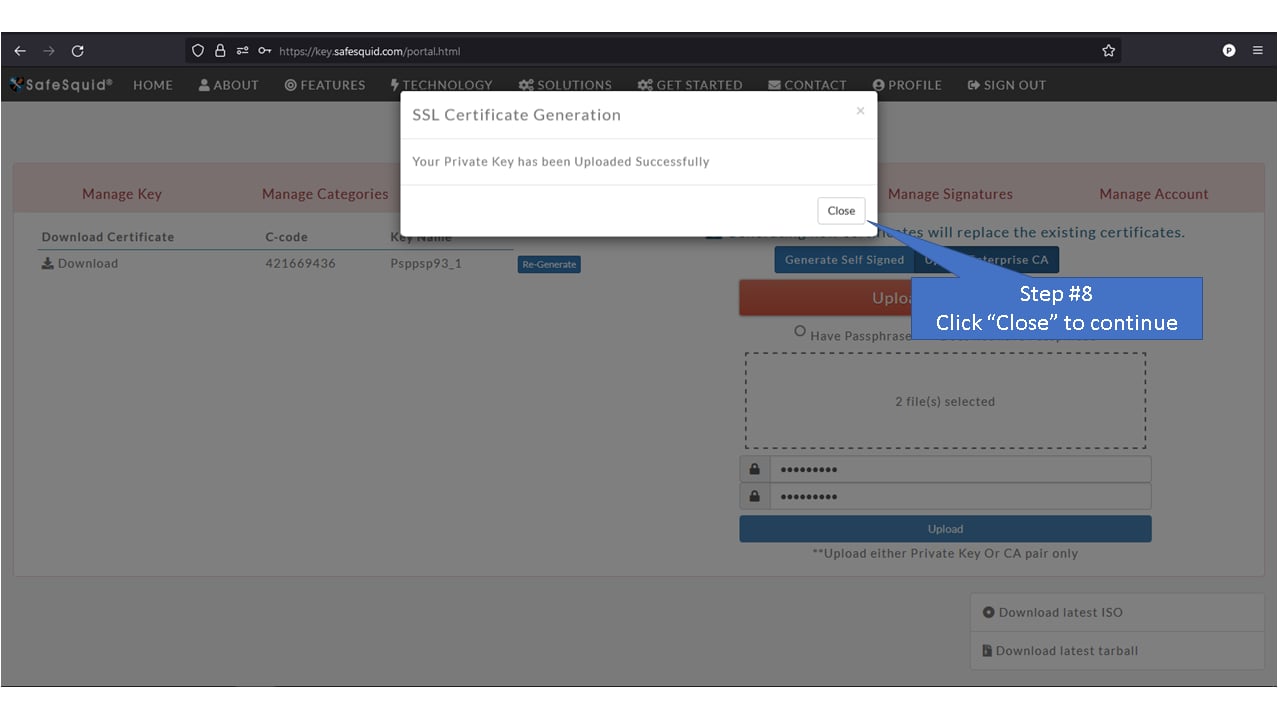
 6. **Click Close**
 ***
### Download Certificate
7. **Enter passphrase** (if prompted) → **Click Download**
***
### Download Certificate
7. **Enter passphrase** (if prompted) → **Click Download**

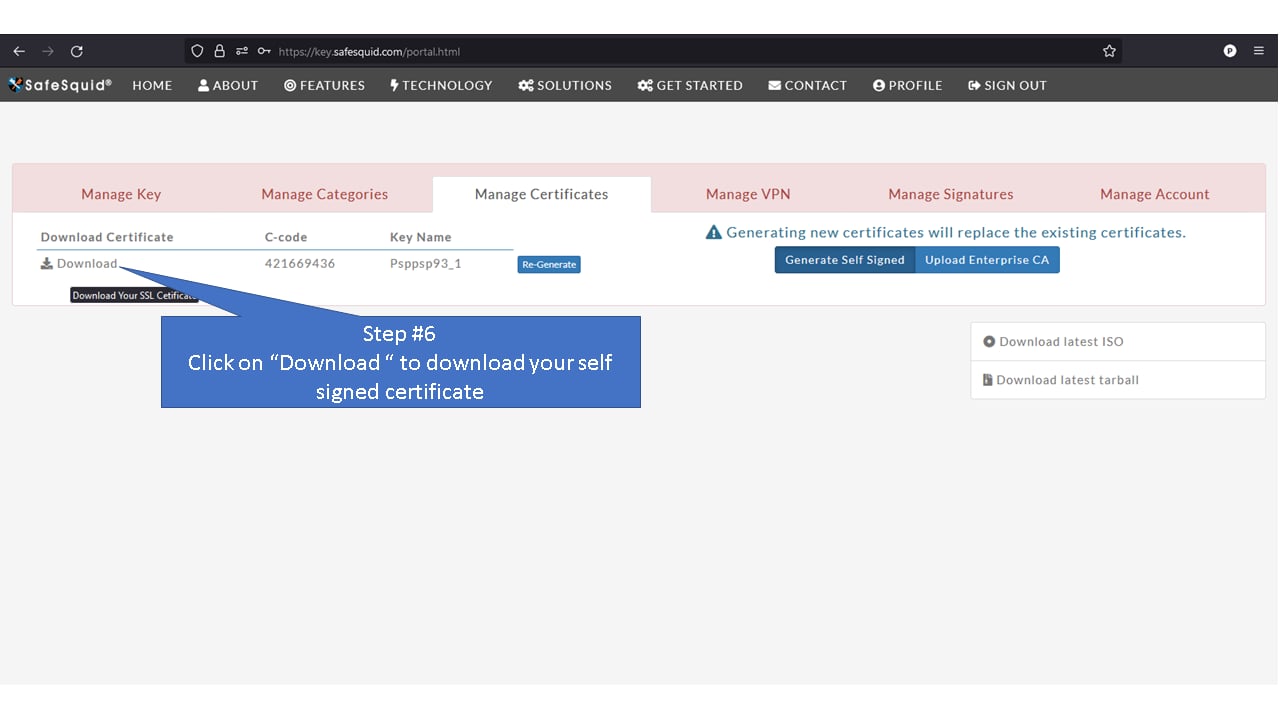 **Save this file** — you'll deploy it to all client systems.
***
## Step 2: Enable HTTPS Inspection in SafeSquid
### Access Configuration Portal
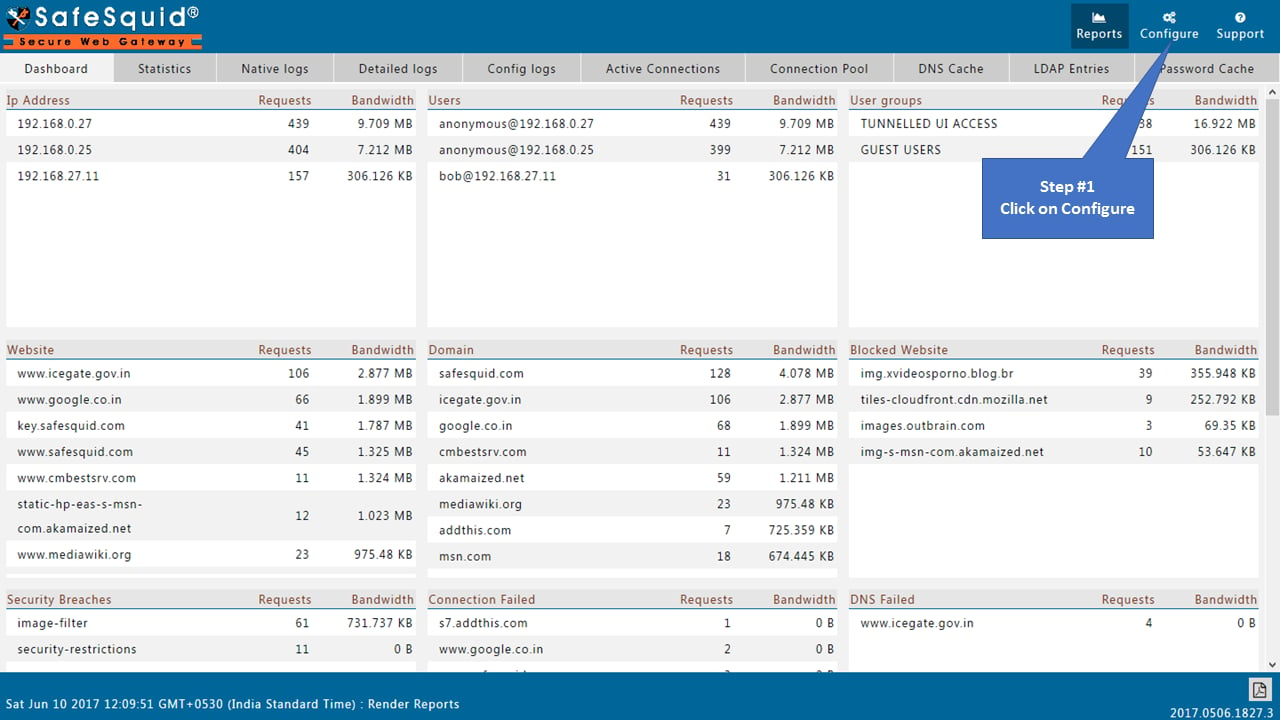
1. **Open SafeSquid interface** → **Click "Configure"**
**Save this file** — you'll deploy it to all client systems.
***
## Step 2: Enable HTTPS Inspection in SafeSquid
### Access Configuration Portal
1. **Open SafeSquid interface** → **Click "Configure"**
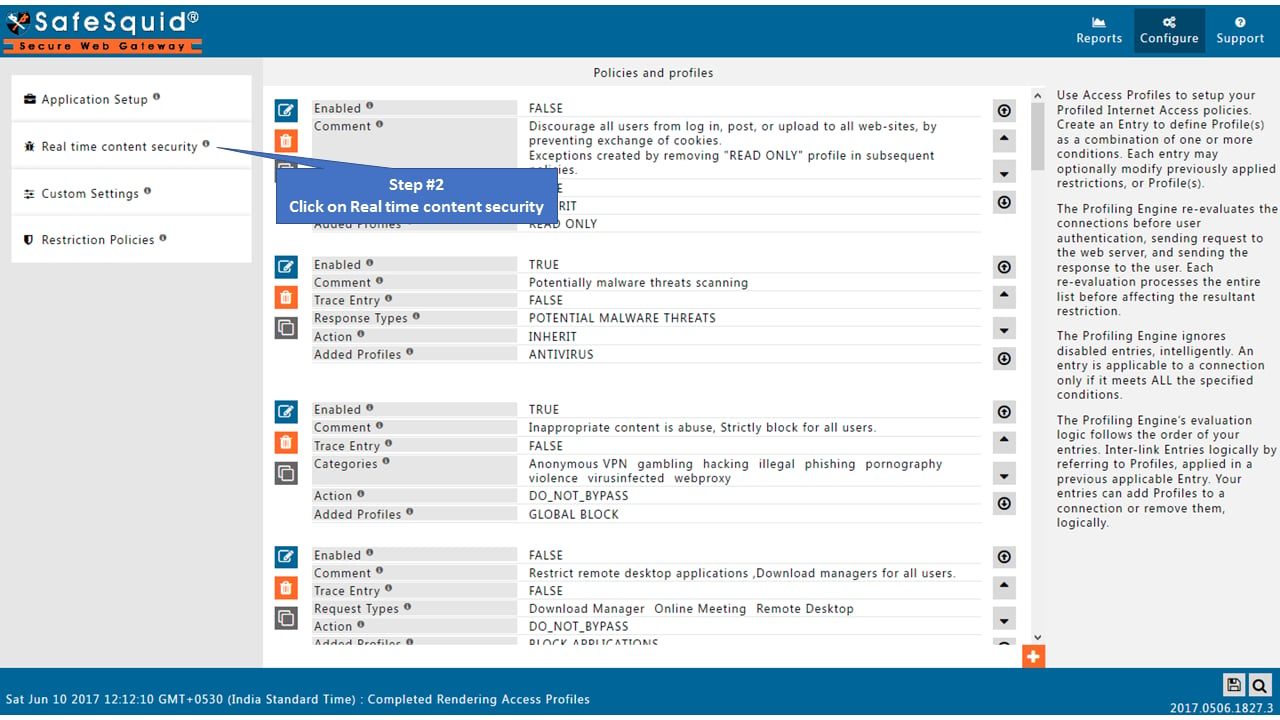
 2. **Expand "Real Time Content Security"** in the sidebar
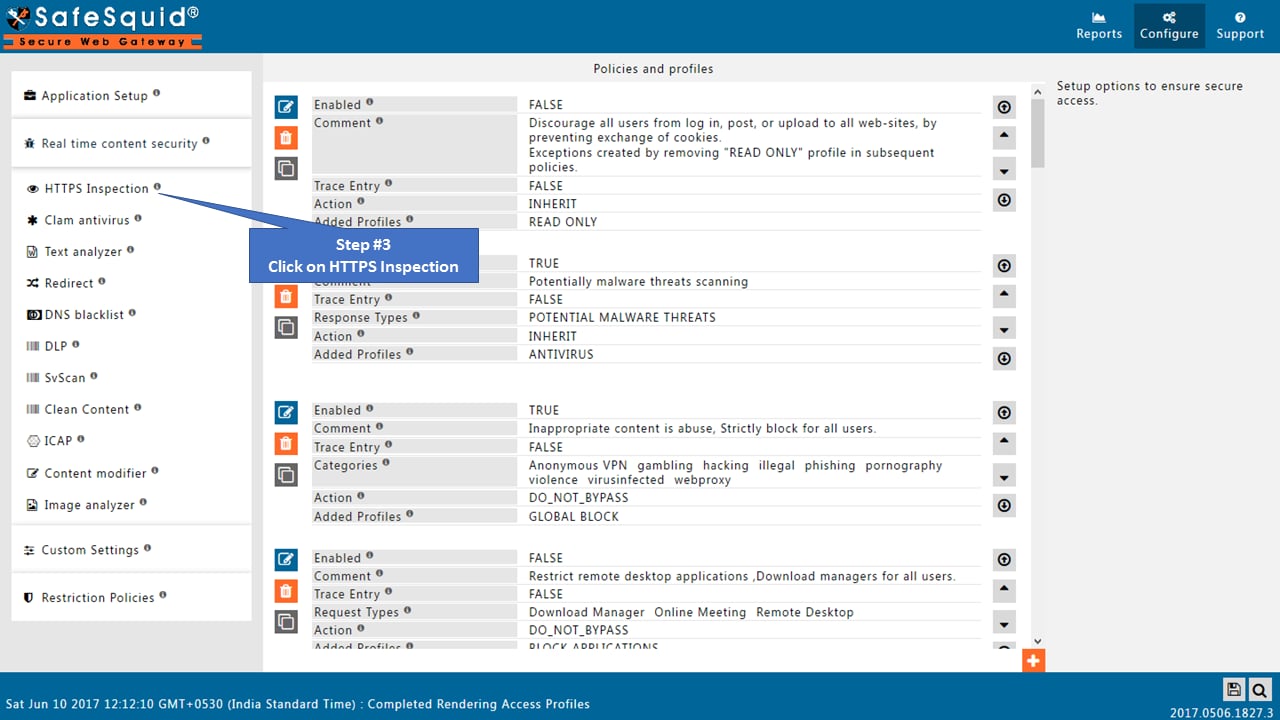
 3. **Click "HTTPS Inspection"**
 ***
### Enable Global HTTPS Inspection
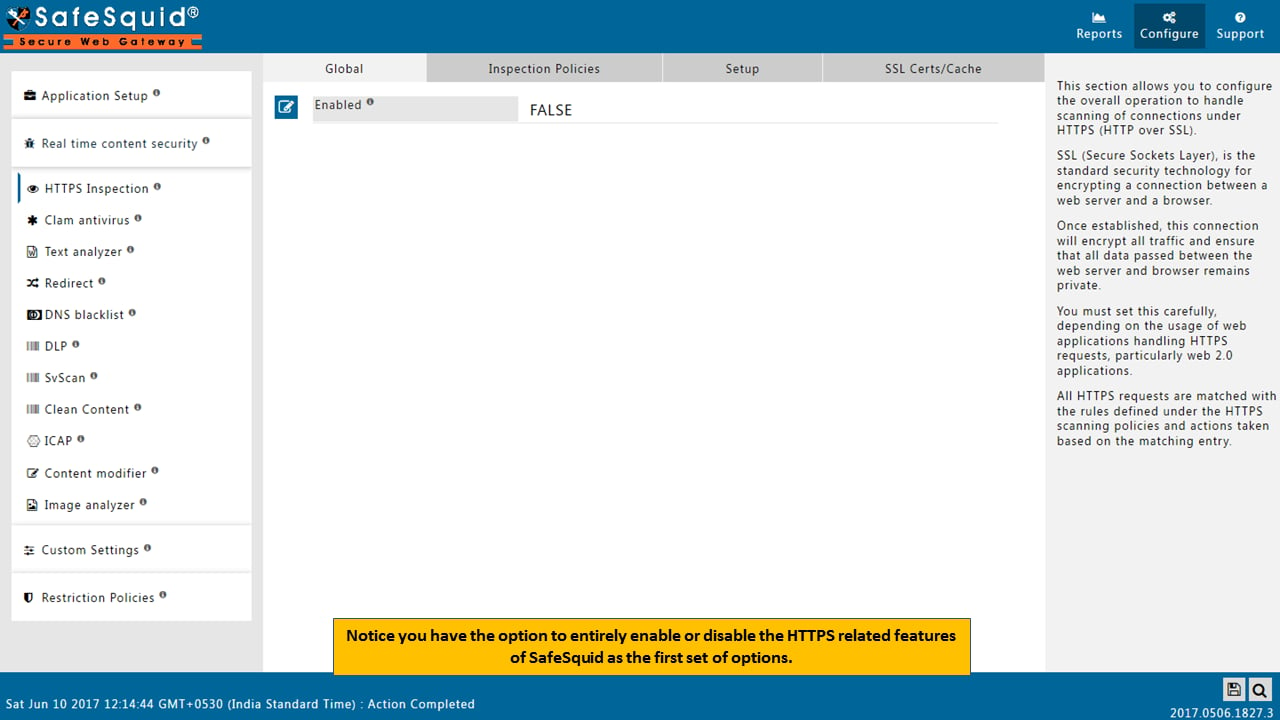
4. **Click the "Global" tab** → **Click Edit** (pencil icon)
:::note
**Version Change**
SafeSquid versions after June 2017 have three tabs: **Global**, **Inspection Policies**, and **Bypass Policies**.
:::
***
### Enable Global HTTPS Inspection
4. **Click the "Global" tab** → **Click Edit** (pencil icon)
:::note
**Version Change**
SafeSquid versions after June 2017 have three tabs: **Global**, **Inspection Policies**, and **Bypass Policies**.
:::
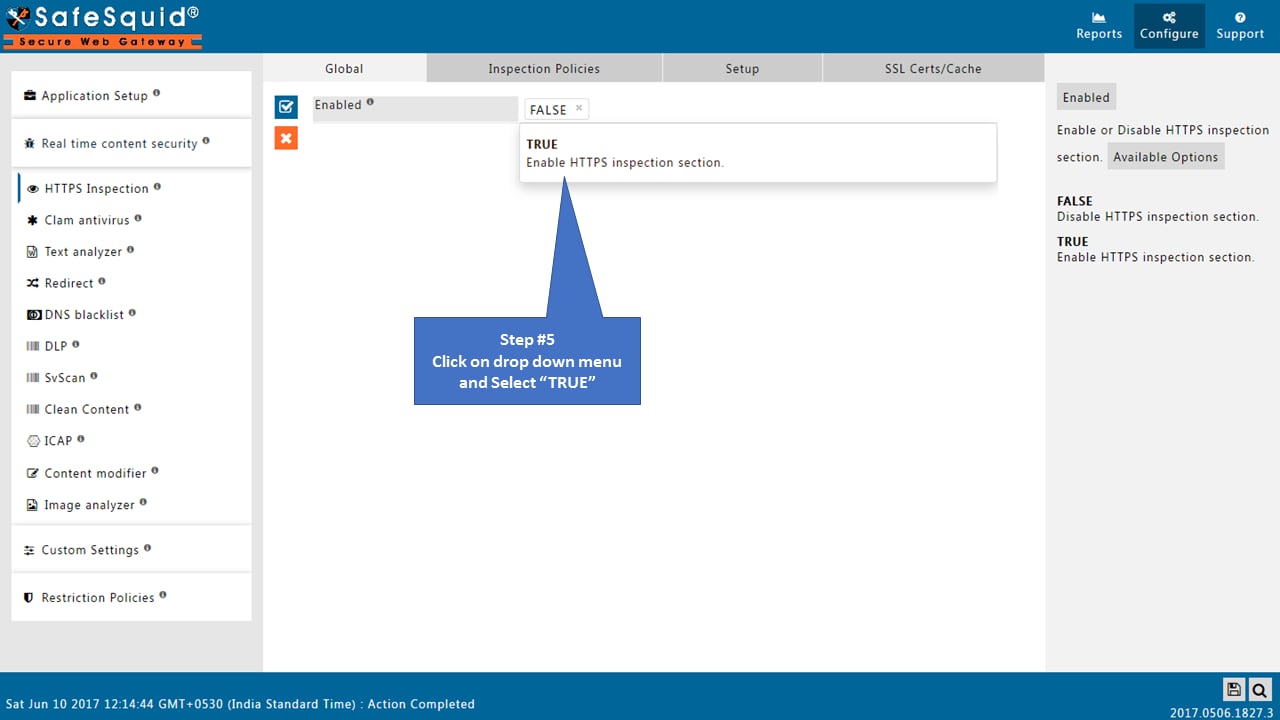
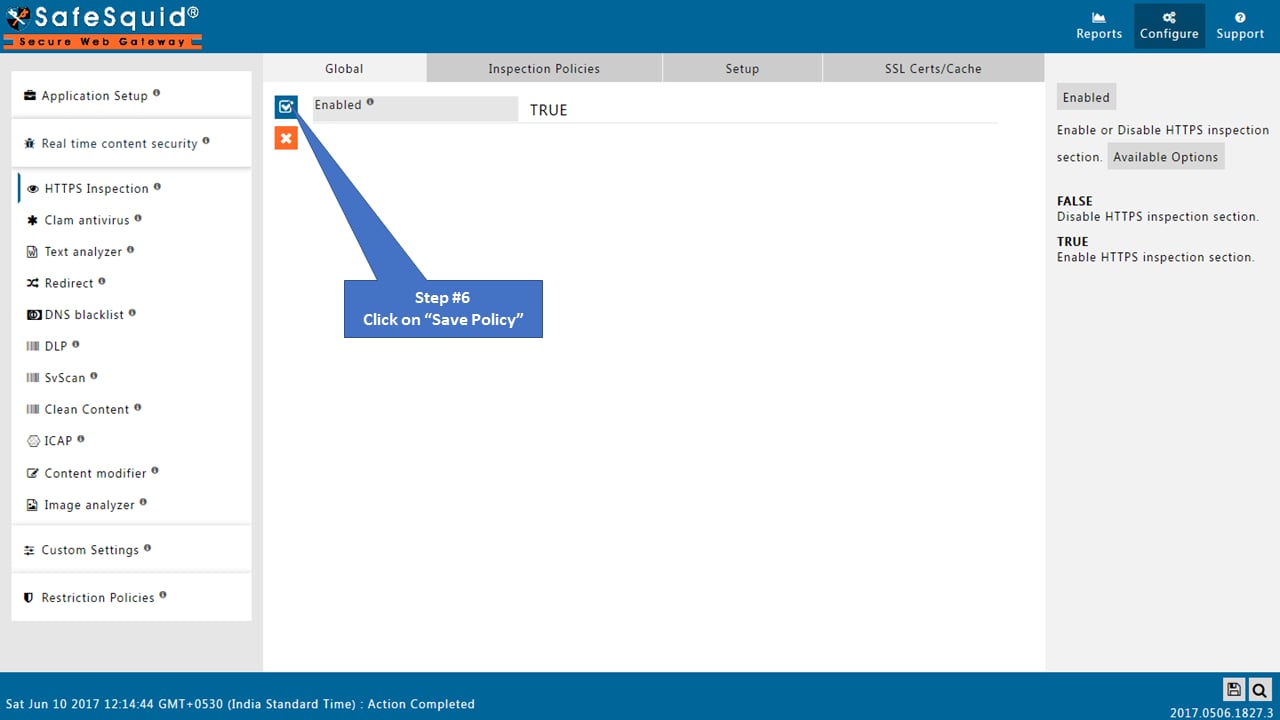
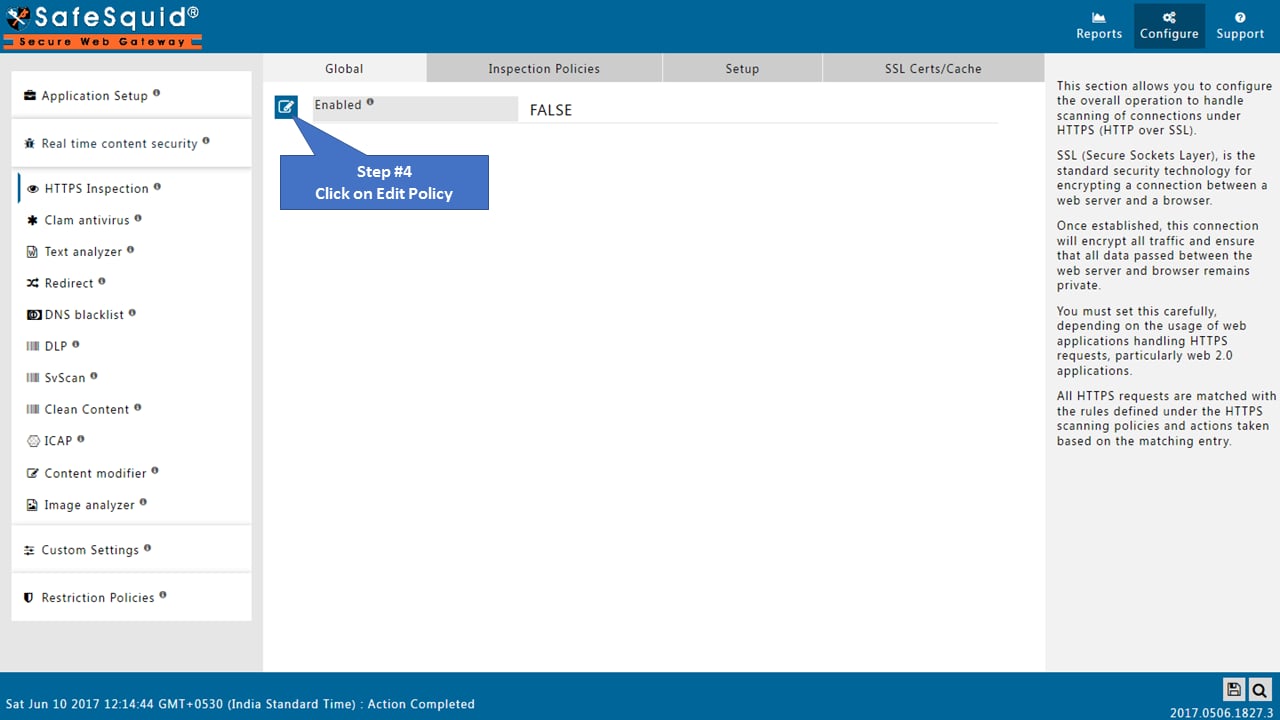 5. **Set "Enabled" to "True"** → **Save Policy**
 ***
### Enable Inspection Policies
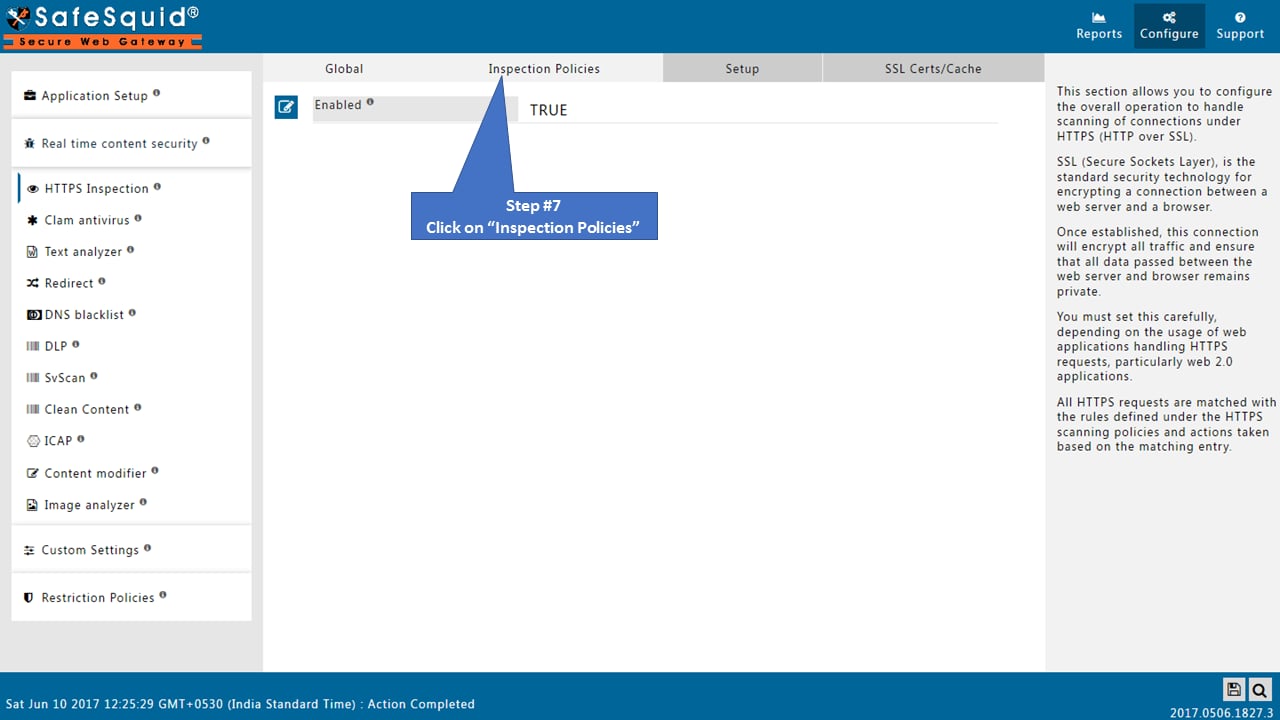
6. **Click "Inspection Policies" tab**
***
### Enable Inspection Policies
6. **Click "Inspection Policies" tab**
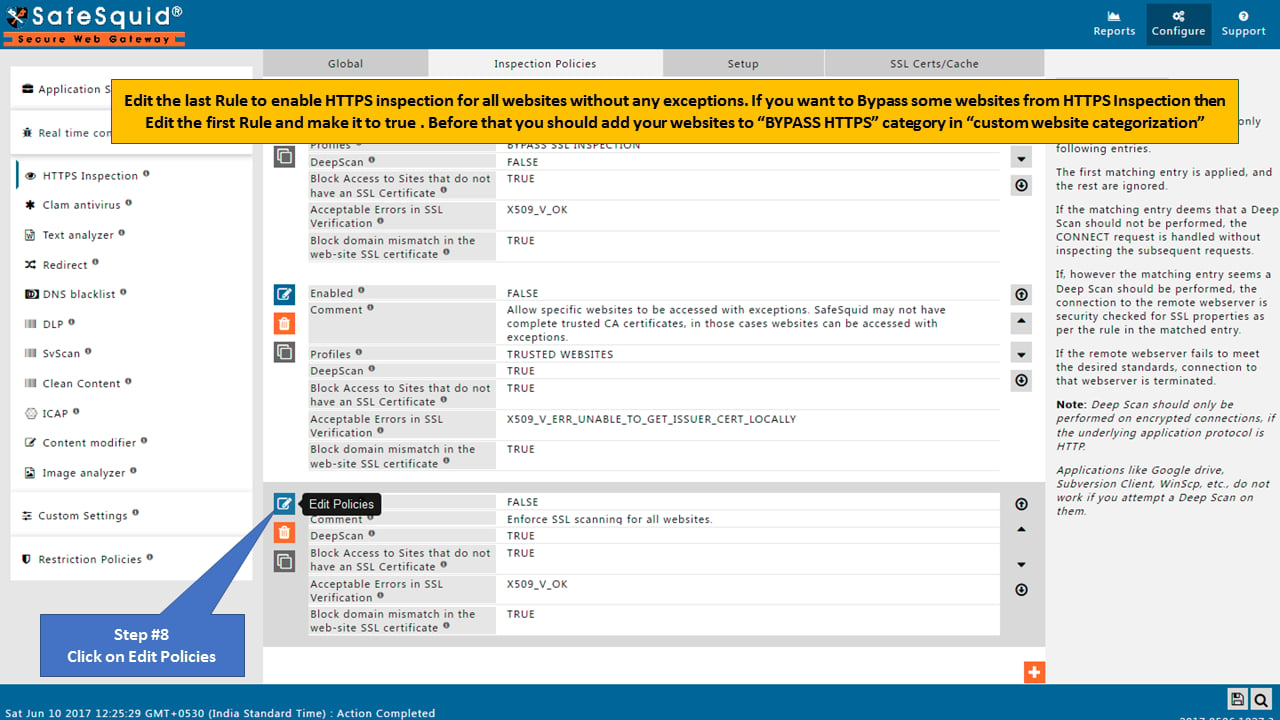
 7. **Verify default policies are enabled**
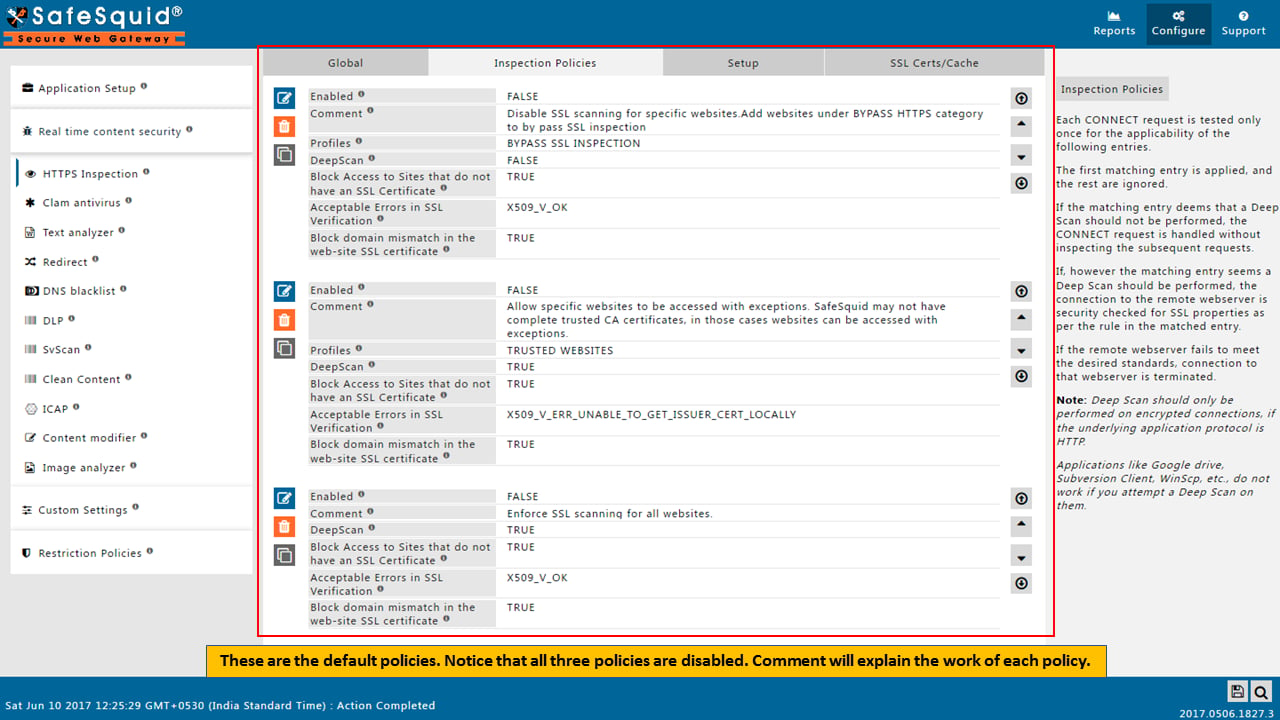 8. **Find "Enforce SSL scanning for all websites"** → **Click Edit**
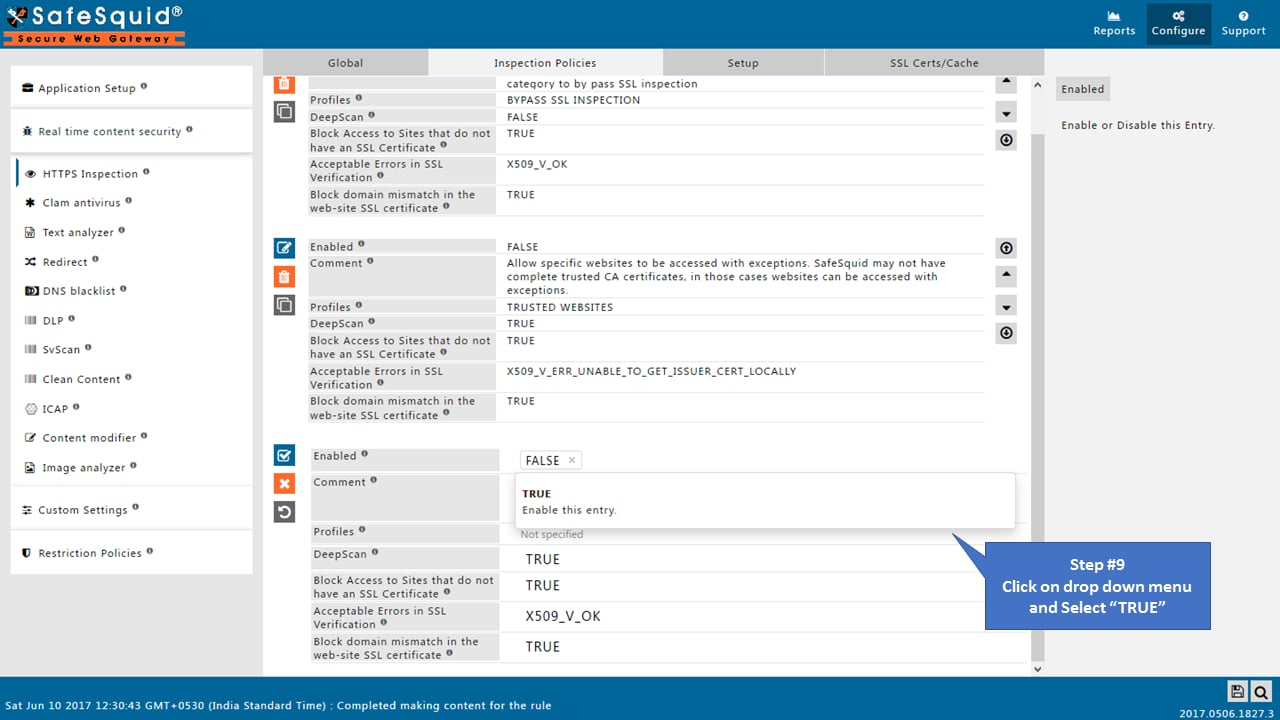
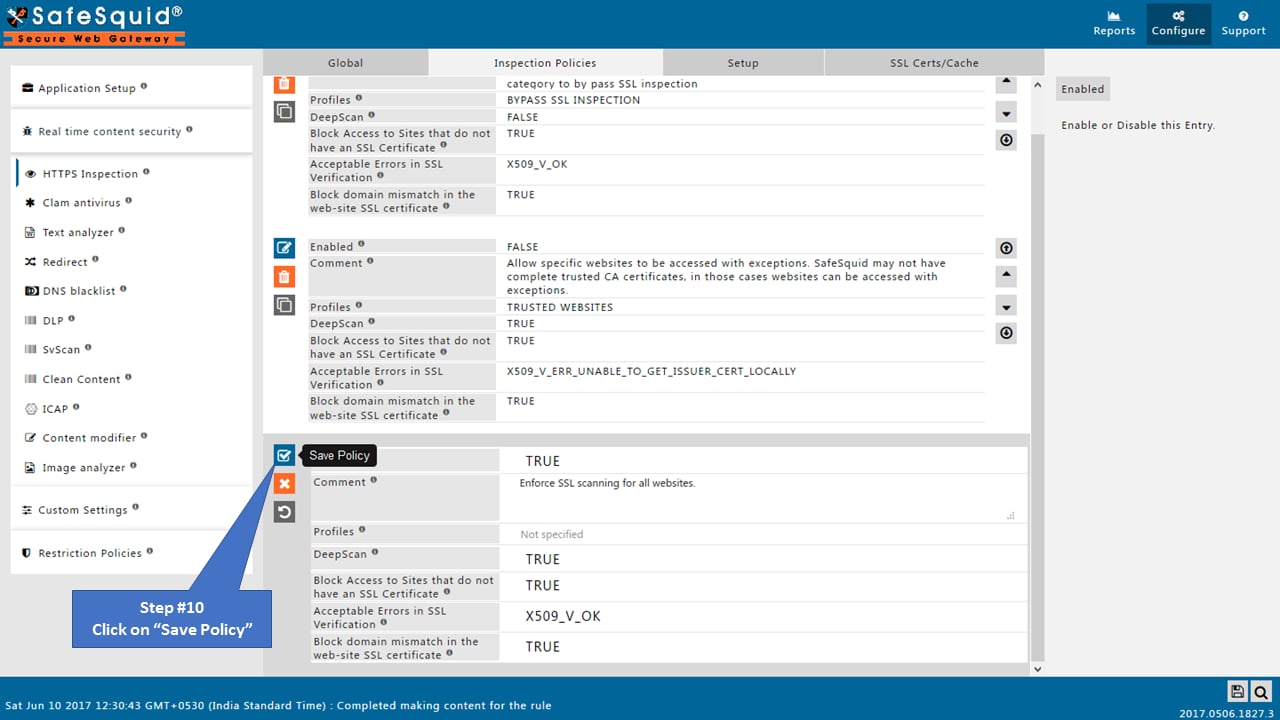
 9. **Set "Enabled" to "True"** → **Save Policy**
 ***
### Save Configuration
10. **Click "Save Configuration"** (floppy disk icon, bottom left)
***
### Save Configuration
10. **Click "Save Configuration"** (floppy disk icon, bottom left)
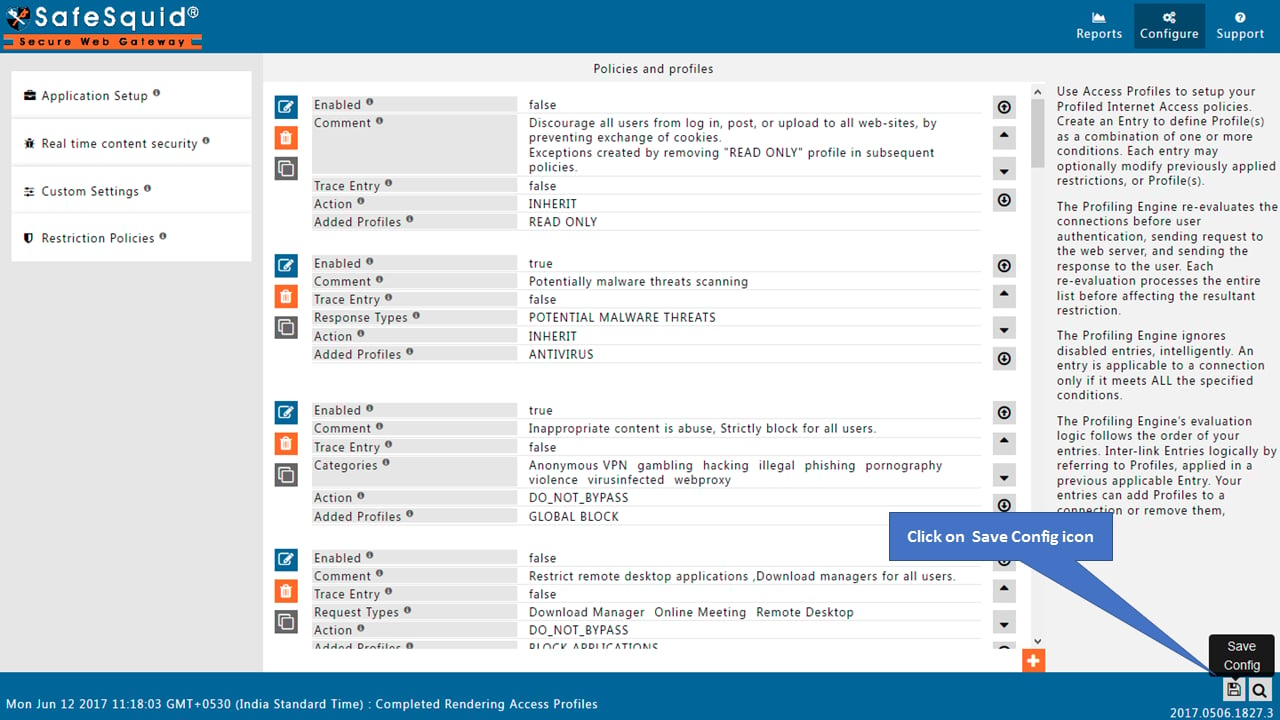 11. **Select "No"** (unless deploying to a cluster) → **Submit**
:::tip
**Cloud Config**
Select "Yes" only if:
* You're deploying the same config to multiple SafeSquid instances (cluster)
* All sections are fully configured for production
Otherwise, select "No" to save locally only.
:::
***
## Step 2 validation checkpoint
Before client rollout, confirm:
* global inspection is enabled
* the intended inspection policy is enabled
* cluster-save behavior matches the rollout plan
If this is wrong here, client trust deployment will not produce the expected inspection outcome.
***
## Step 3: Deploy Root CA to Clients
All clients must trust the SafeSquid Root CA to avoid certificate warnings.
### Windows (Chrome, Edge, IE)
**See detailed guide:** [Import Certificate into Chrome/IE](/Import_Certificate_Chrome_IE)
**Quick summary:**
1. Double-click the downloaded certificate
2. **Install Certificate** → **Local Machine** → **Next**
3. **Browse** → **Trusted Root Certification Authorities** → **OK**
4. **Next** → **Finish**
**For enterprise deployment:** Use GPO to push the certificate to all Windows machines.
***
### Firefox (All Platforms)
Firefox uses its own certificate store.
1. **Download the SafeSquid Root CA** (from Step 1)
2. **Open Firefox** → **Settings** → **Privacy & Security** → **Certificates** → **View Certificates**
3. **Authorities tab** → **Import**
4. **Select the SafeSquid certificate file**
5. **Check "Trust this CA to identify websites"** → **OK**
**Verify:**
* Visit `https://www.google.com` (via SafeSquid proxy)
* Click padlock → **More information** → **View Certificate**
* Certificate chain should show SafeSquid Root CA
***
### macOS
**Via System Keychain:**
1. Double-click the certificate file
2. **Add** → Enter admin password
3. **Open Keychain Access** → **System** keychain
4. Find SafeSquid certificate → **Get Info**
5. **Trust** section → **When using this certificate** → **Always Trust**
**For enterprise:** Use MDM (Jamf, Intune) to deploy to all Macs.
***
### Mobile Devices
**iOS/Android:**
* Deploy via MDM (Jamf, Intune, Workspace ONE)
* Manual: Email certificate → Open on device → Install
***
## Step 4: Validate inspection and bypass behavior
Run both of these tests before broad rollout:
1. **Positive inspection test**\
Visit a site that should be inspected and confirm the presented certificate is issued through the SafeSquid trust path.
2. **Negative bypass test**\
Visit a destination that should be bypassed and confirm the original site certificate remains intact.
Also confirm that a content-aware policy which could not previously see HTTPS traffic now triggers on an inspected flow.
***
## Step 5: Configure Bypass Policies
Bypass HTTPS inspection for:
* Banking and financial sites (compliance)
* Healthcare portals (HIPAA)
* SSL-pinned applications (will break otherwise)
* Government sites
***
### Enable Default Bypass Policy
1. **Click "Configure"** in SafeSquid interface
11. **Select "No"** (unless deploying to a cluster) → **Submit**
:::tip
**Cloud Config**
Select "Yes" only if:
* You're deploying the same config to multiple SafeSquid instances (cluster)
* All sections are fully configured for production
Otherwise, select "No" to save locally only.
:::
***
## Step 2 validation checkpoint
Before client rollout, confirm:
* global inspection is enabled
* the intended inspection policy is enabled
* cluster-save behavior matches the rollout plan
If this is wrong here, client trust deployment will not produce the expected inspection outcome.
***
## Step 3: Deploy Root CA to Clients
All clients must trust the SafeSquid Root CA to avoid certificate warnings.
### Windows (Chrome, Edge, IE)
**See detailed guide:** [Import Certificate into Chrome/IE](/Import_Certificate_Chrome_IE)
**Quick summary:**
1. Double-click the downloaded certificate
2. **Install Certificate** → **Local Machine** → **Next**
3. **Browse** → **Trusted Root Certification Authorities** → **OK**
4. **Next** → **Finish**
**For enterprise deployment:** Use GPO to push the certificate to all Windows machines.
***
### Firefox (All Platforms)
Firefox uses its own certificate store.
1. **Download the SafeSquid Root CA** (from Step 1)
2. **Open Firefox** → **Settings** → **Privacy & Security** → **Certificates** → **View Certificates**
3. **Authorities tab** → **Import**
4. **Select the SafeSquid certificate file**
5. **Check "Trust this CA to identify websites"** → **OK**
**Verify:**
* Visit `https://www.google.com` (via SafeSquid proxy)
* Click padlock → **More information** → **View Certificate**
* Certificate chain should show SafeSquid Root CA
***
### macOS
**Via System Keychain:**
1. Double-click the certificate file
2. **Add** → Enter admin password
3. **Open Keychain Access** → **System** keychain
4. Find SafeSquid certificate → **Get Info**
5. **Trust** section → **When using this certificate** → **Always Trust**
**For enterprise:** Use MDM (Jamf, Intune) to deploy to all Macs.
***
### Mobile Devices
**iOS/Android:**
* Deploy via MDM (Jamf, Intune, Workspace ONE)
* Manual: Email certificate → Open on device → Install
***
## Step 4: Validate inspection and bypass behavior
Run both of these tests before broad rollout:
1. **Positive inspection test**\
Visit a site that should be inspected and confirm the presented certificate is issued through the SafeSquid trust path.
2. **Negative bypass test**\
Visit a destination that should be bypassed and confirm the original site certificate remains intact.
Also confirm that a content-aware policy which could not previously see HTTPS traffic now triggers on an inspected flow.
***
## Step 5: Configure Bypass Policies
Bypass HTTPS inspection for:
* Banking and financial sites (compliance)
* Healthcare portals (HIPAA)
* SSL-pinned applications (will break otherwise)
* Government sites
***
### Enable Default Bypass Policy
1. **Click "Configure"** in SafeSquid interface
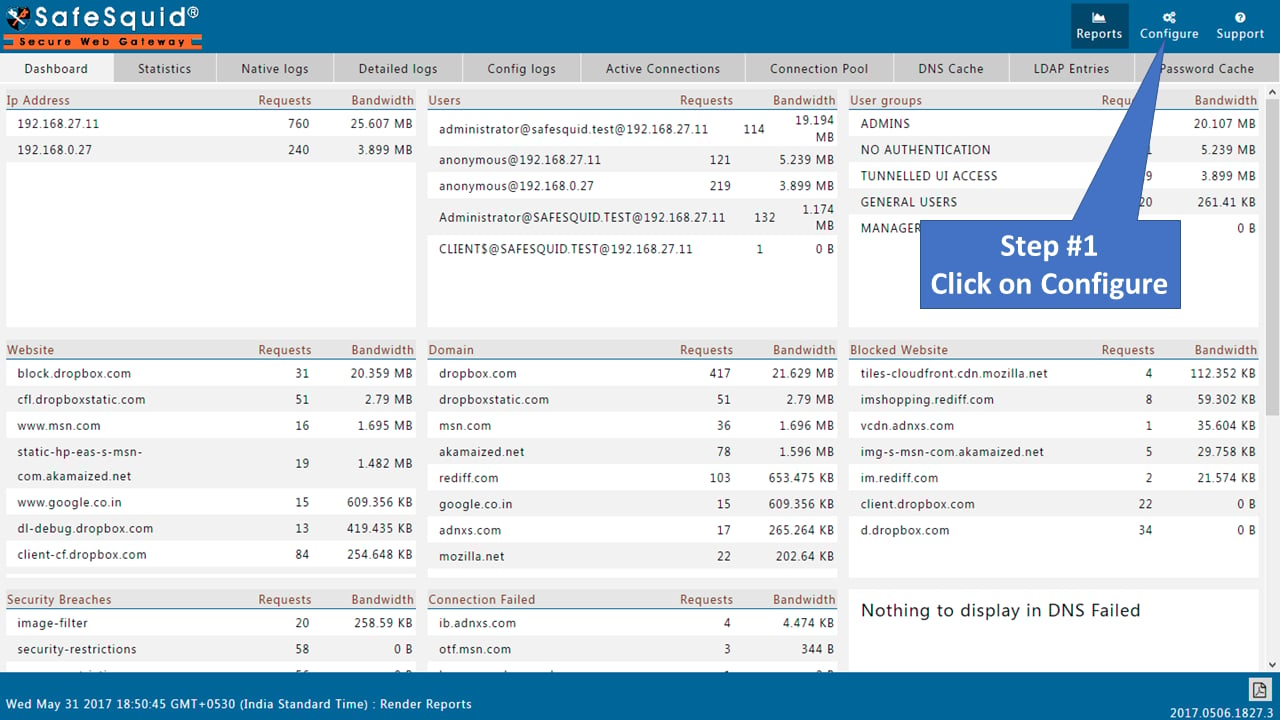 2. **Click Search** (magnifying glass icon, top right)
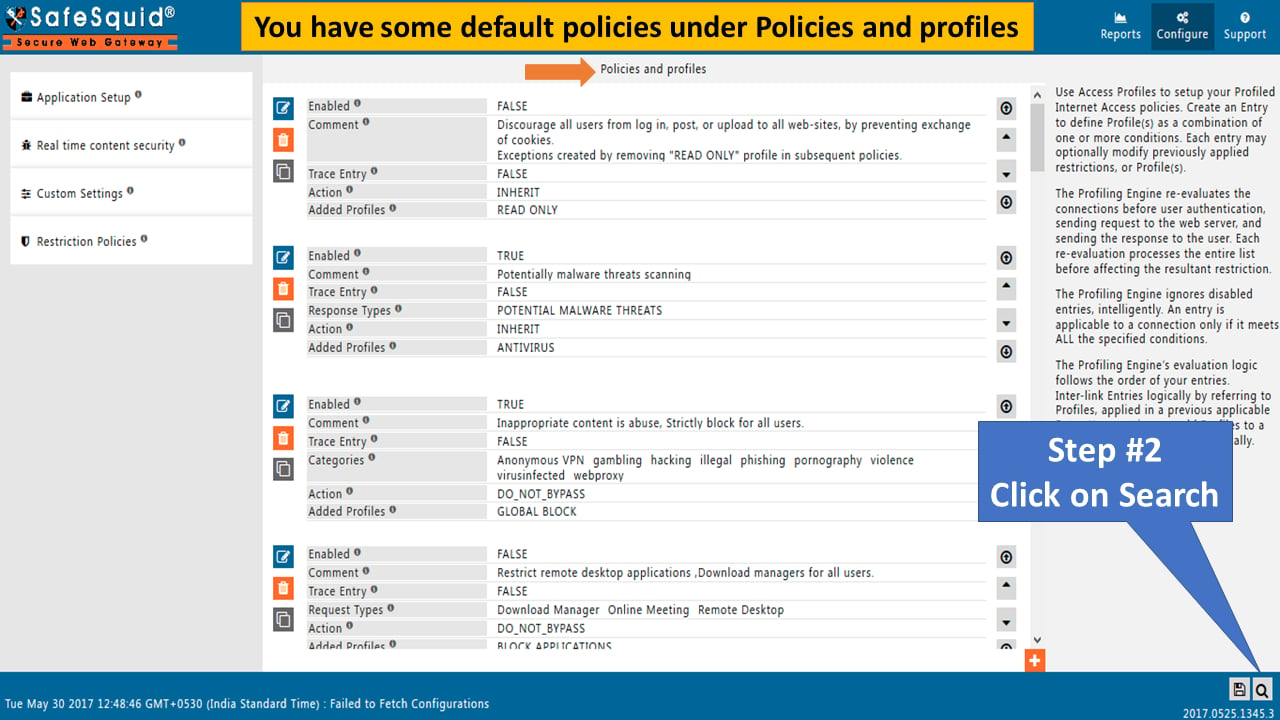 3. **Type "BYPASS SSL INSPECTION"** → **Enter**
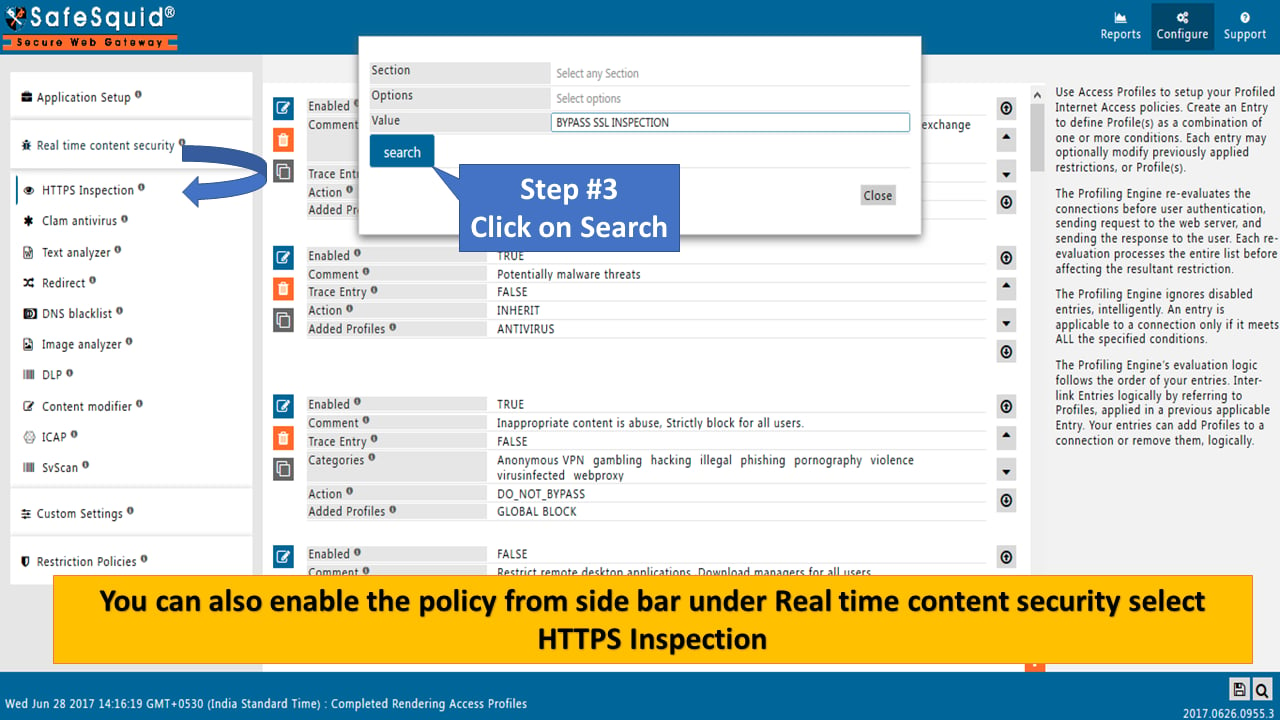 4. **Click Edit** on the bypass policy
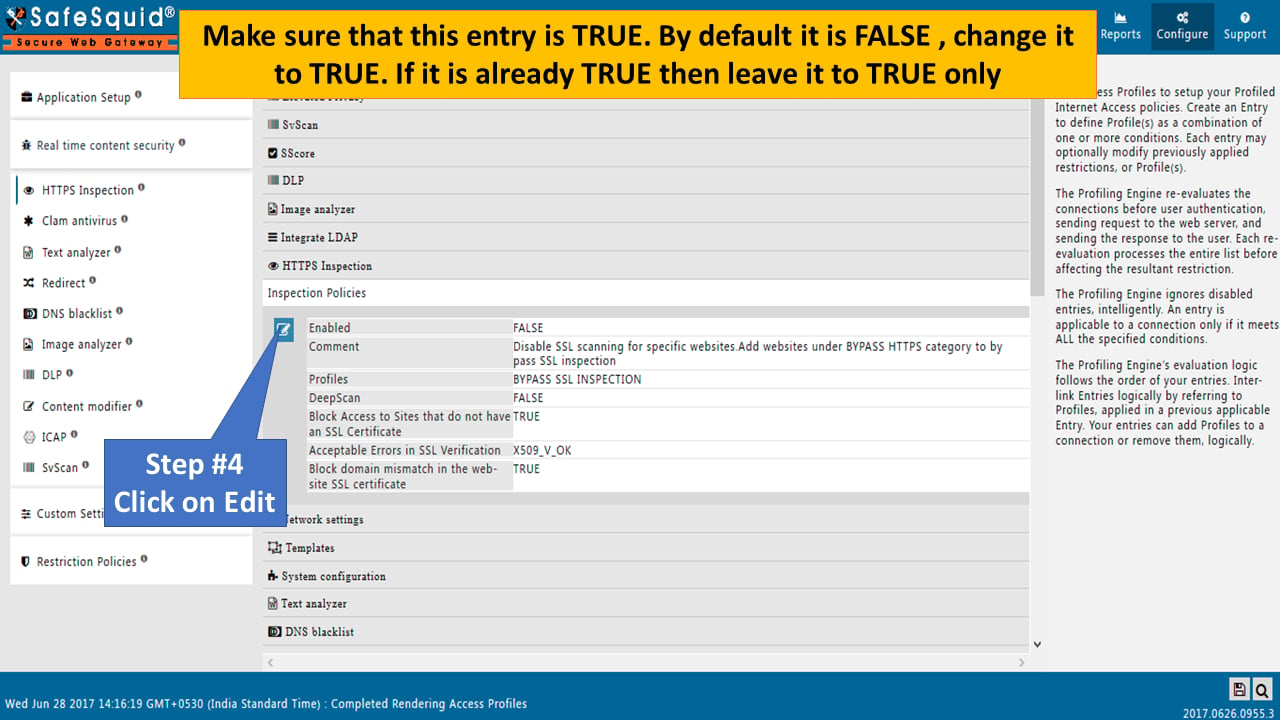 5. **Set "Enabled" to "True"** → **Save Policy**
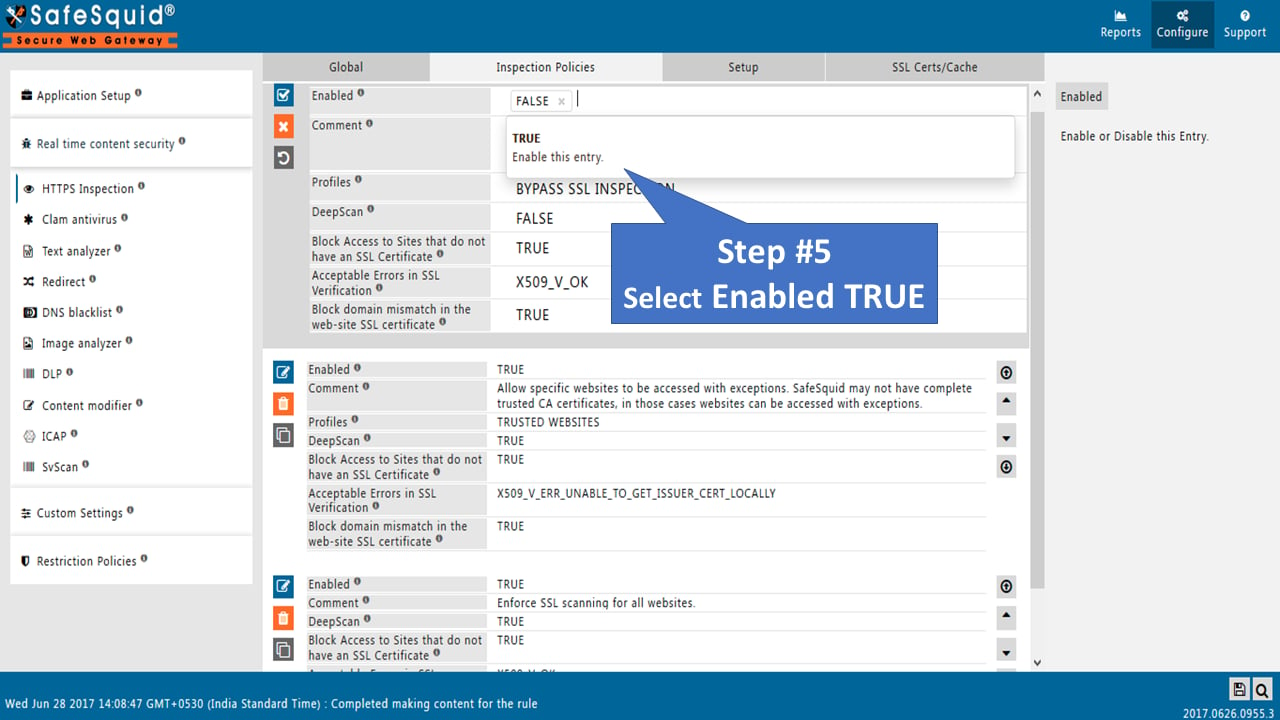
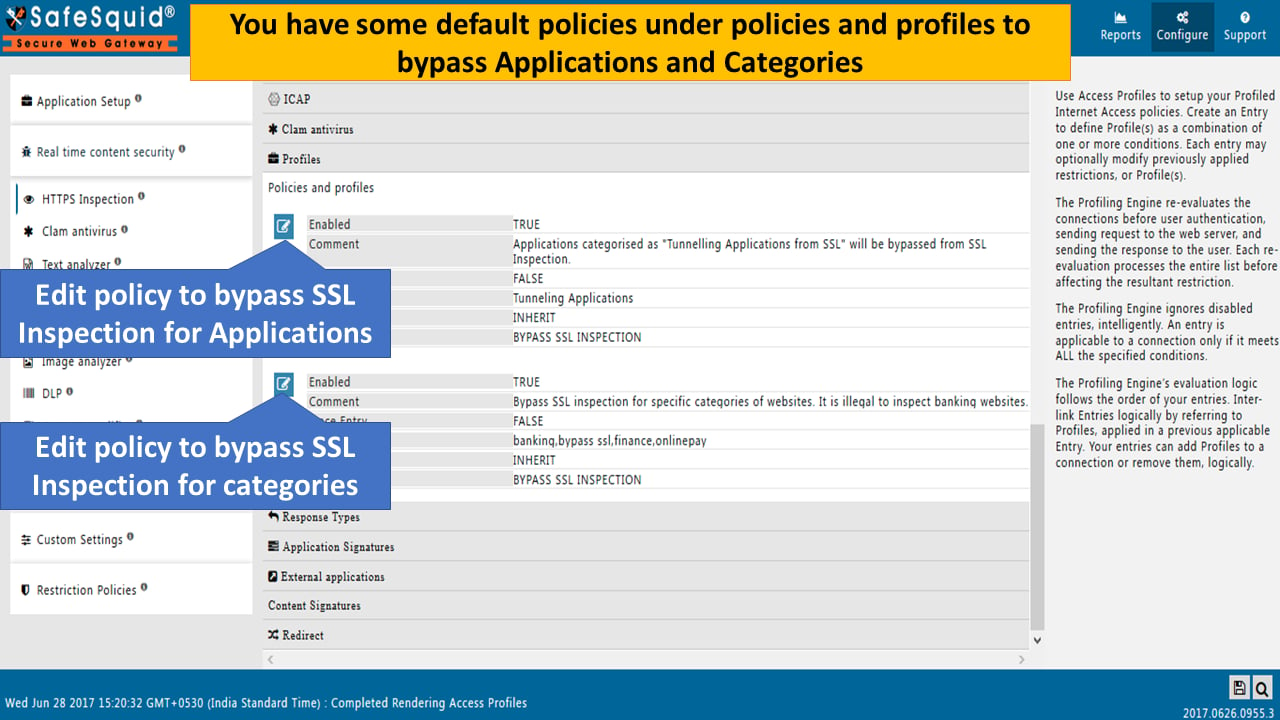
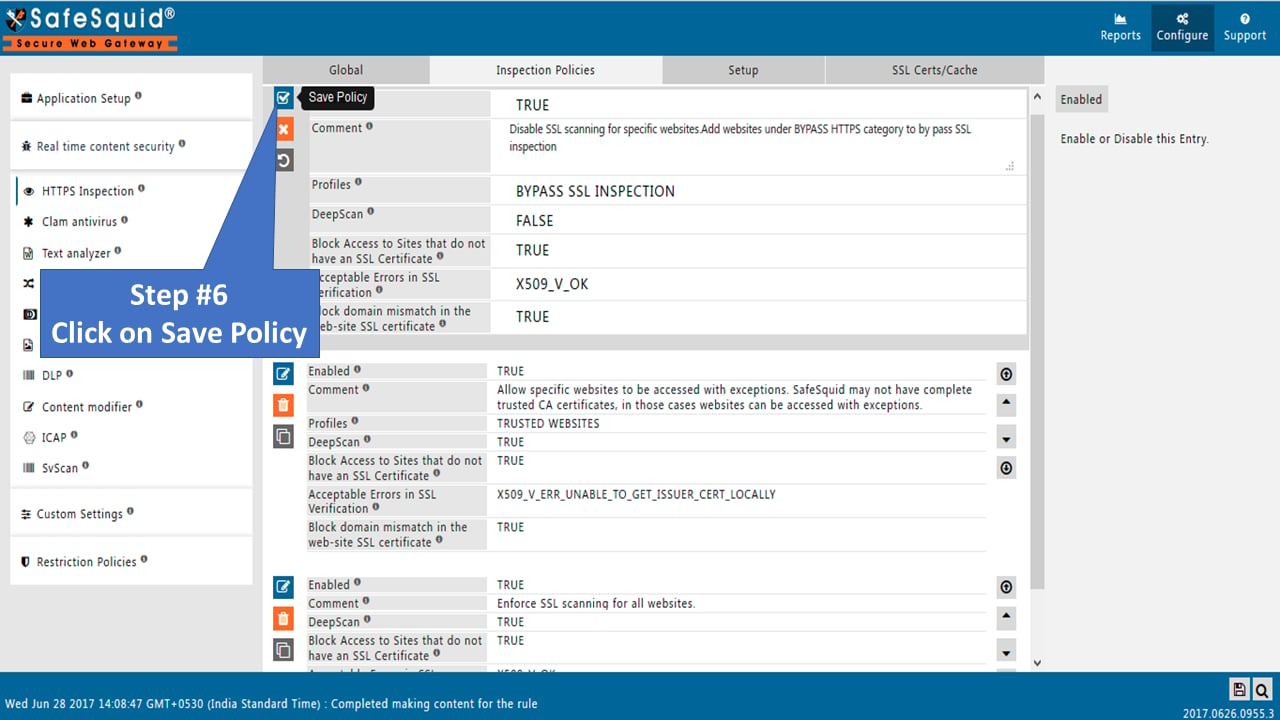 6. **Review and enable related bypass policies** (for banking apps, Windows Update, etc.)
 ***
### Create Custom Bypass for Specific Domains
**Example:** Bypass HTTPS inspection for Dropbox.
***
### Create Custom Bypass for Specific Domains
**Example:** Bypass HTTPS inspection for Dropbox.
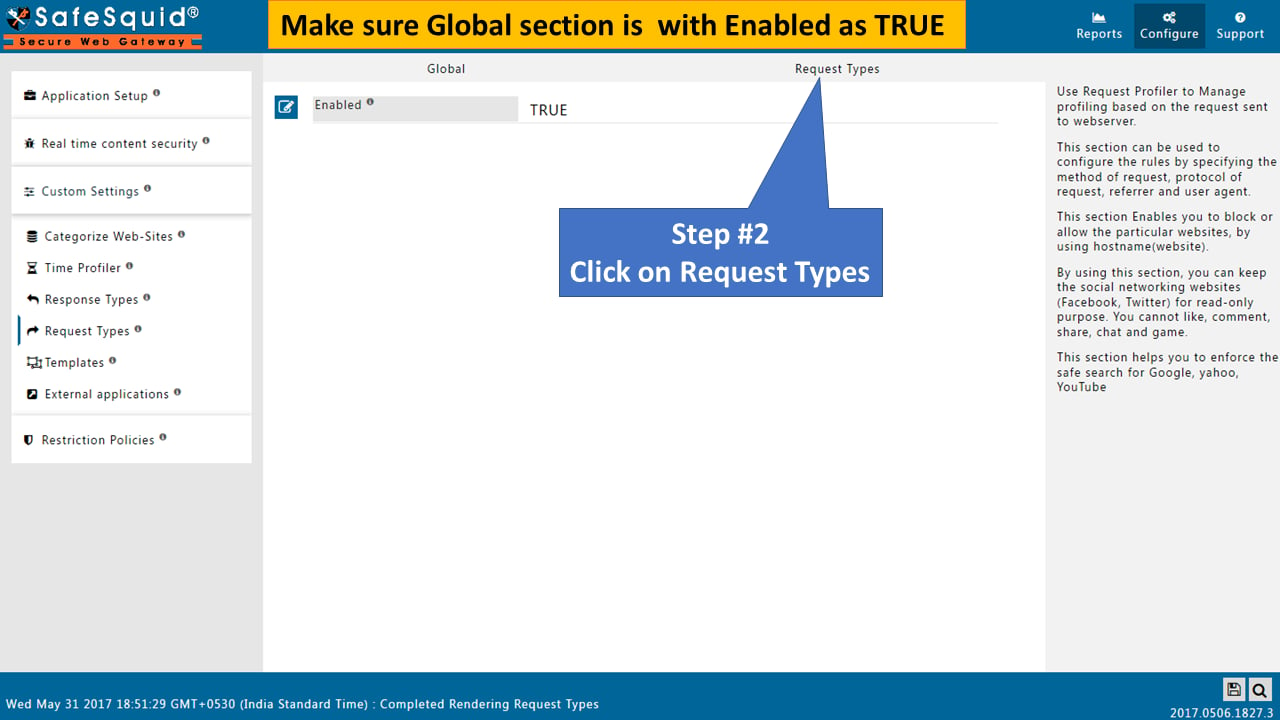
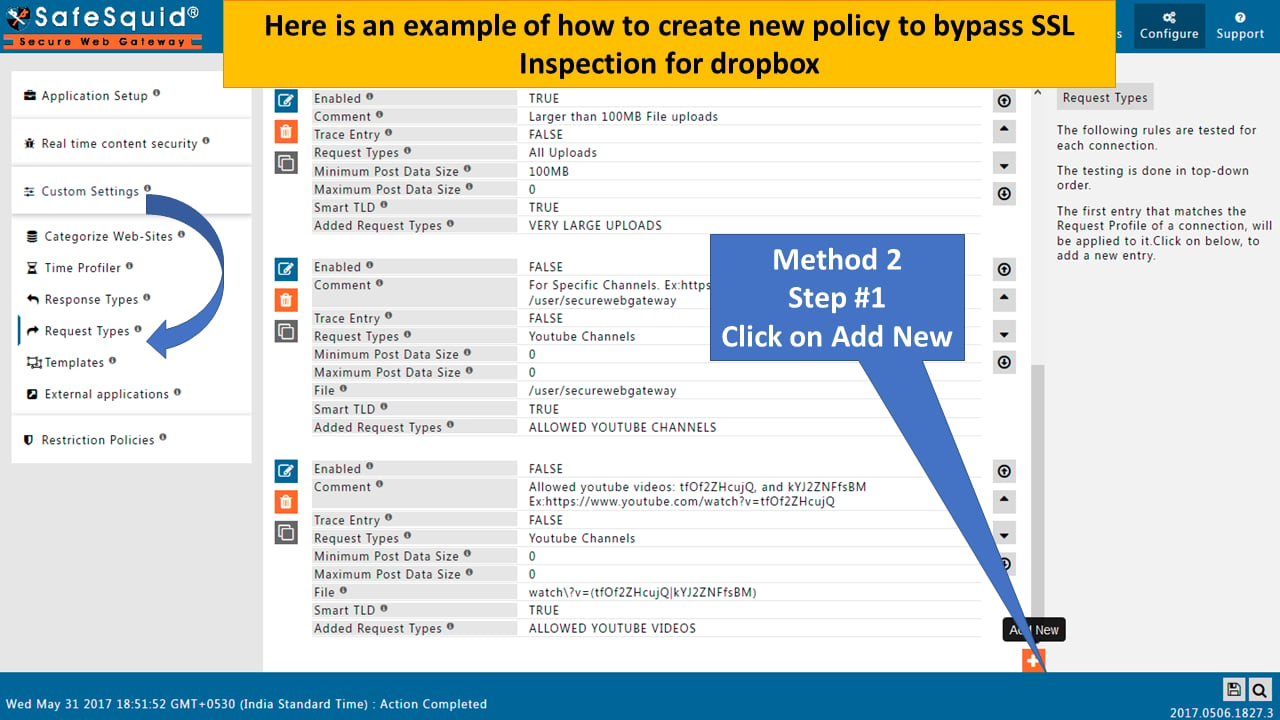 **Step 1: Define Request Type**
1. **Sidebar** → **Profiling Engine** → **Request Types** → **Add New**
**Step 1: Define Request Type**
1. **Sidebar** → **Profiling Engine** → **Request Types** → **Add New**
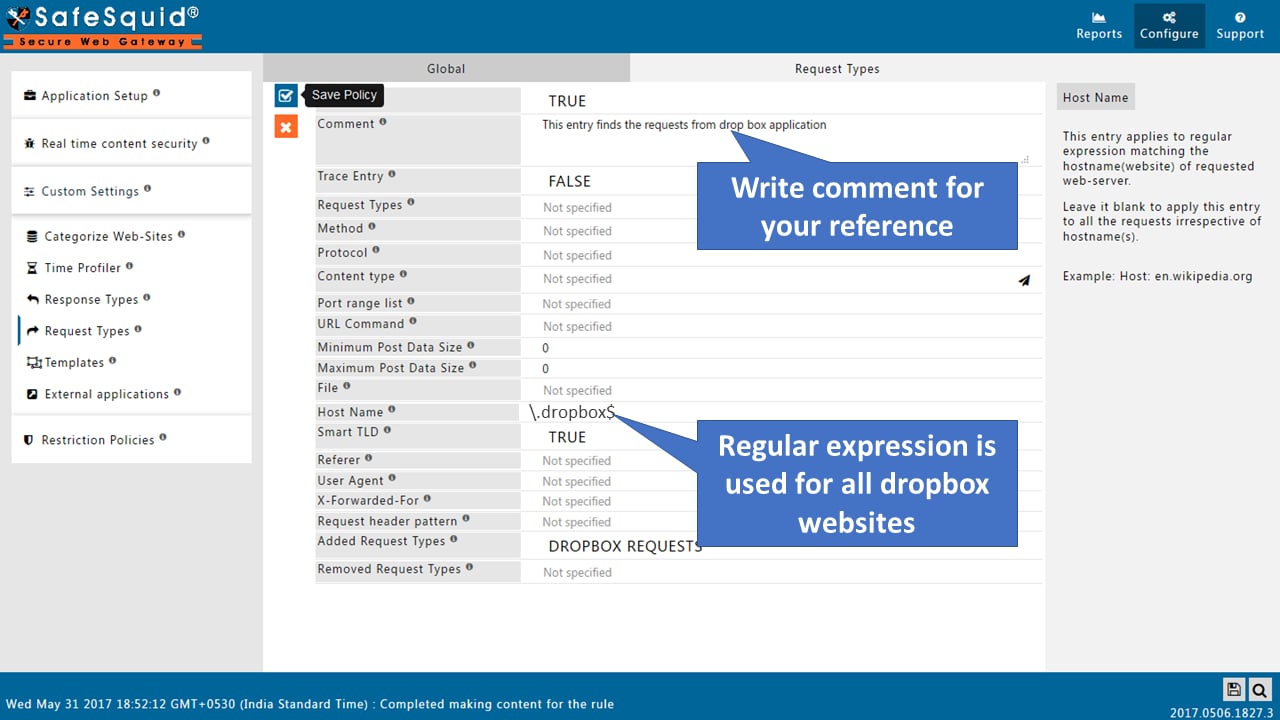
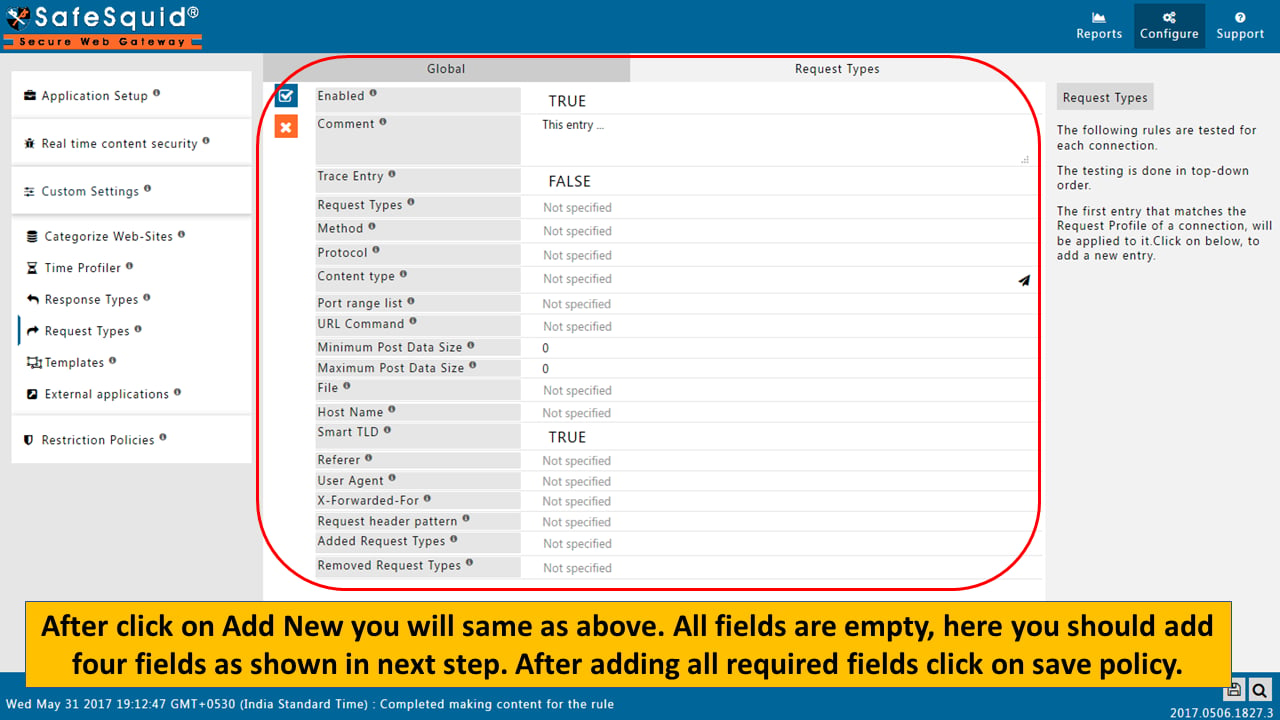 2. **Comment:** "Dropbox domains"\
**Match pattern:** `.*dropbox.*`\
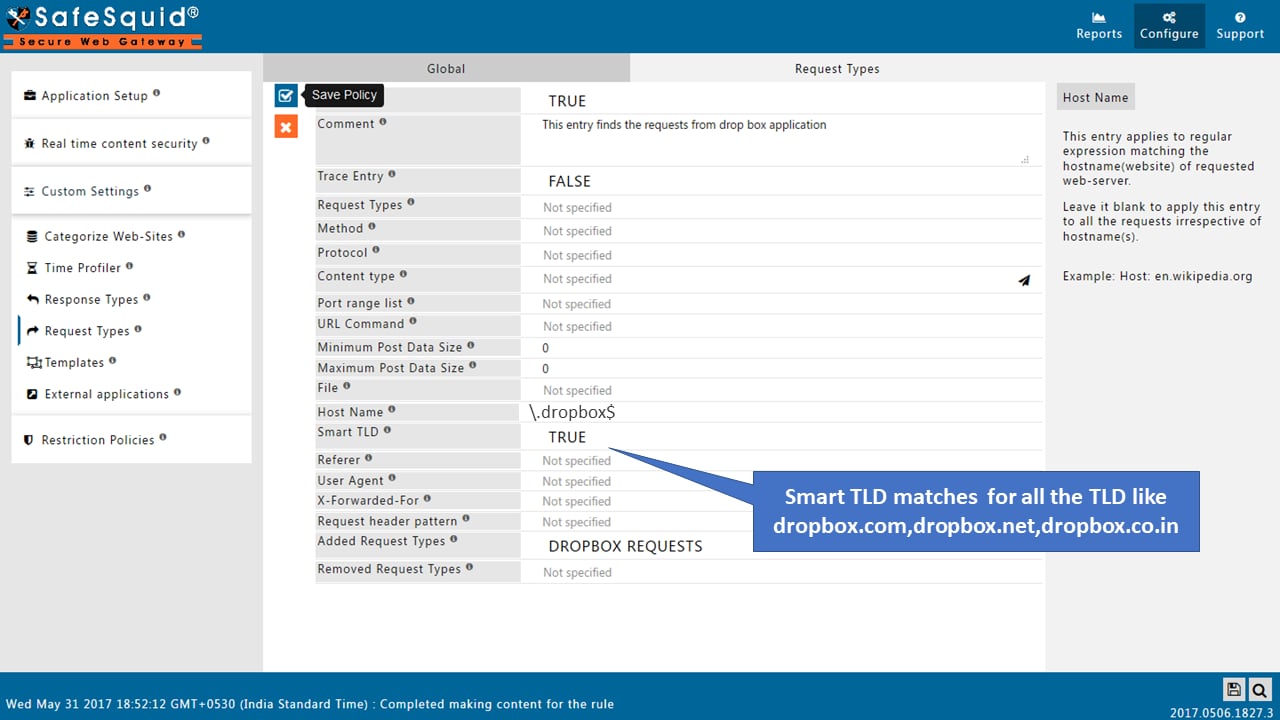
**Smart TLD:** True
2. **Comment:** "Dropbox domains"\
**Match pattern:** `.*dropbox.*`\
**Smart TLD:** True
 **Step 2: Create Access Policy**
3. **Sidebar** → **Access Policies** → **Access Profiles** → **Add New**
**Step 2: Create Access Policy**
3. **Sidebar** → **Access Policies** → **Access Profiles** → **Add New**
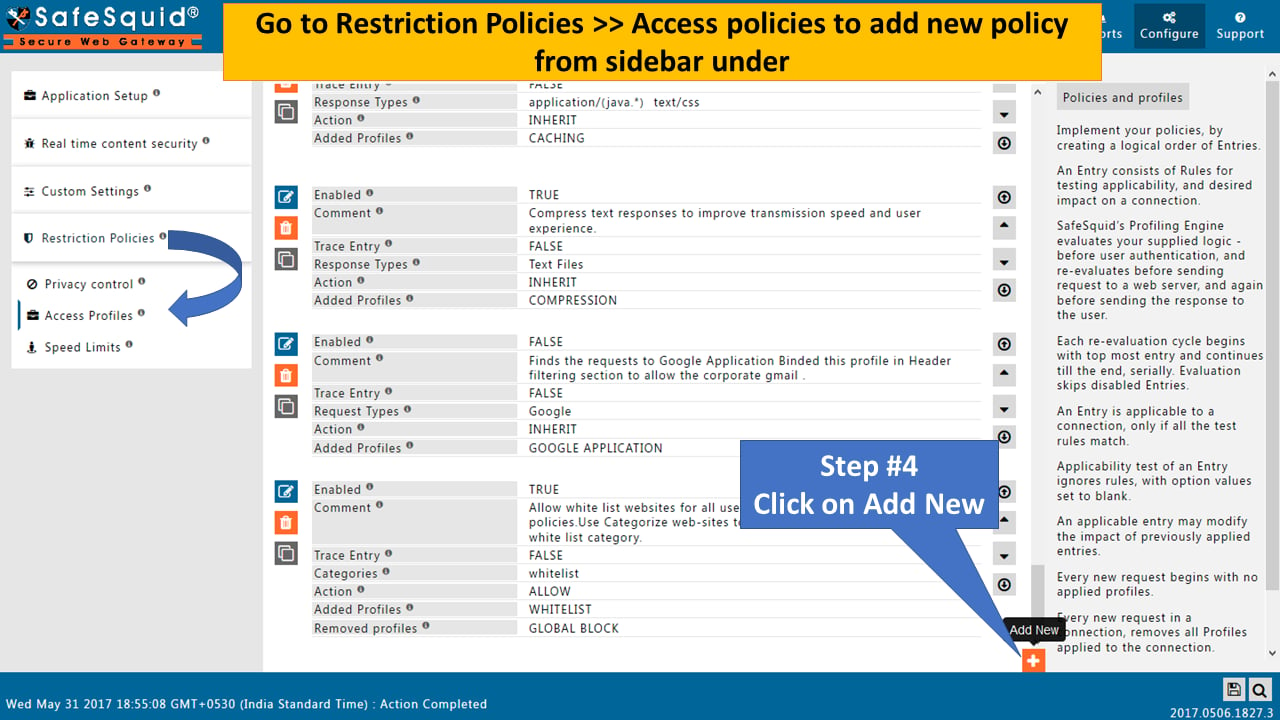 4. **Comment:** "Bypass SSL for Dropbox"\
**Request Type:** Select "Dropbox domains" (from Step 1)\
**Added profiles:** Select "BYPASS SSL INSPECTION"
4. **Comment:** "Bypass SSL for Dropbox"\
**Request Type:** Select "Dropbox domains" (from Step 1)\
**Added profiles:** Select "BYPASS SSL INSPECTION"
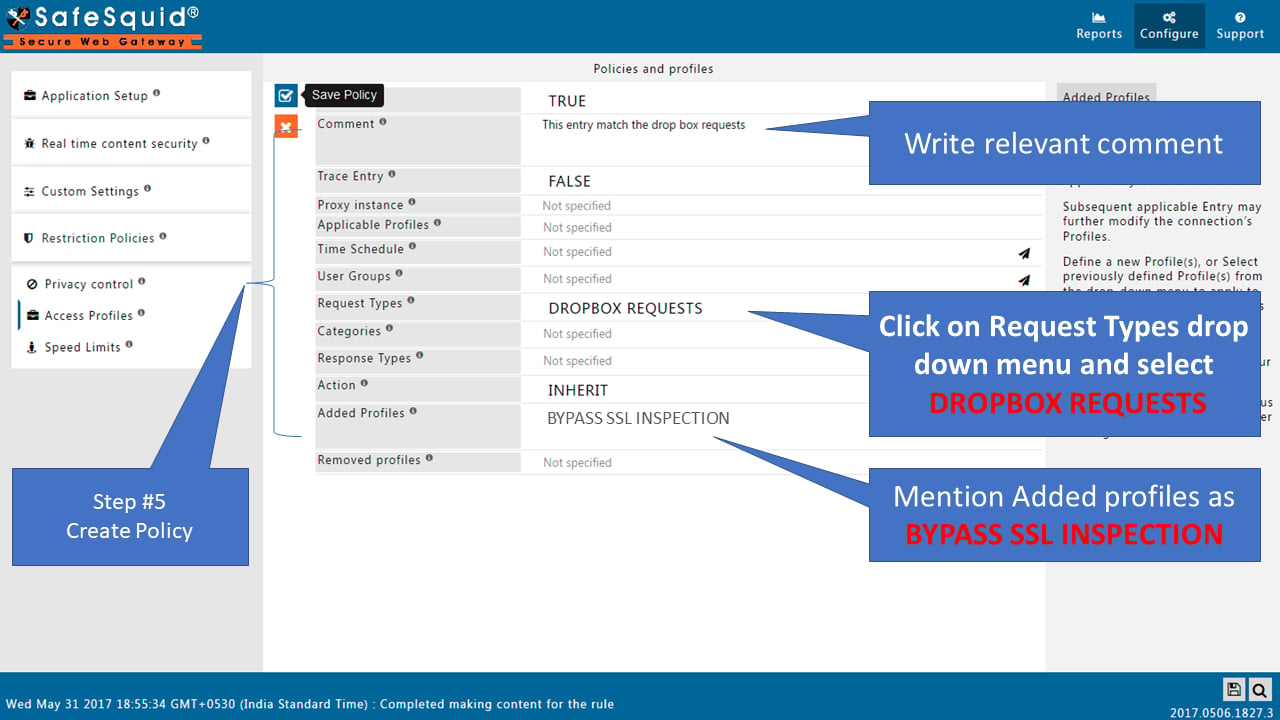 5. **Save Policy**
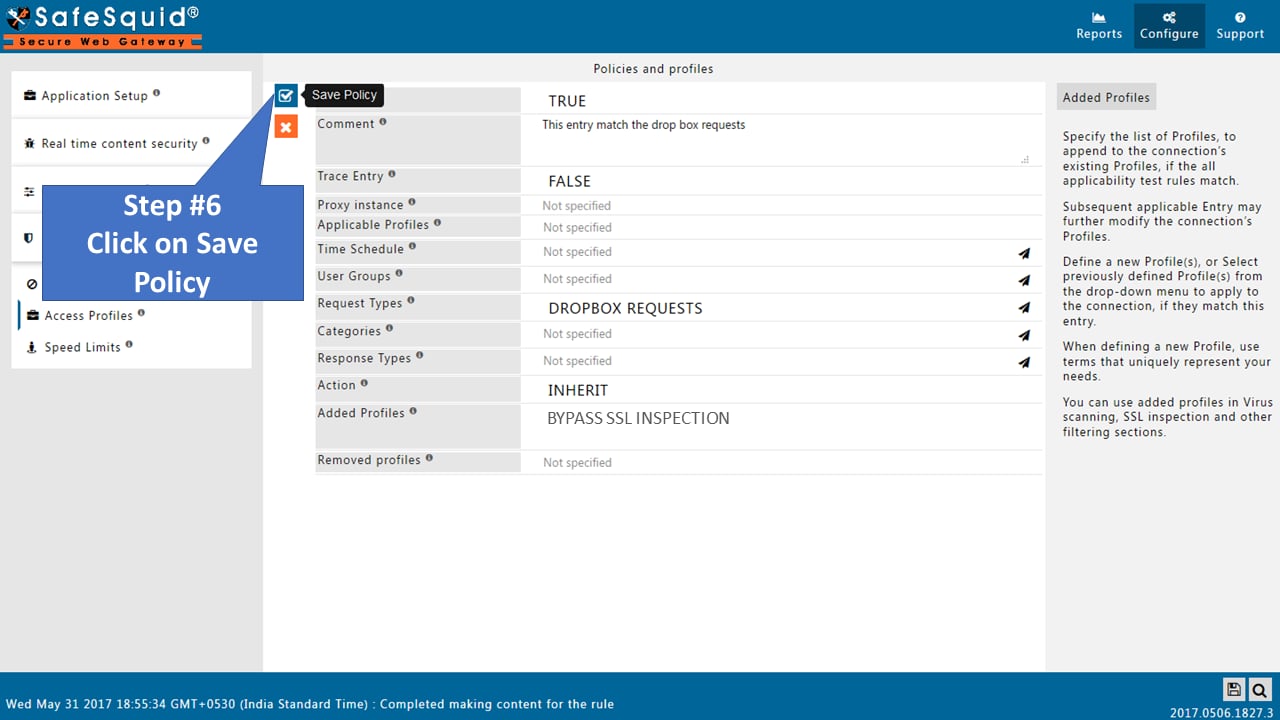 6. **Save Configuration** (floppy disk icon, bottom left)
**Test:** Upload/download files via Dropbox to verify bypass works.
***
## Verification
### Test HTTPS Inspection is Working
**On a client with SafeSquid Root CA installed:**
1. **Browse to** `https://www.google.com`
2. **Click padlock** → **Certificate** → **View**
3. **Verify:** Certificate chain shows SafeSquid Root CA as the issuer
4. **No certificate warnings** should appear
**Expected certificate chain:**
```
www.google.com (issued by SafeSquid Root CA)
└─ SafeSquid Root CA (self-signed or your enterprise CA)
```
***
### Test Bypass is Working
**On the same client:**
1. **Browse to a bypassed site** (e.g., banking site you added to bypass)
2. **Click padlock** → **Certificate** → **View**
3. **Verify:** Certificate shows the **original site's CA** (not SafeSquid)
**Expected:** Bypassed sites show their original certificates (e.g., DigiCert, Let's Encrypt).
***
### Check SafeSquid Logs
**On SafeSquid server:**
```bash theme={null}
tail -f /var/log/safesquid/access/extended.log
```
**Expected for inspected sites:**
* Full URL logged (including path, not just domain)
* `200 OK` or similar HTTP status
**Expected for bypassed sites:**
* Only `CONNECT` method logged
* No detailed path information
***
## Troubleshooting
| **Issue** | **Likely Cause** | **Fix** |
| --------------------------------------- | ----------------------------------- | --------------------------------------------------------------------------------------------- |
| Certificate warnings on all HTTPS sites | Root CA not installed on client | Install SafeSquid Root CA in Trusted Root store (see Step 3) |
| Firefox shows warnings, Chrome works | Firefox uses separate cert store | Import certificate into Firefox separately (see above) |
| Banking/healthcare sites broken | HTTPS inspection enabled, no bypass | Add sites to bypass policy (Step 4) |
| Mobile apps not working | SSL pinning | Add app's domains to bypass policy |
| "NET::ERR\_CERT\_AUTHORITY\_INVALID" | Root CA not trusted | Verify certificate installed in **Trusted Root Certification Authorities** (not Intermediate) |
| Inspection works, then stops | SafeSquid restart cleared config | Re-save configuration; check if config was saved to cloud |
| Some sites work, others don't | Partial bypass or incorrect policy | Review bypass policies; check logs for CONNECT vs full requests |
**Still not working?**
1. **Verify HTTPS Inspection is enabled:**
* Configuration Portal → Real-time Content Security → HTTPS Inspection → Global = True
2. **Check certificate is deployed:**
* Windows: Run `certmgr.msc` → Trusted Root Certification Authorities → Certificates
* Firefox: Settings → Privacy & Security → Certificates → View Certificates → Authorities
* macOS: Keychain Access → System → Find SafeSquid cert
3. **Test with curl:**
```bash theme={null}
# Should work without cert if bypass is correct:
curl --proxy http://SAFESQUID-IP:8080 https://www.google.com
```
4. **Check SafeSquid logs:**
```bash theme={null}
tail -50 /var/log/safesquid/safesquid.log
grep -i "ssl\|cert\|handshake" /var/log/safesquid/safesquid.log
```
***
## Source register
| Topic | Status | Source |
| --------------------------------------------- | ------------- | ------------------------------------------------------------------------- |
| Root CA via Self-Service Portal | **Confirmed** | This guide, [Self-Service Portal](/Self-Service_Portal) |
| Enable inspection UI path | **Confirmed** | Steps in this guide |
| Client trust stores (Windows, Firefox, macOS) | **Confirmed** | This guide, [Import Certificate Chrome/IE](/Import_Certificate_Chrome_IE) |
| Exact time-to-complete for enterprise fleets | **Missing** | Estimate only; size per change window |
***
## Next Steps
1. **[Authentication](/Authentication)** — Enable user-aware policies (SSL Inspection must be working first)
2. **[Access Restriction](/Access_Restriction)** — Configure URL filtering (now works on HTTPS)
3. **[Data Leakage Prevention](/Data_Leakage_Prevention)** — Scan HTTPS uploads for sensitive data
4. **[Troubleshooting](/Troubleshooting)** — SSL-specific issues and diagnostics
**Related:**
* [Self-Service Portal](/Self-Service_Portal) — Manage certificates
* [Import Certificate into Chrome/IE](/Import_Certificate_Chrome_IE) — Detailed Windows guide
## Related topics
- [SSL Inspection](/use_cases/ssl_inspection/ssl_inspection.md)
- [Proxy Chain](/use_cases/scaling_and_high_availability/proxy_chain.md)
- [Login Issues on Specific Websites](/troubleshooting/unable_to_login_specific_website.md)
- [Transparent Proxy](/use_cases/scaling_and_high_availability/transparent_proxy.md)
- [Compliance Templates](/use_cases/access_restriction/compliance_templates.md)
6. **Save Configuration** (floppy disk icon, bottom left)
**Test:** Upload/download files via Dropbox to verify bypass works.
***
## Verification
### Test HTTPS Inspection is Working
**On a client with SafeSquid Root CA installed:**
1. **Browse to** `https://www.google.com`
2. **Click padlock** → **Certificate** → **View**
3. **Verify:** Certificate chain shows SafeSquid Root CA as the issuer
4. **No certificate warnings** should appear
**Expected certificate chain:**
```
www.google.com (issued by SafeSquid Root CA)
└─ SafeSquid Root CA (self-signed or your enterprise CA)
```
***
### Test Bypass is Working
**On the same client:**
1. **Browse to a bypassed site** (e.g., banking site you added to bypass)
2. **Click padlock** → **Certificate** → **View**
3. **Verify:** Certificate shows the **original site's CA** (not SafeSquid)
**Expected:** Bypassed sites show their original certificates (e.g., DigiCert, Let's Encrypt).
***
### Check SafeSquid Logs
**On SafeSquid server:**
```bash theme={null}
tail -f /var/log/safesquid/access/extended.log
```
**Expected for inspected sites:**
* Full URL logged (including path, not just domain)
* `200 OK` or similar HTTP status
**Expected for bypassed sites:**
* Only `CONNECT` method logged
* No detailed path information
***
## Troubleshooting
| **Issue** | **Likely Cause** | **Fix** |
| --------------------------------------- | ----------------------------------- | --------------------------------------------------------------------------------------------- |
| Certificate warnings on all HTTPS sites | Root CA not installed on client | Install SafeSquid Root CA in Trusted Root store (see Step 3) |
| Firefox shows warnings, Chrome works | Firefox uses separate cert store | Import certificate into Firefox separately (see above) |
| Banking/healthcare sites broken | HTTPS inspection enabled, no bypass | Add sites to bypass policy (Step 4) |
| Mobile apps not working | SSL pinning | Add app's domains to bypass policy |
| "NET::ERR\_CERT\_AUTHORITY\_INVALID" | Root CA not trusted | Verify certificate installed in **Trusted Root Certification Authorities** (not Intermediate) |
| Inspection works, then stops | SafeSquid restart cleared config | Re-save configuration; check if config was saved to cloud |
| Some sites work, others don't | Partial bypass or incorrect policy | Review bypass policies; check logs for CONNECT vs full requests |
**Still not working?**
1. **Verify HTTPS Inspection is enabled:**
* Configuration Portal → Real-time Content Security → HTTPS Inspection → Global = True
2. **Check certificate is deployed:**
* Windows: Run `certmgr.msc` → Trusted Root Certification Authorities → Certificates
* Firefox: Settings → Privacy & Security → Certificates → View Certificates → Authorities
* macOS: Keychain Access → System → Find SafeSquid cert
3. **Test with curl:**
```bash theme={null}
# Should work without cert if bypass is correct:
curl --proxy http://SAFESQUID-IP:8080 https://www.google.com
```
4. **Check SafeSquid logs:**
```bash theme={null}
tail -50 /var/log/safesquid/safesquid.log
grep -i "ssl\|cert\|handshake" /var/log/safesquid/safesquid.log
```
***
## Source register
| Topic | Status | Source |
| --------------------------------------------- | ------------- | ------------------------------------------------------------------------- |
| Root CA via Self-Service Portal | **Confirmed** | This guide, [Self-Service Portal](/Self-Service_Portal) |
| Enable inspection UI path | **Confirmed** | Steps in this guide |
| Client trust stores (Windows, Firefox, macOS) | **Confirmed** | This guide, [Import Certificate Chrome/IE](/Import_Certificate_Chrome_IE) |
| Exact time-to-complete for enterprise fleets | **Missing** | Estimate only; size per change window |
***
## Next Steps
1. **[Authentication](/Authentication)** — Enable user-aware policies (SSL Inspection must be working first)
2. **[Access Restriction](/Access_Restriction)** — Configure URL filtering (now works on HTTPS)
3. **[Data Leakage Prevention](/Data_Leakage_Prevention)** — Scan HTTPS uploads for sensitive data
4. **[Troubleshooting](/Troubleshooting)** — SSL-specific issues and diagnostics
**Related:**
* [Self-Service Portal](/Self-Service_Portal) — Manage certificates
* [Import Certificate into Chrome/IE](/Import_Certificate_Chrome_IE) — Detailed Windows guide
## Related topics
- [SSL Inspection](/use_cases/ssl_inspection/ssl_inspection.md)
- [Proxy Chain](/use_cases/scaling_and_high_availability/proxy_chain.md)
- [Login Issues on Specific Websites](/troubleshooting/unable_to_login_specific_website.md)
- [Transparent Proxy](/use_cases/scaling_and_high_availability/transparent_proxy.md)
- [Compliance Templates](/use_cases/access_restriction/compliance_templates.md)