Expert Installation
Language Selection
English is the default selected language.Change it only, if you are not very comfortable with English.

Country Selection
Select your country as the location.This selection is related to ensure correct time settings of the system.

Keyboard layout Selection
Select the keyboard layout that matches the origin of the keyboard attached to the system.

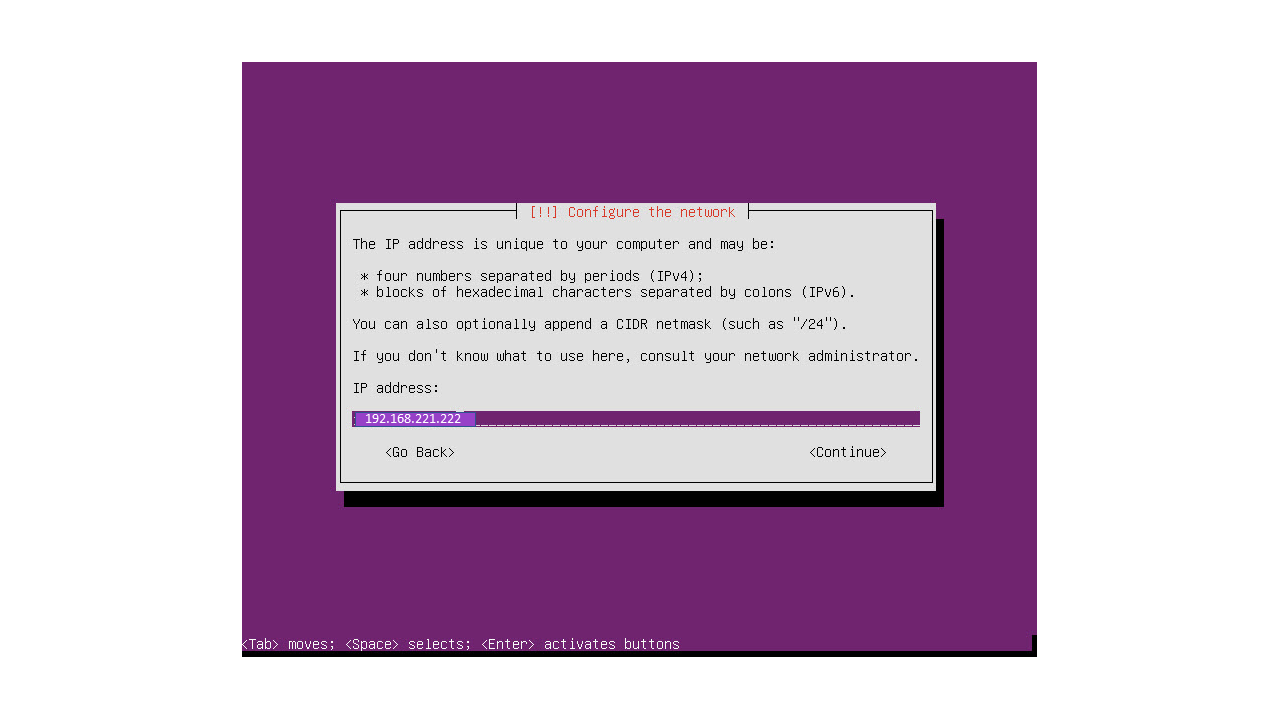
Network Configuration
Network interface selection:This will show you the all network interfaces present in your system.Select the interface that has Internet connectivity as the primary

Assign IP address to the primary interface
Setting up the Netmask

Gateway Setting
Mention your Gateway settings

Mention DNS
Mention DNS server IP

Hostname of Your Server
Setting the correct hostname of your gateway is very important, if you plan to integrate it with your active directory.
The default host name is SWG. You can give any hostname as per your choice other than safesquid.That means hostname never be safesquid.

Domain name Setting
The domain name setting is also very important, if you plan to integrate it with your active directory.

NTP server Configuration
By default, ntp server has been set to pool.ntp.org . If you have your own ntp server, then you may set to that address for clock synchronization between computer systems to some time reference.

Choose a mirror of the Ubuntu archive
Select the country for ubuntu archive to download required packages

HTTP proxy Setup
This field should be blank

Set up users and passwords
Create a username and password. You will login with this username and password after the installation is complete.

Username for your account
By default the filed is empty, select the username for Login. Here i am given as administrator

Choose password for new user
Choose the strong password the user

Re-enter password
confirm the password. It should match with the password given in previous step

Encrypt your home directory
Select whether you want encrypt your home directory or not

Configure the Clock
Select the clock based on the location

Partition disks
select yes to manage partitions

Size of Guided Partition
Specify the size of hard disk provided

Select Method of Partition
Here you will five options
- Guided partitioning
- configure software raid
- configure local volume manager
- configure encrypted volumes
- configure iscsi volumes
Select partition to modify its settings
If you don't want to modify default partitions then, select Finish Partitioning and write changes to the disk,

List of Partitions
Here you can see list of all partitions

Installation of base system
It will automatically install the base system. It takes little bit of time to install completely.

Configuring the apt
It will configure apt packages one after the other in this process.

Select and install software
Here it install the Operating System

Install the GRUB boot loader
Select the Boot loader

Finishing installation
Finishing the installation is the last step in installation.

At last, the system reboots and goes through system initialization. Afterward, a welcome screen appears with SafeSquid(Secure Web Gateway) screen.
 screen..png")
Login to the Server
Login to the server by using the username and password created in previous steps
