Setup Your Secure Web Gateway With SafeSquid For Windows Platform
Overview
SafeSquid for Windows SWG should be used as a Service on Microsoft Windows. SafeSquid Service can also be controlled like any other Windows service from the Service Management Console. SafeSquid Service helps you to distribute Internet Access across your enterprise, while providing you Total Content Control & Total Access Control. It has all the features for Content Filtering that you would ever require to ensure that the Internet Usage in your enterprise, is never abused or misused. It ensures that the Internet Usage in your enterprise, is always as per your Corporate Internet Access Policy.
SafeSquid for Windows SWG installation process is quite easy, and self-intuitive. SafeSquid for Windows SWG Setup will automatically install the necessary files required for execution of SafeSquid service. SafeSquid for Windows SWG package is bundle with SafeSquid Service Manager and SafeSquid Support Tar-Ball Generator.
Prerequisites
The following information is important to consider before beginning to install SafeSquid for Windows SWG.
- Download latest version of SafeSquid for Windows SWG from - Latest Windows SWG
- You will need Administrator rights on Windows machine to install SafeSquid for Windows SWG.
- You will need Administrative privileges to start, stop, restart or modify the startup parameters of SafeSquid Service.
- You have to provide the direct internet access to the SafeSquid service IP while installation.
- You have to provide sufficient hardware to run SafeSquid Service. See the Hardware Requirements here - Hardware requirements
Installation Process
Download and Install Latest SafeSquid Windows SWG Package
1. Download latest SafeSquid for Windows SWG package from - http://downloads.safesquid.net/#
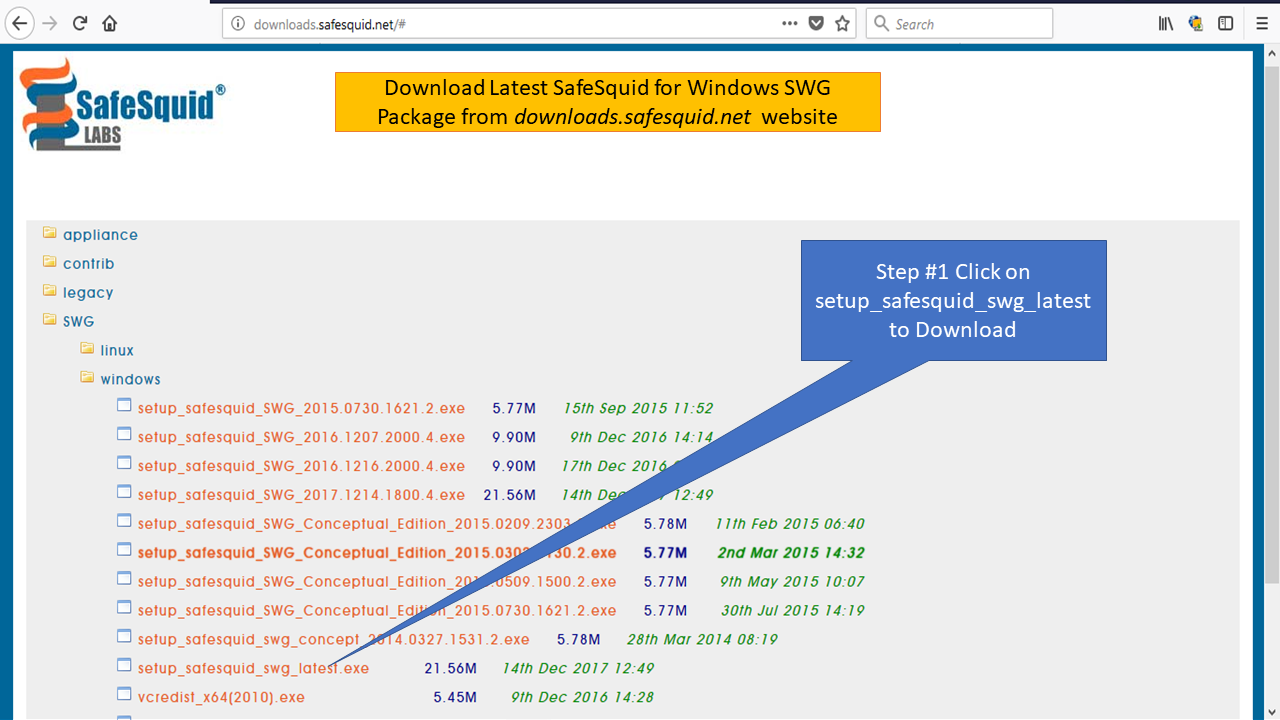 |
|
2. Save the Latest SafeSquid for Windows SWG Package on Disk. 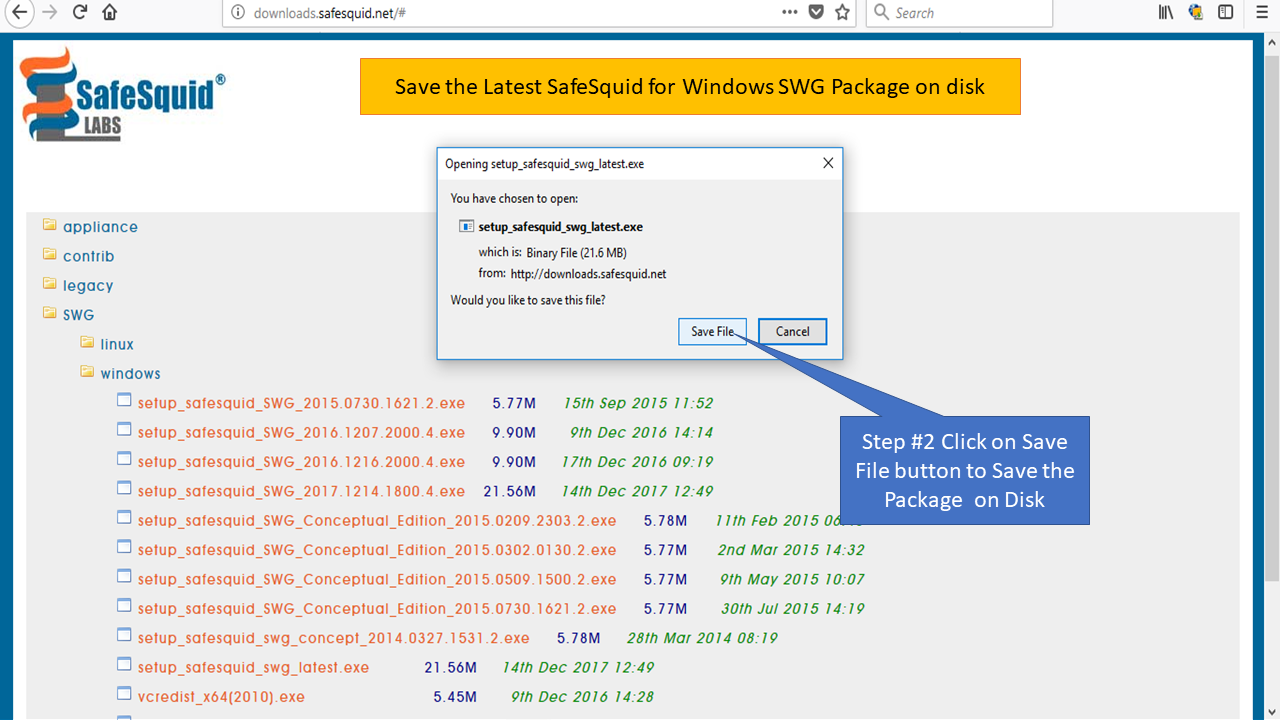 |
|
3. Find the latest SafeSquid for Windows SWG setup/package downloaded on your machine. Double click the downloaded SafeSquid for Windows SWG Setup file to start installation process. 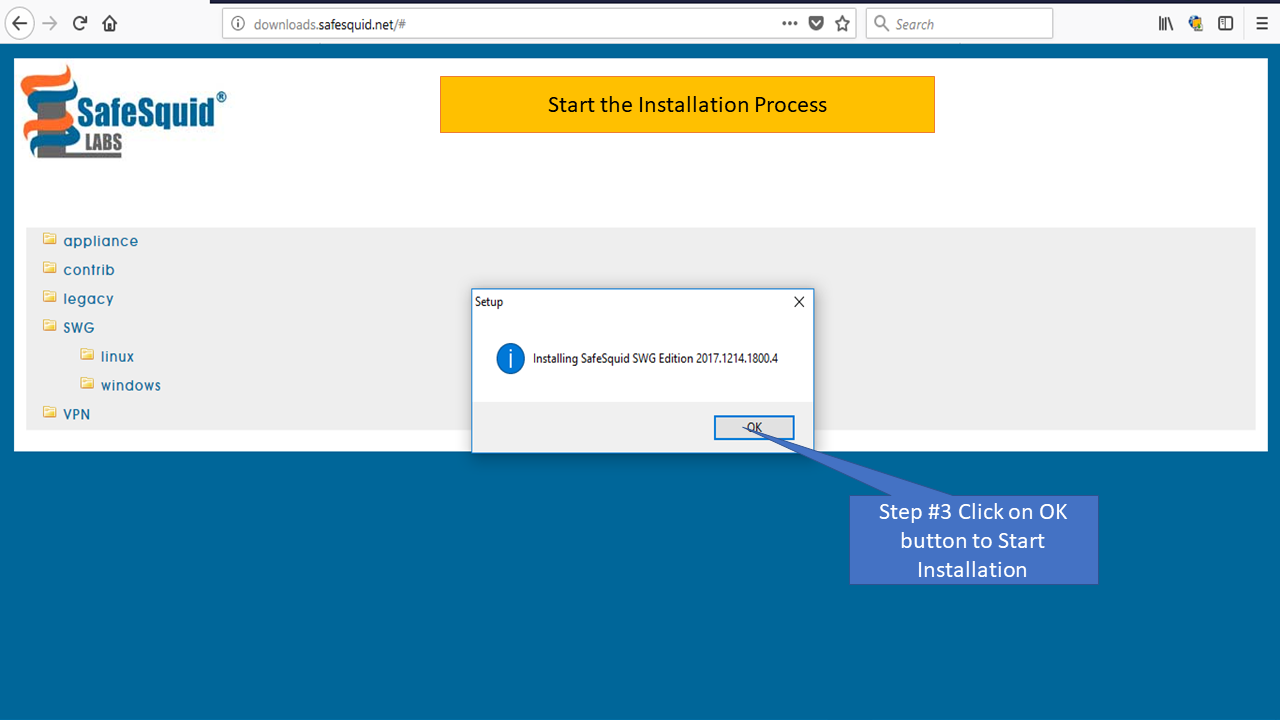 |
|
4. Enter your Name and Company name. 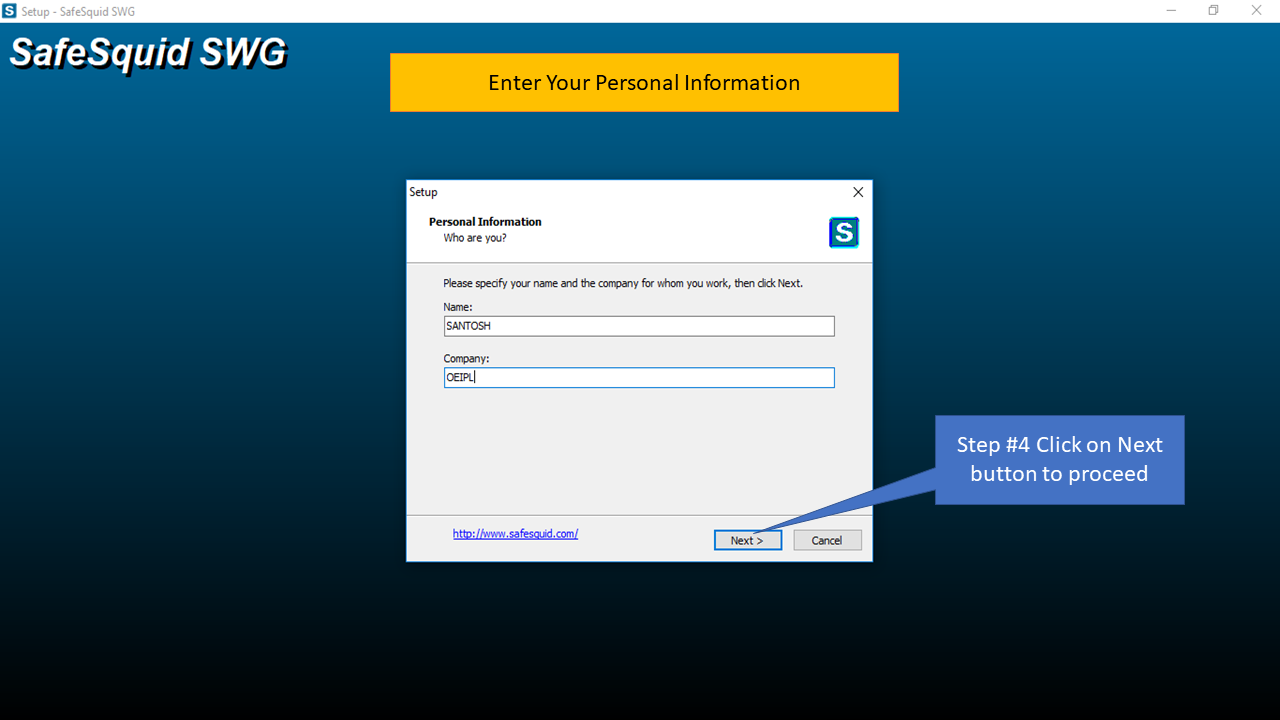 |
|
5. Read the End-User License Agreement. Select 'I accept the agreement' and click on 'Next' button to continue. 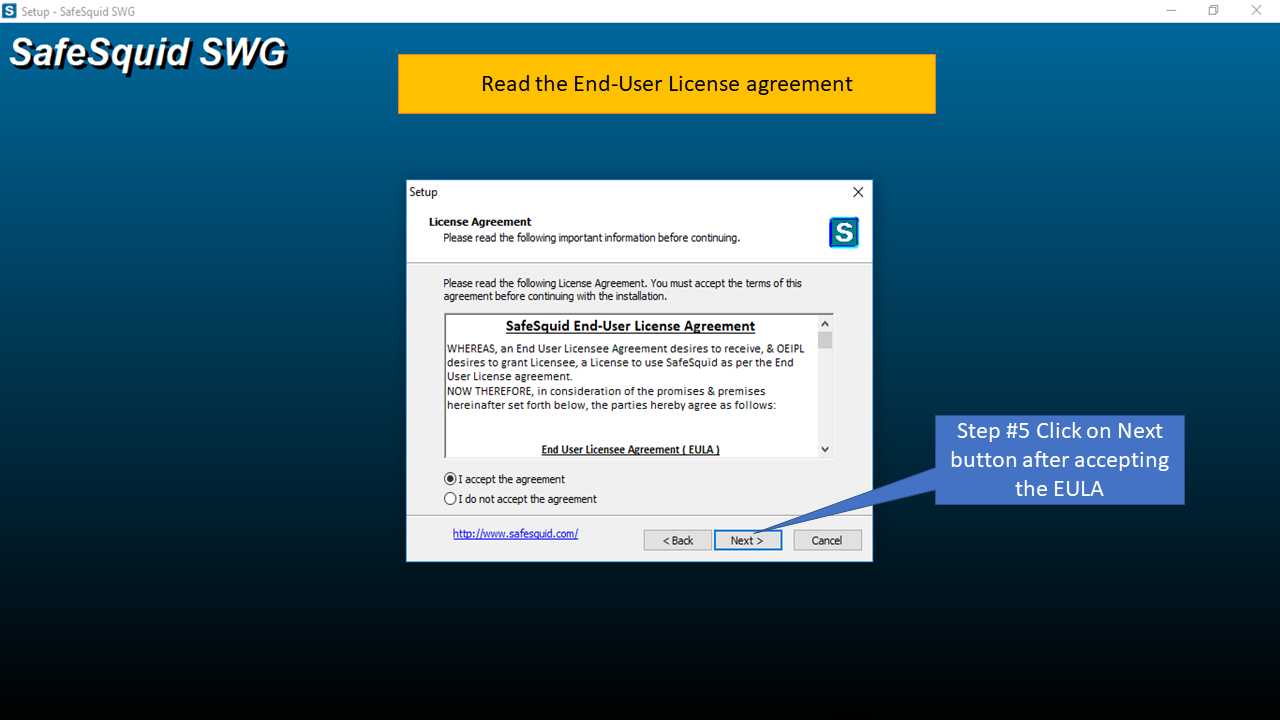 |
|
6. Read the Important and Helpful Information about SafeSquid before you Start Installation. 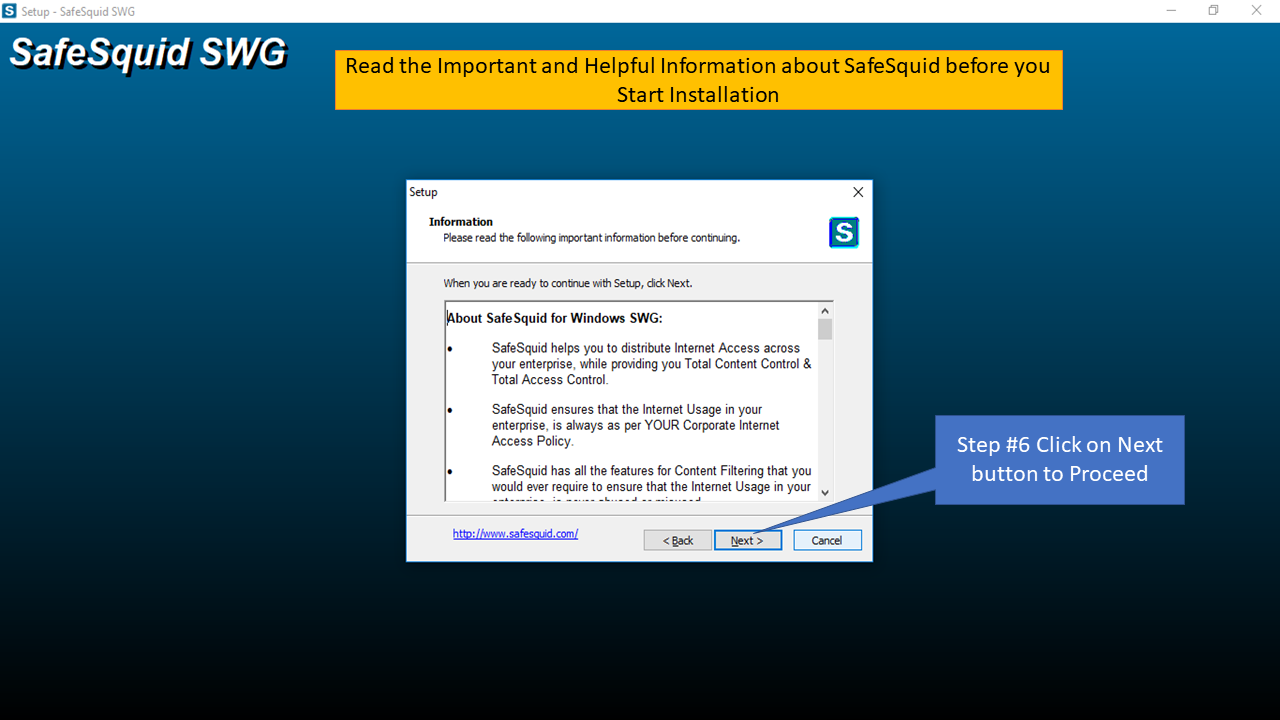 |
|
7. Click on 'Next' button to continue with default Var Directory path OR select a different path. SafeSquid service will use this path to store cache content, database, logs, etc. 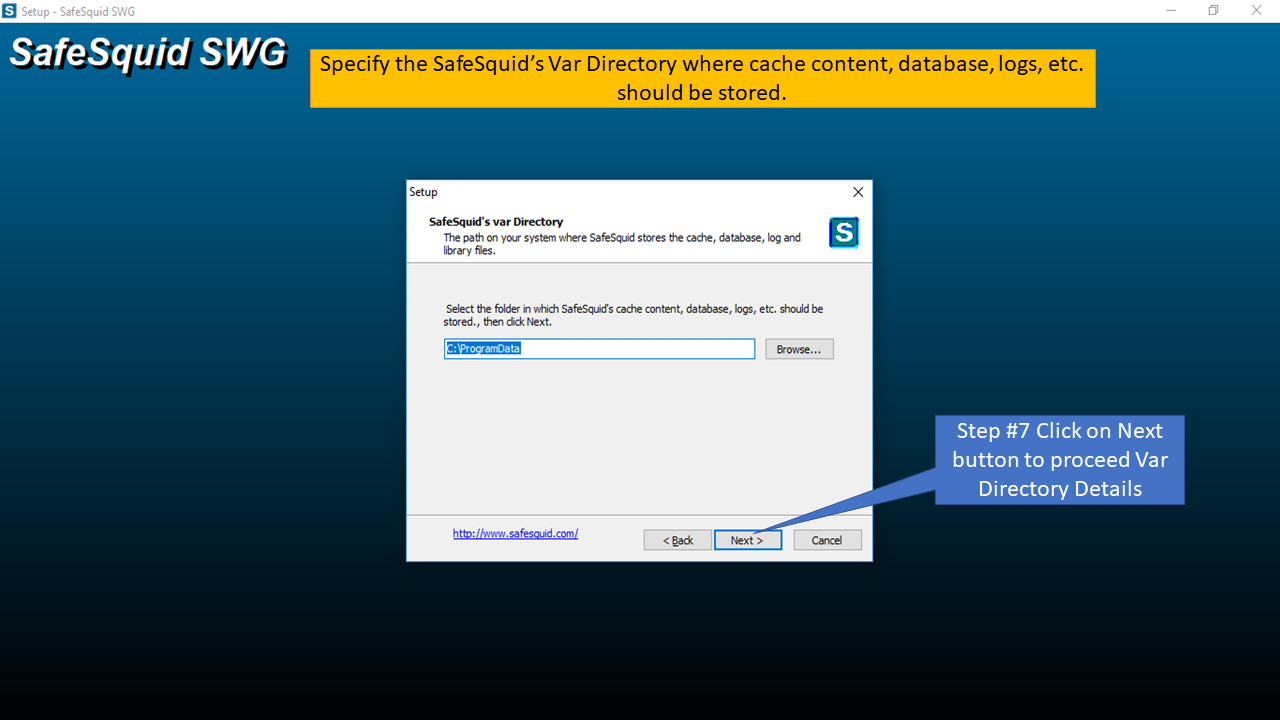 |
|
8. Click on 'Next' button to continue with default Usr directory path OR select a different path. SafeSquid service will use this path to store policies, SSL certificates and Web-GUI supporting files. 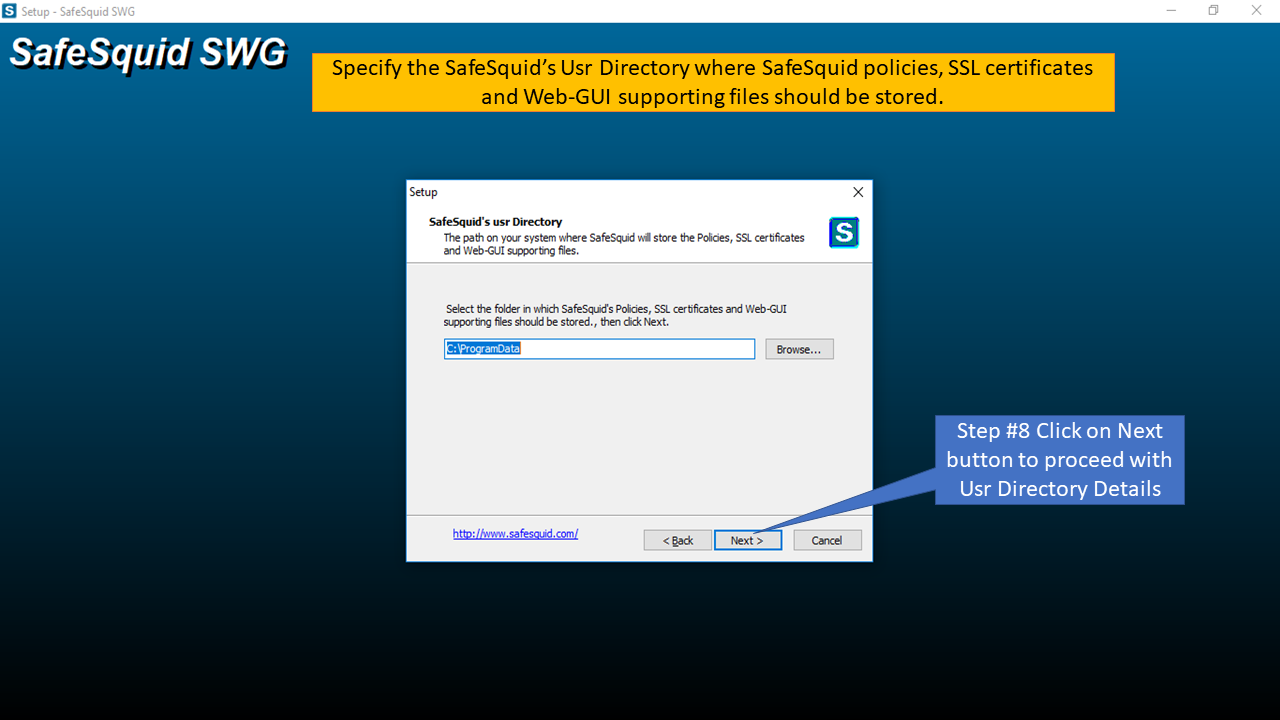 |
|
9. Click on 'Next' button to continue with default Log directory path OR select a different path. SafeSquid service will use this path to store all type of Log files. 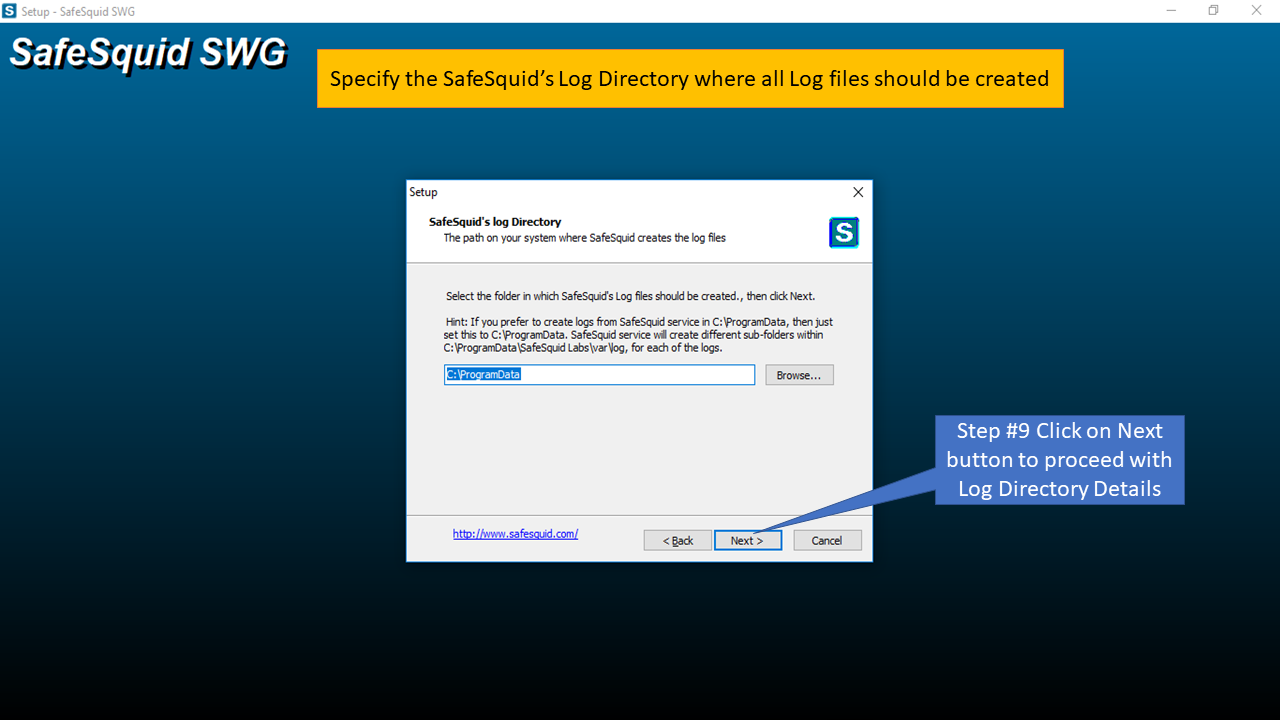 |
|
10. Click on 'Next' button to continue with default option OR select different path to store SafeSquid shortcuts. 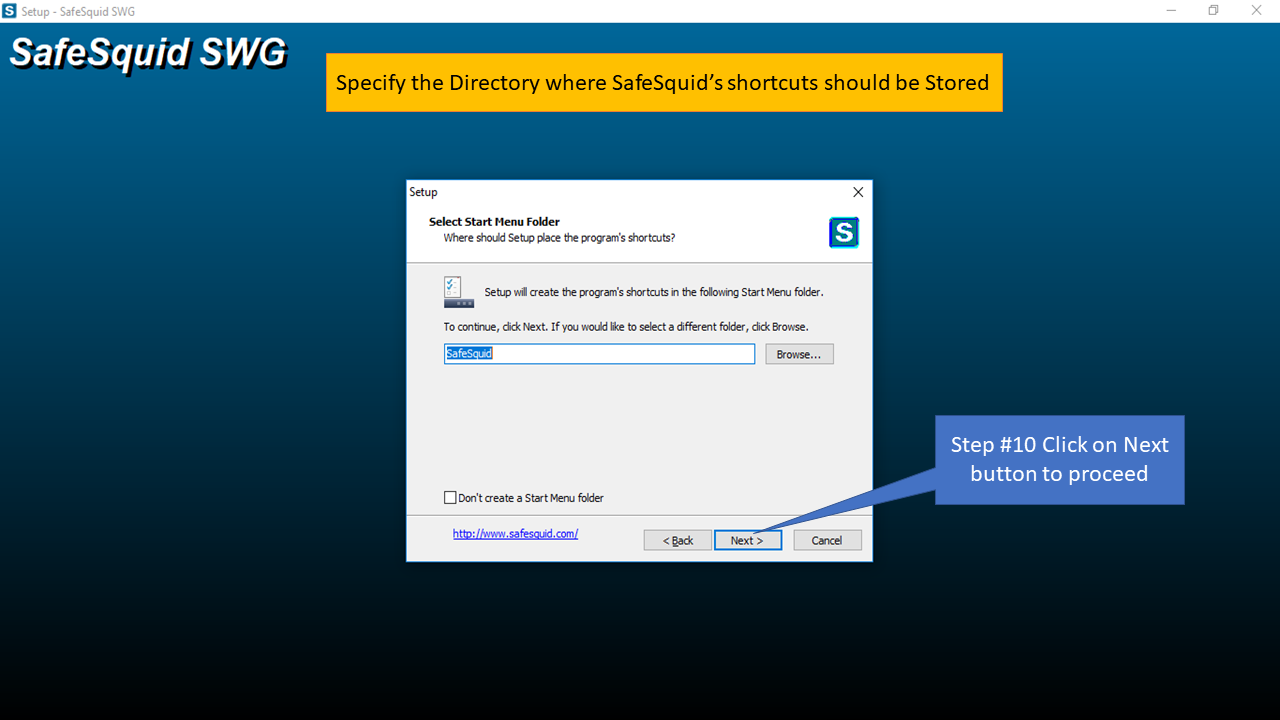 |
|
11. Select whether Desktop and QuickLaunch Icon be created for SafeSquid's Service Manager. Click on 'Next' button to continue with installation. 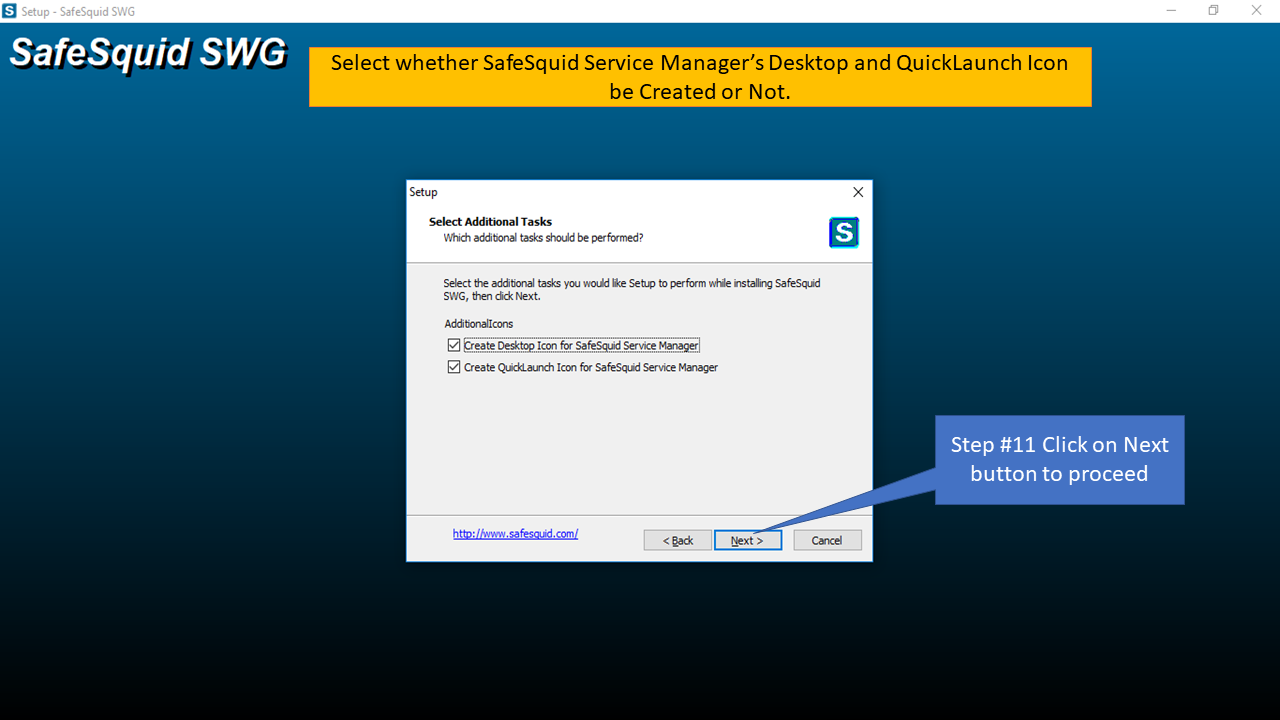 |
|
12. Your preferred settings are displayed for review. Click on 'Back' button and traverse till the page to change any of setting. Click on 'Install' button to proceed with current installation settings. 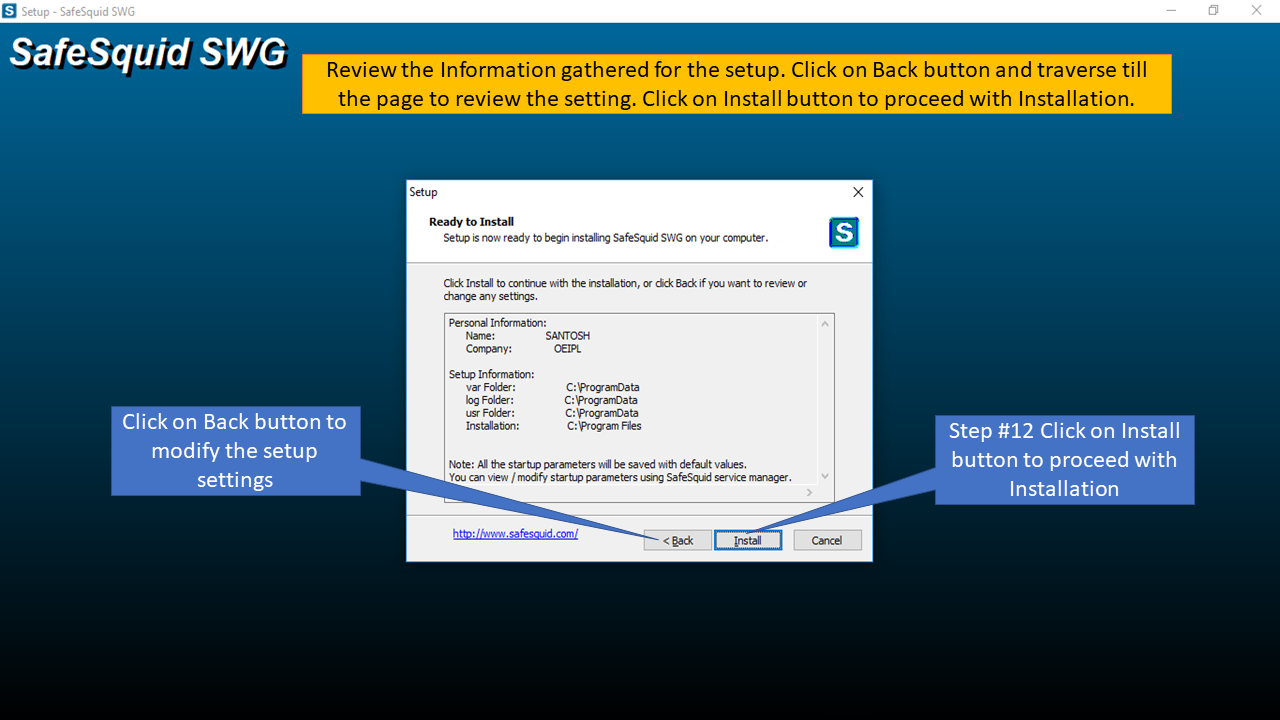
|
|
You can click on 'Cancel' button in between to stop the installation Process. 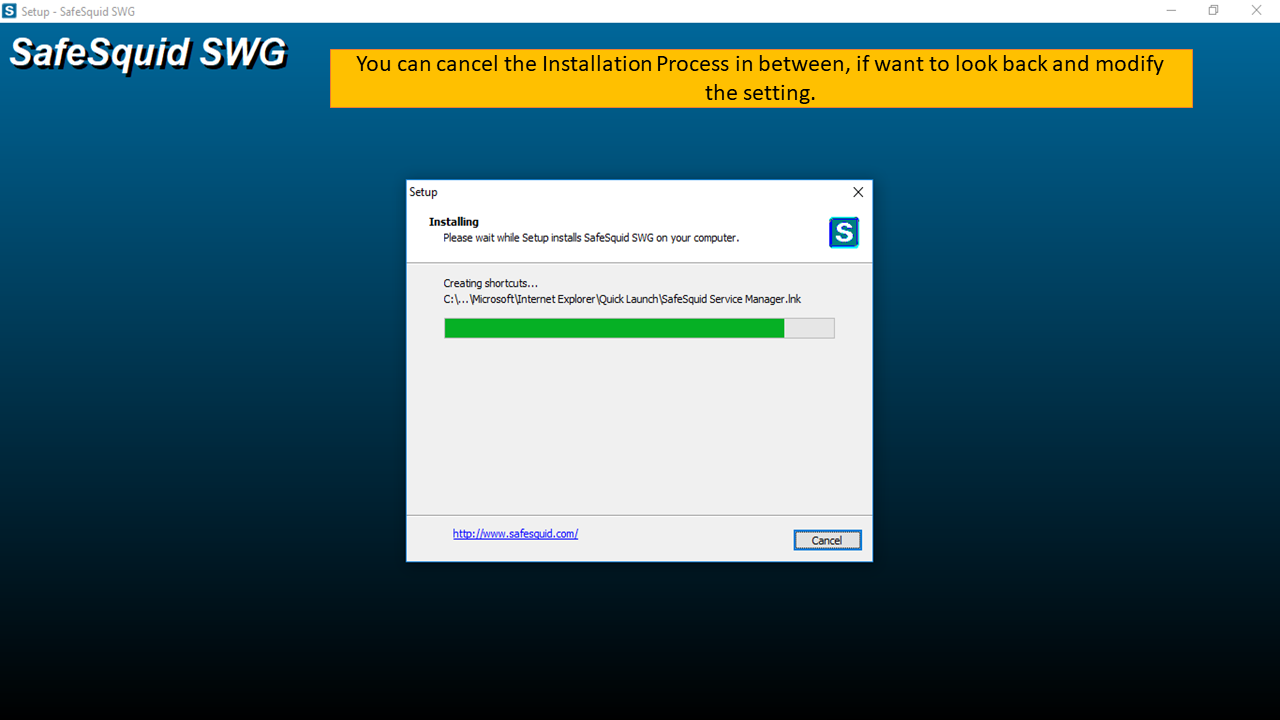 |
|
13. Post Installation information page is displayed for your reference. Click 'Next' button to continue with setup. 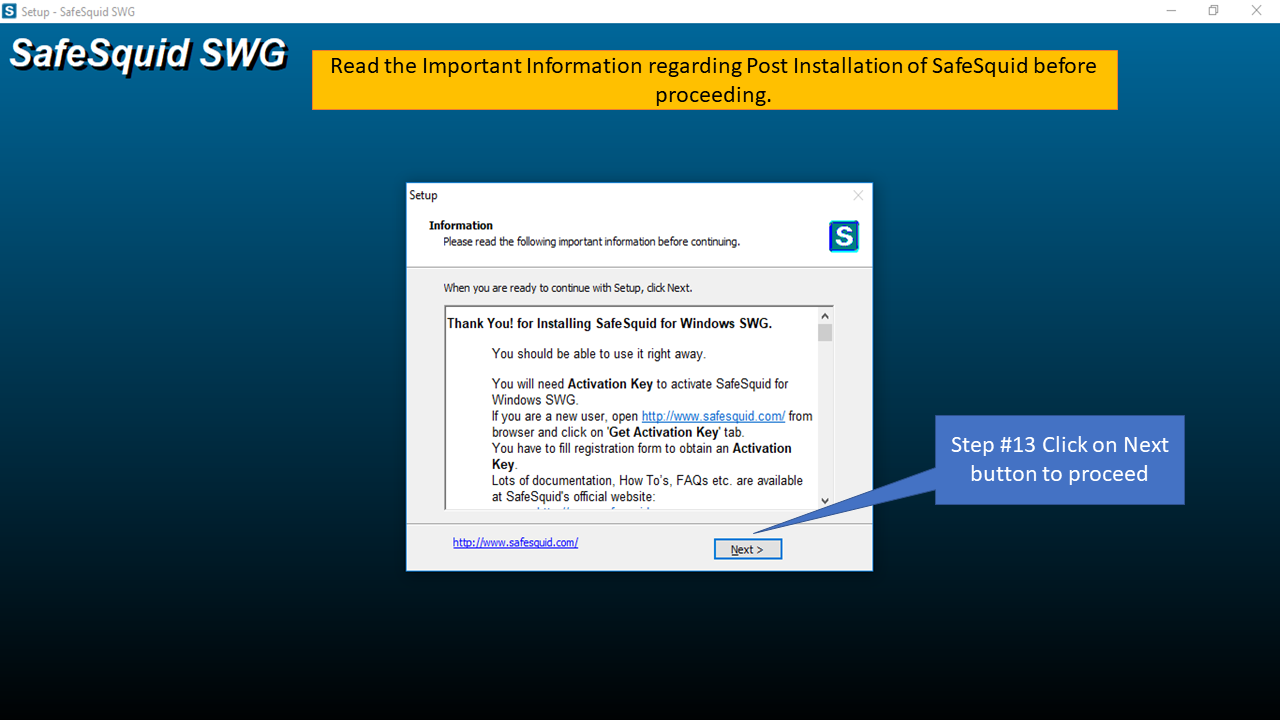 |
|
14. Your installation process is completed. You have to Activate the Product before using it. 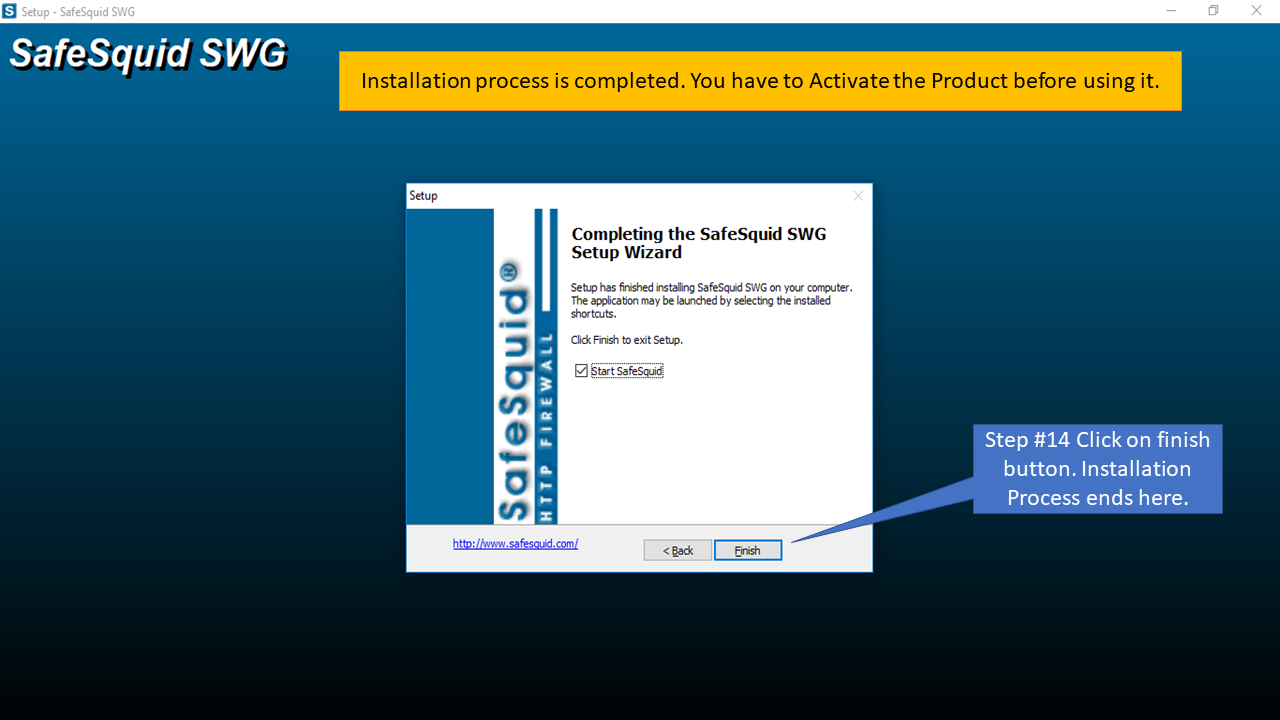 |
|
15. You will find Installation Log at the end of Product Installation. This log will provide you detail information about installation, whether its completed with any problem or not. 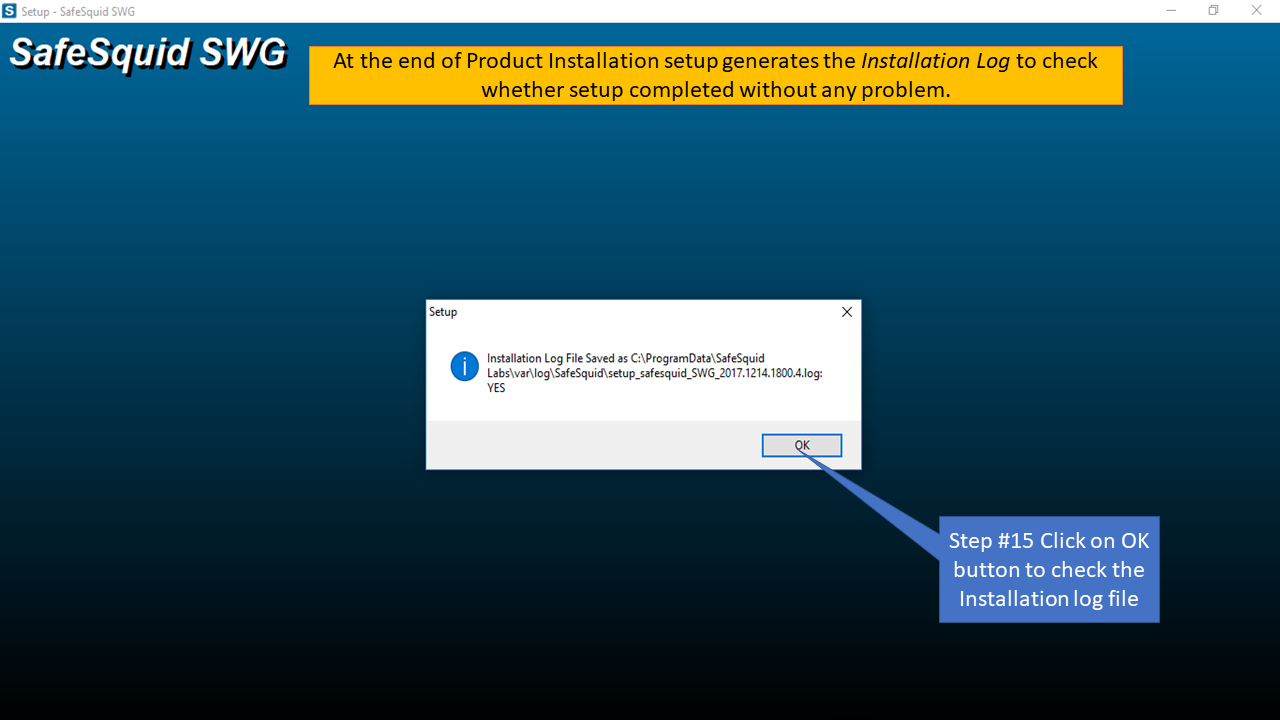 |
|
SafeSquid Service Manager can used to be accessed from the Quick Launch ToolBar(if you opted for it), or from Windows Desktop(if you opted for it). 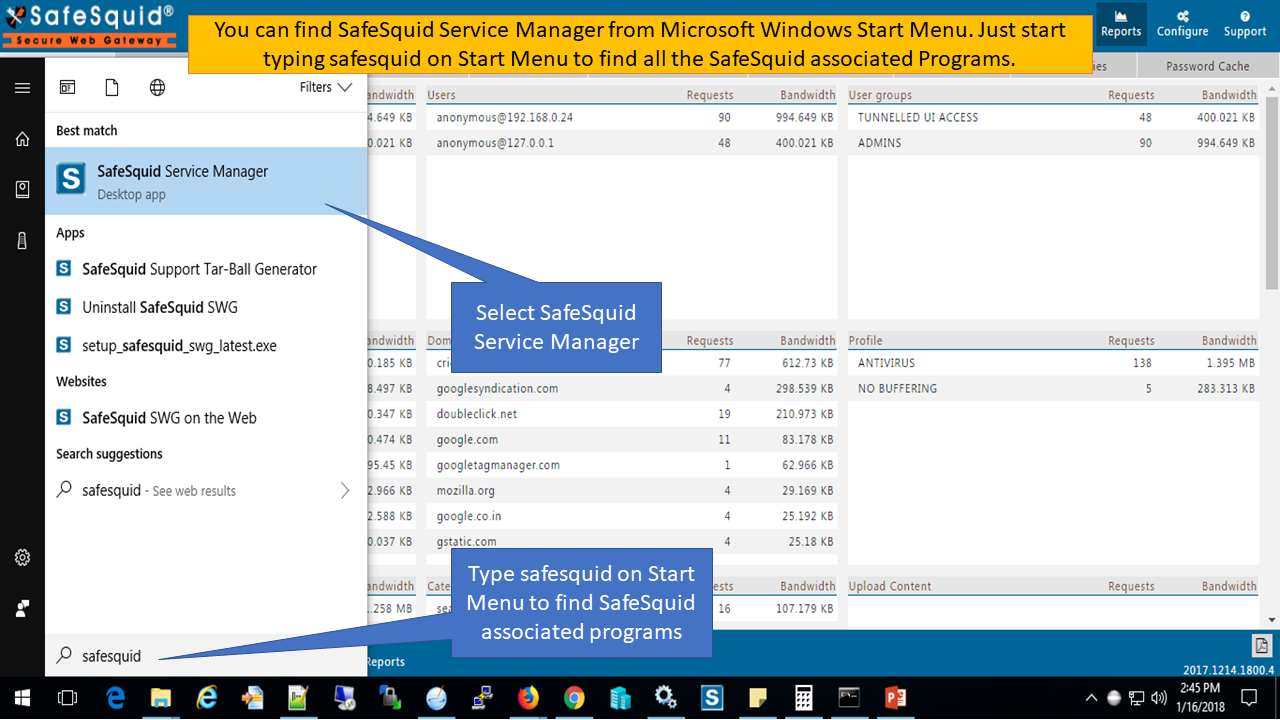 |
|
To Restart the SafeSquid Service select 'Restart the SafeSquid Service' and click on 'Next' button. 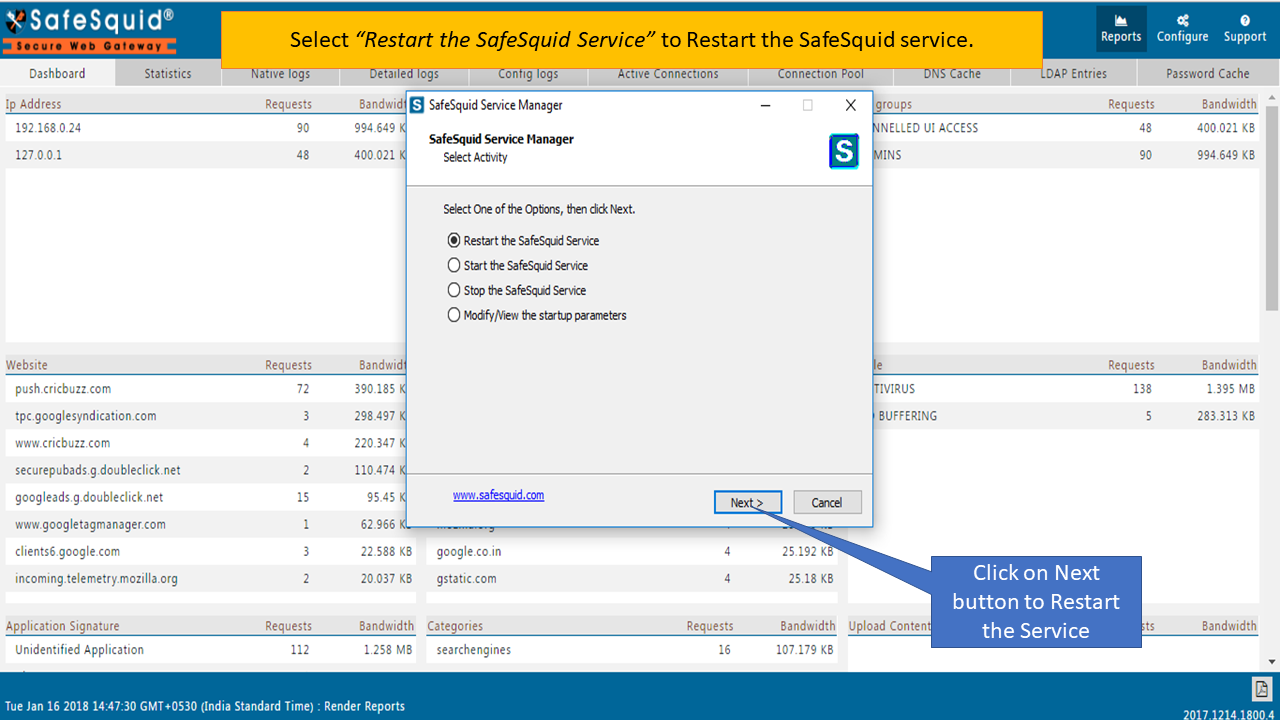 |
|
To Start the SafeSquid Service select 'Start the SafeSquid Service' and click on 'Next' button. 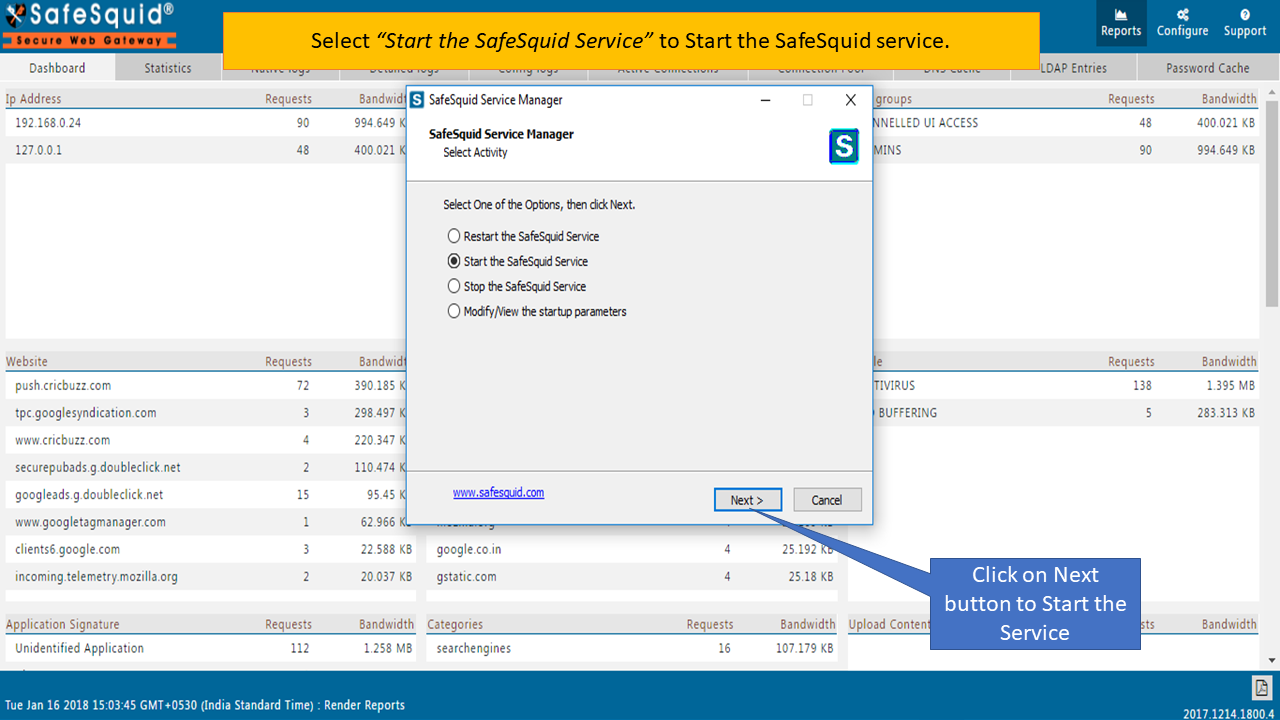 |
|
To Stop the SafeSquid Service select 'Stop the SafeSquid Service' and click on 'Next' button. 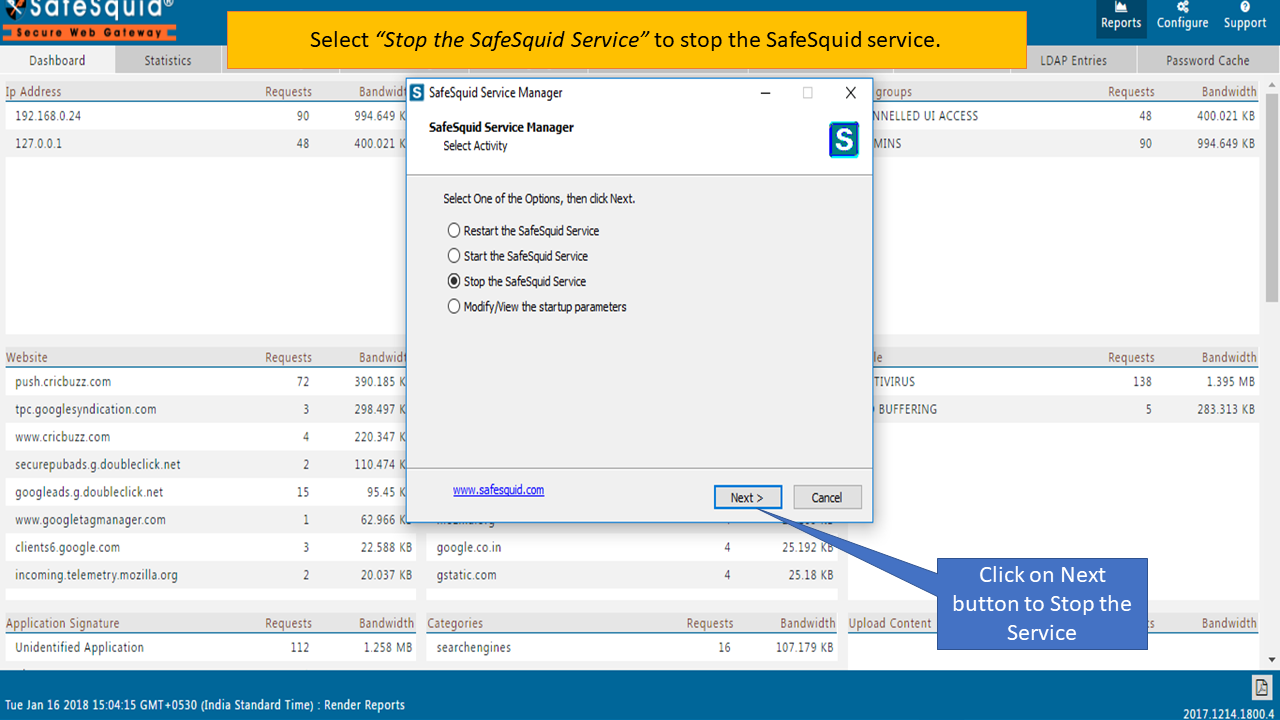 |
|
To modify/view the startup parameters select 'Modify/View the startup parameters' and click on 'Next' button. 1. Steps to start modify/view the startup parameters. 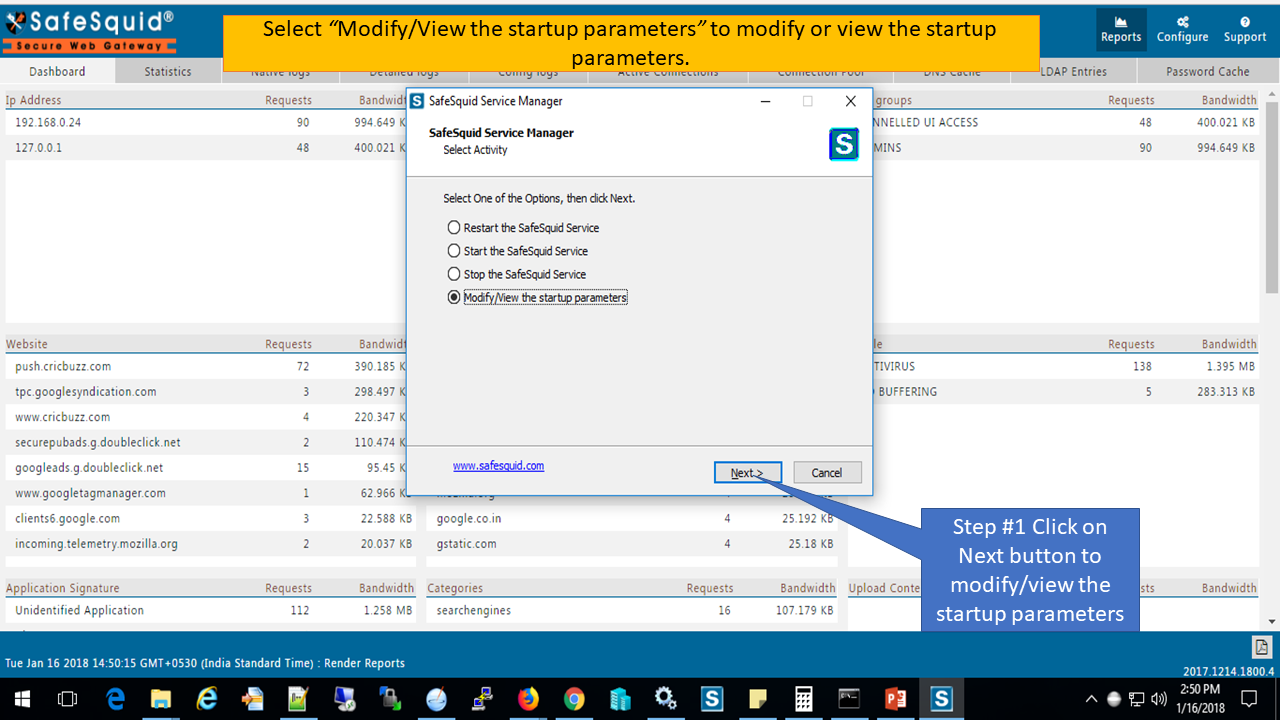 |
|
2. Select the checkbox(es) that you would like SafeSquid Native Log to store. Selecting too many options could effect the size of the log file. Click on 'Next' button to continue with default selections. 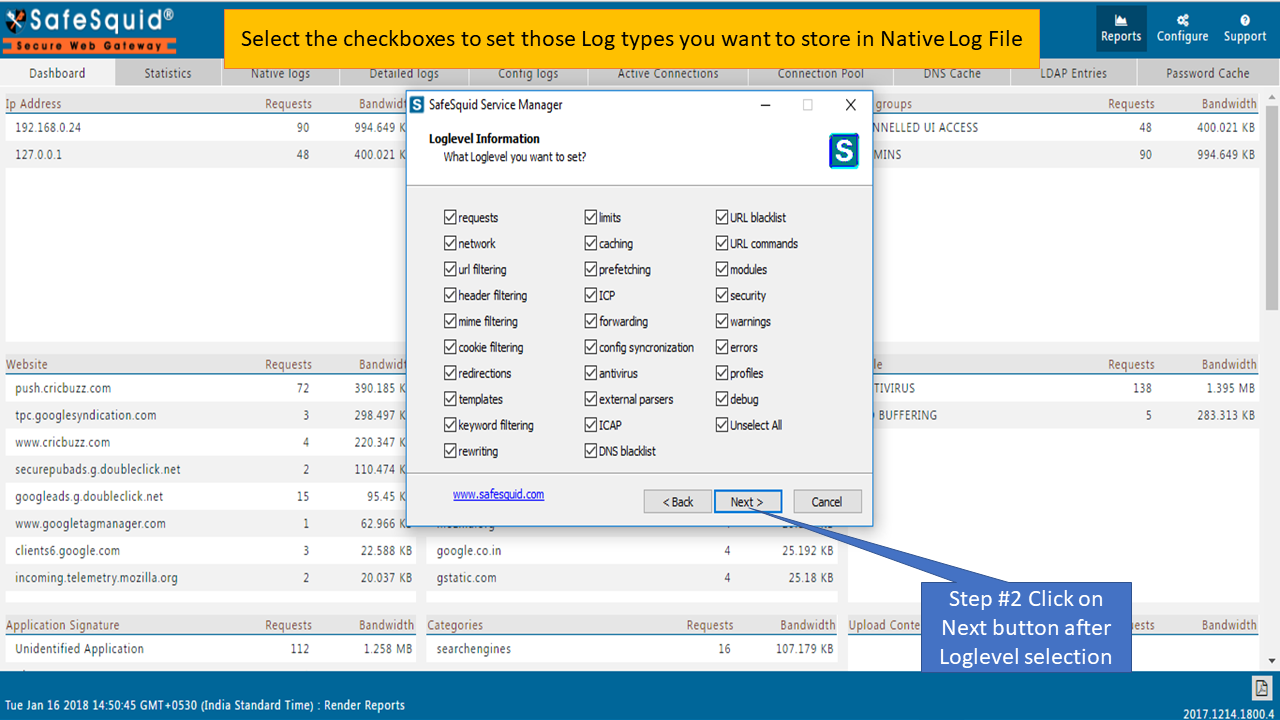 |
|
3. Select maximum Log Size Limit in bytes to store on disk. Also set what action to be taken after this limit is reached. Click 'Next' button to continue with default option. 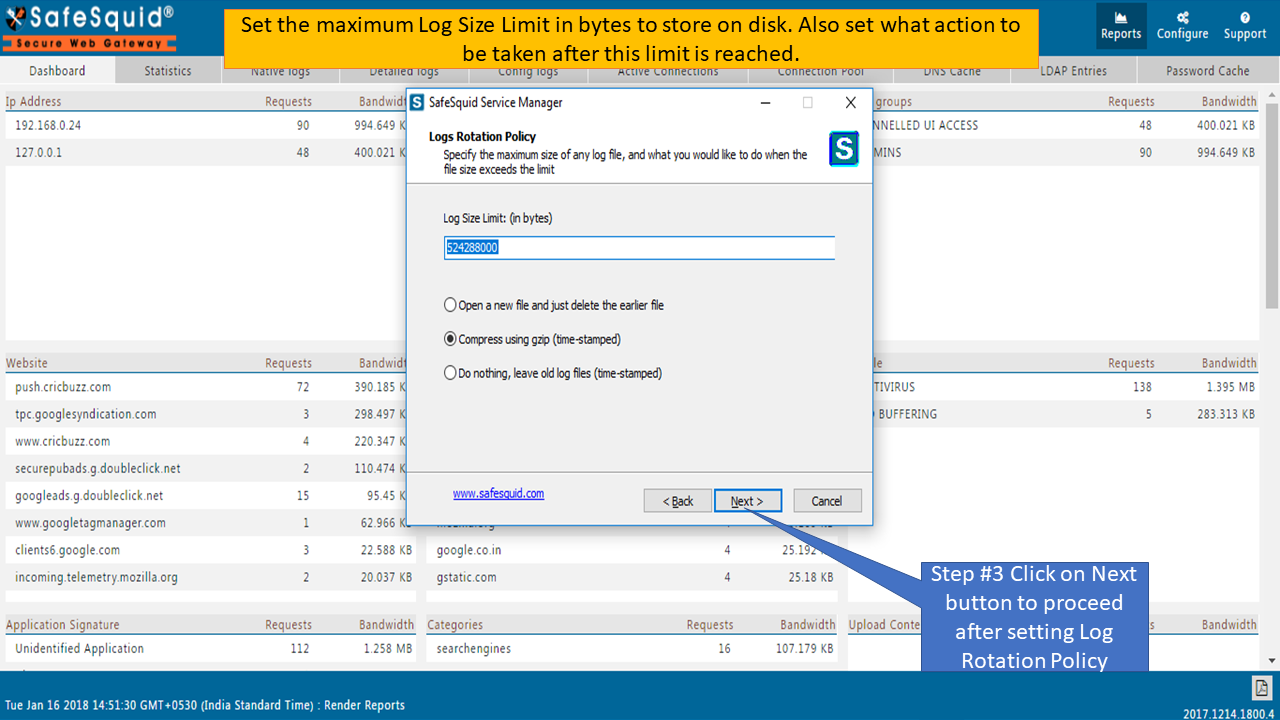 |
|
4. Enter IP Address and Port on which SafeSquid should listen, or click 'Next' button to continue with default option. 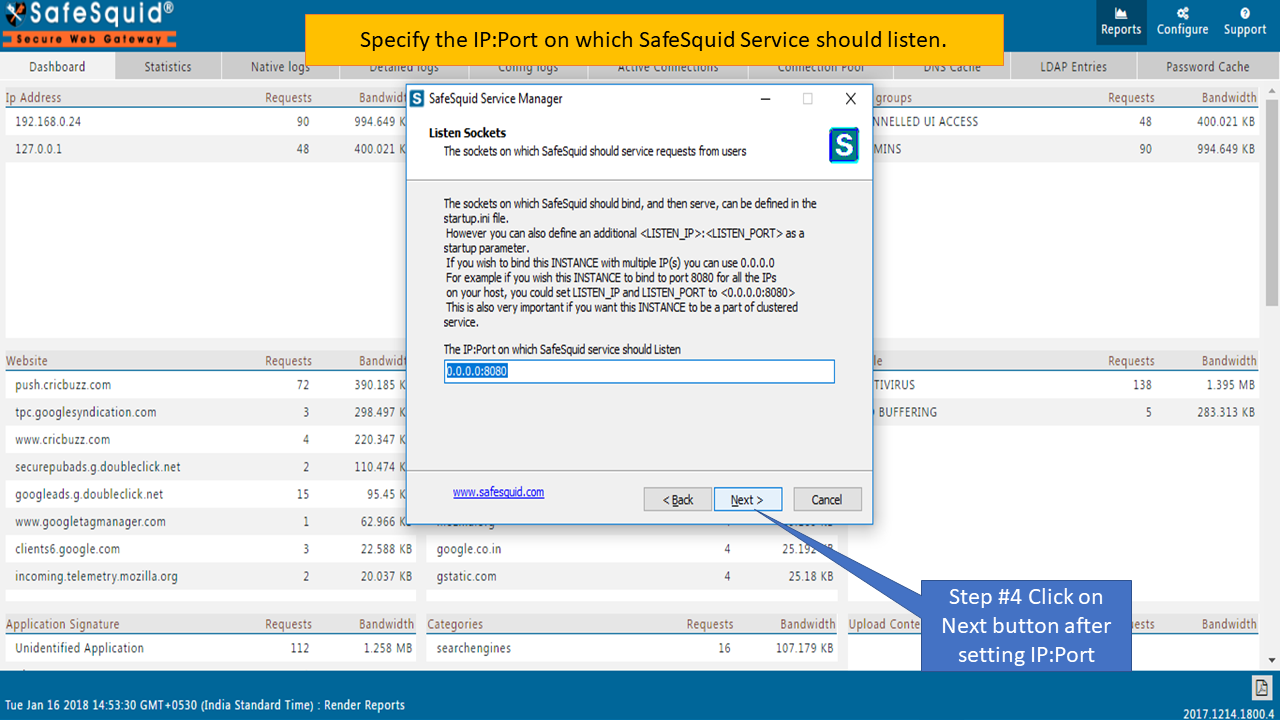 |
|
5. Define Master Server in a Master-Slave installation. Stand-Alone Setup: This option is only effective, if you are setting up a SafeSquid Slave Server to an existing SafeSquid Master Server. If you are setting up a stand-alone server, ignore this option (leave it blank) and click 'Next' button to continue. SafeSquid Slave Setup: If you are setting up a SafeSquid Slave Server to an existing SafeSquid Master Server, specify either FQDN:PORT or IP:PORT of the Master Server, on which Master SafeSquid Server is listening, to synchronize configuration from the Master Server. 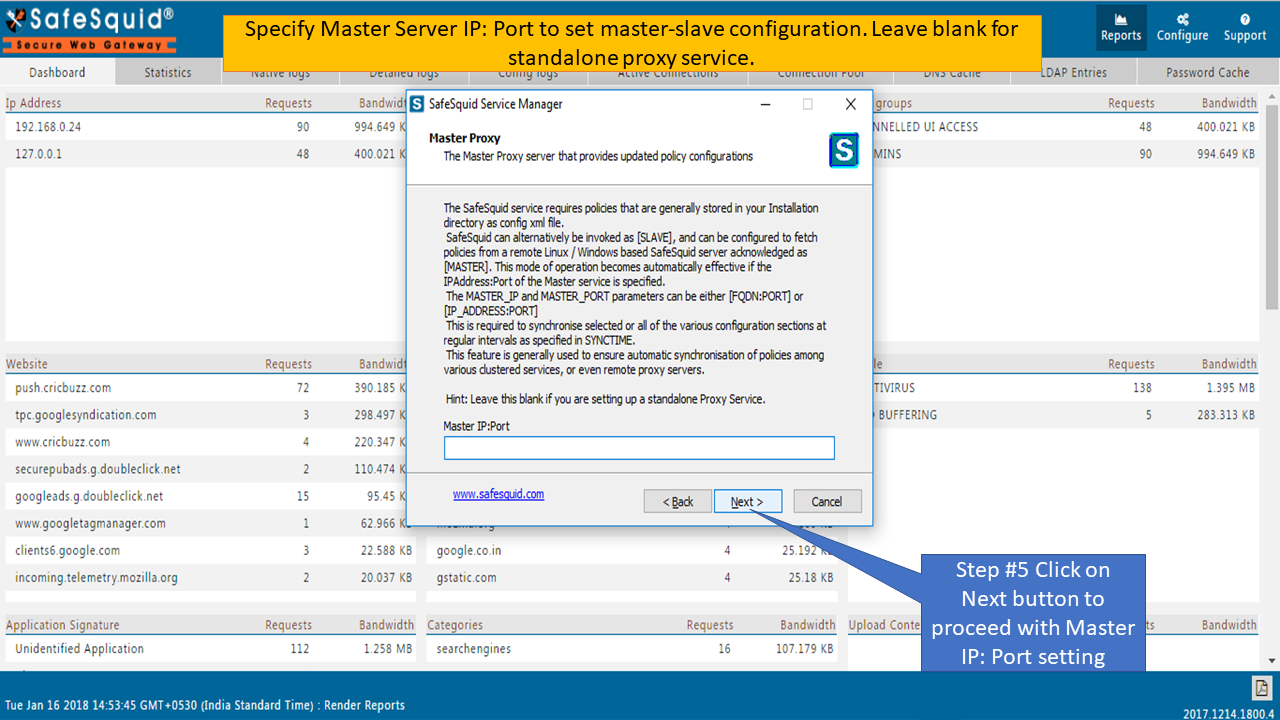 |
|
6. Specify the Buffer sizes for Inbound and Outbound Sockets to improve the performance. Click on 'Next' button to continue with default option. 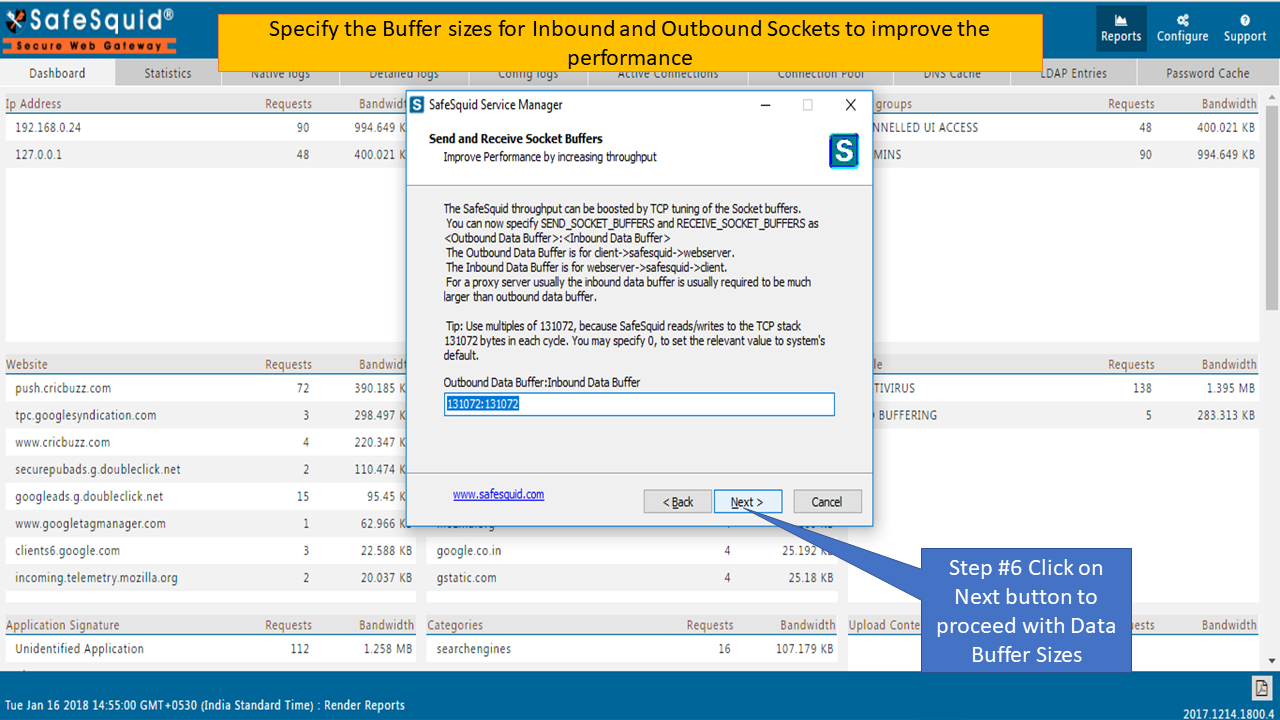 |
|
7. Specify the TCP Keepalive parameters to improve overall stability and system resource utilization. Click 'Next' button to continue with default value(Recommended). 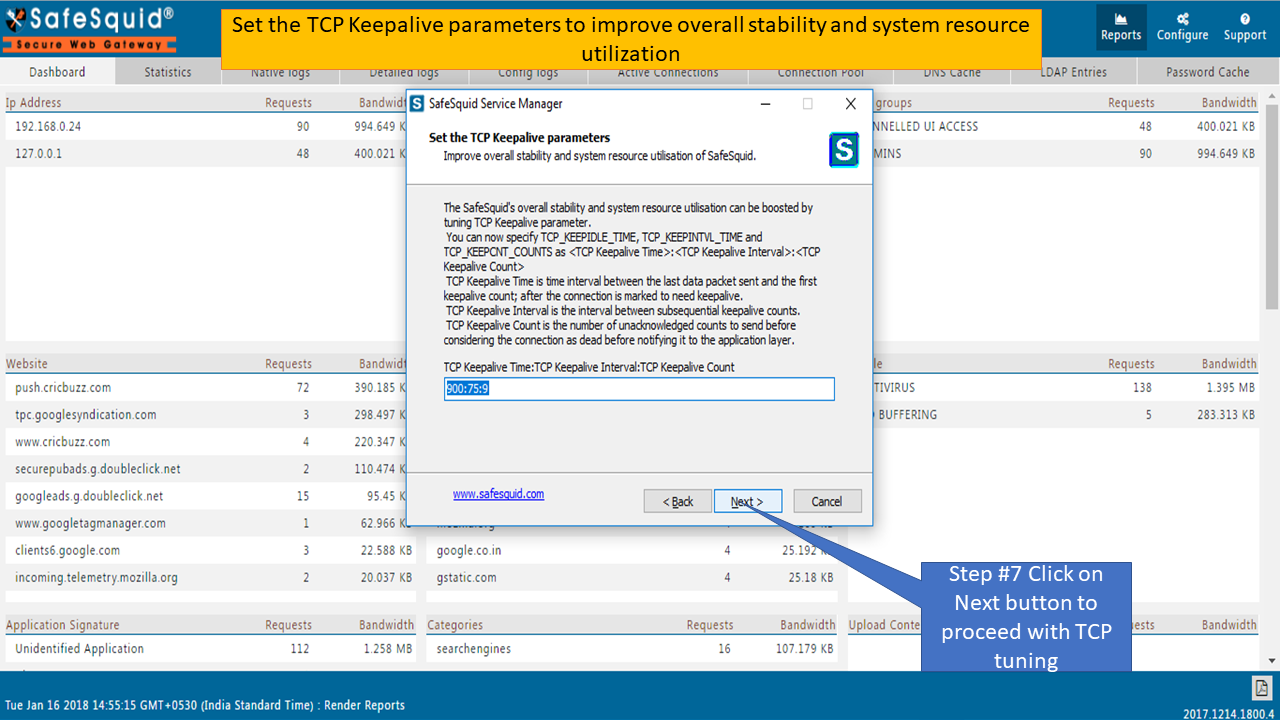 |
|
8. Specify the Password cache size with expiry time(in seconds) to reduce latency when authentication is required from remote authentication system i.e. ADS / LDAP server. Click 'Next' button to continue with default settings. 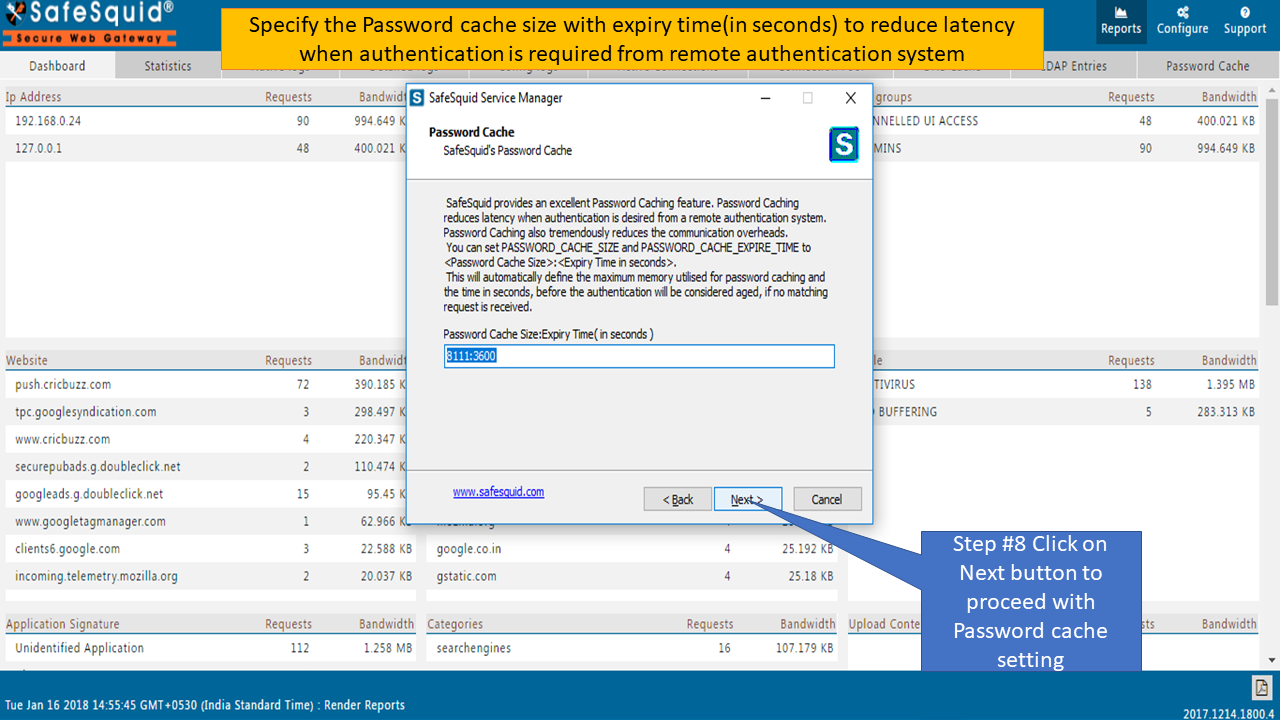 |
|
9. Specify the comma separated list of section names which should not be synchronized. Always include cache section since each service instance has its own set of cached objects. 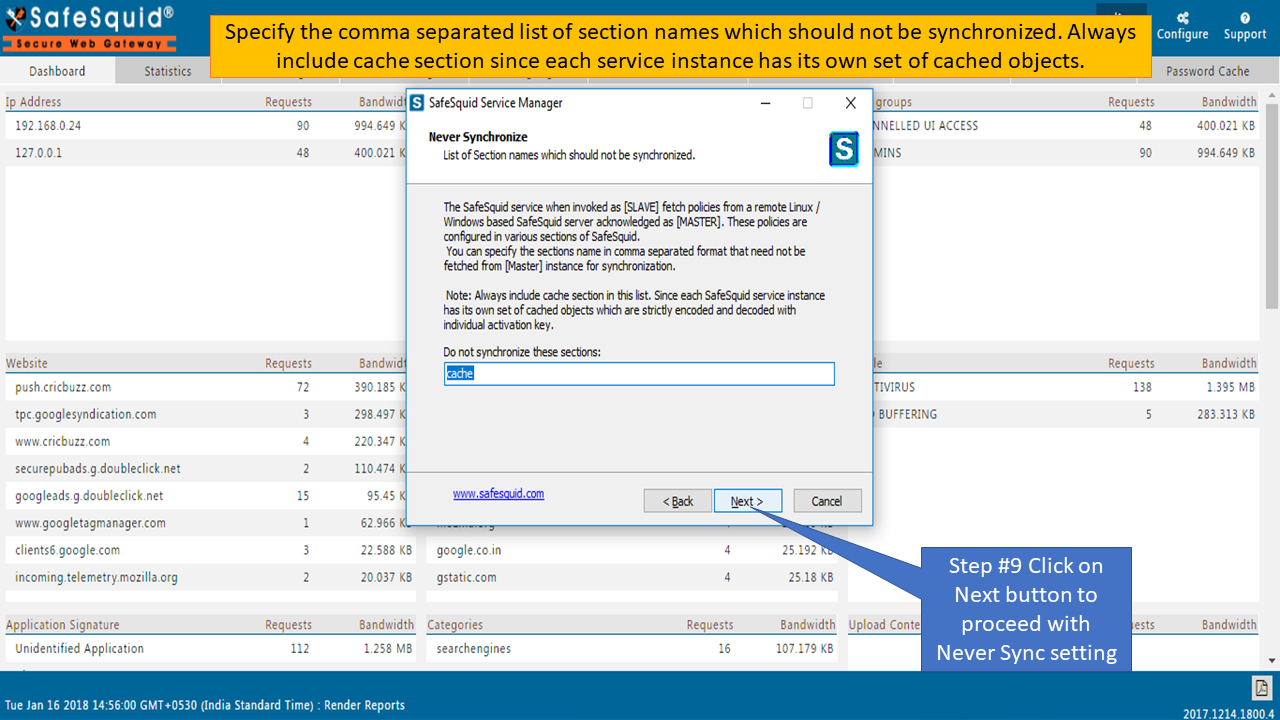 |
|
10. Specify the comma separated list of sections for synchronization with Master-Slave configuration. Leave blank for synchronizing every sections of SafeSquid except cache section. 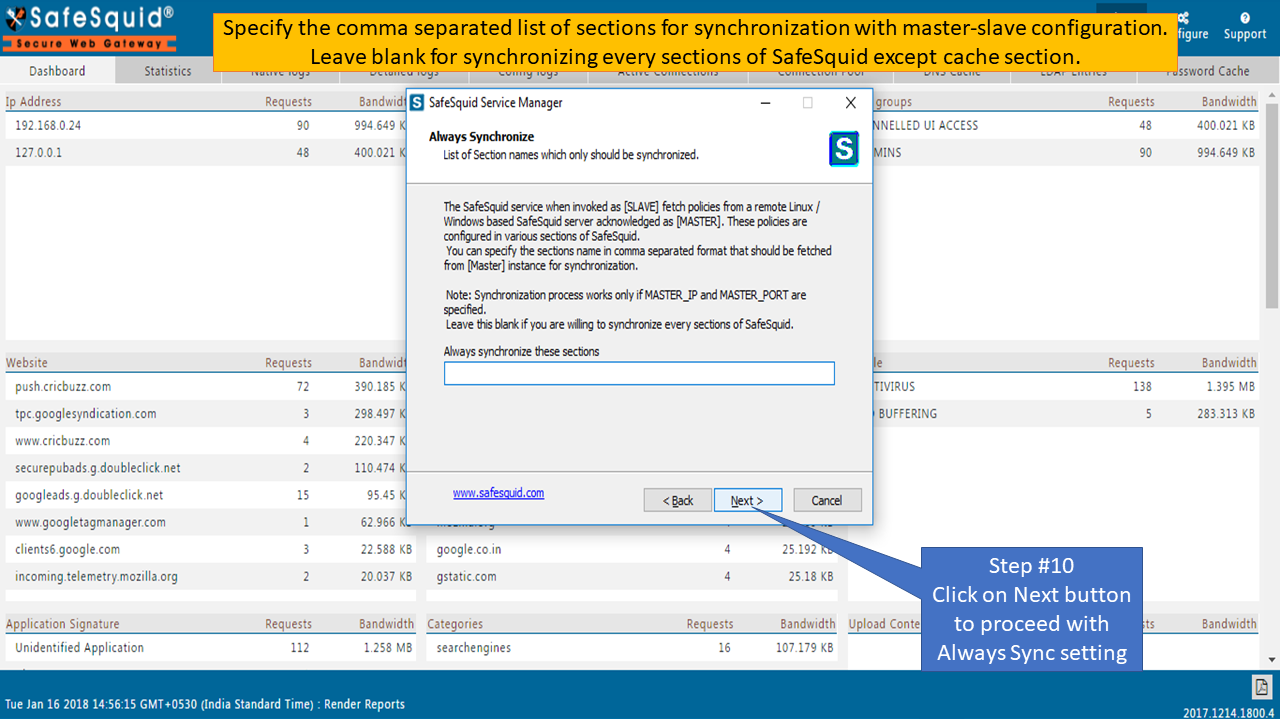 |
|
11. Specify the synchronization time in seconds for Master-Slave installation. Click 'Next' button to continue with default option. 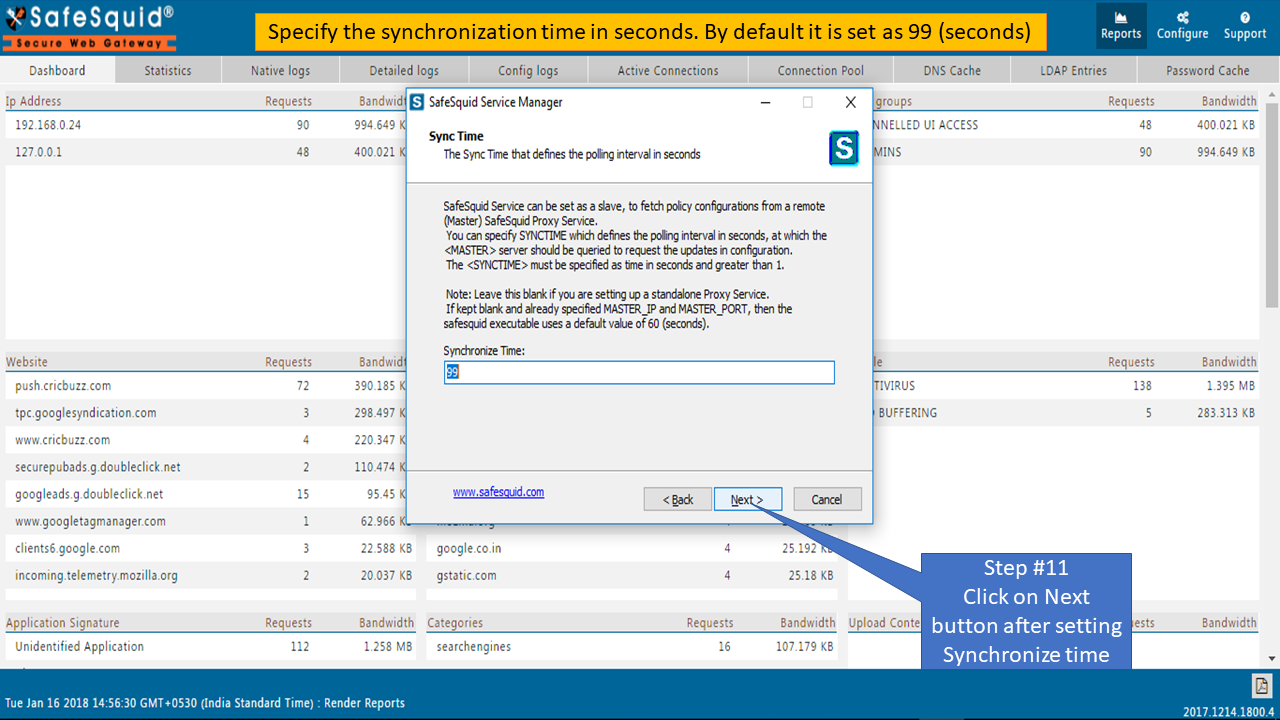 |
|
12. Specify the Stack size to allocate memory for each posix thread. Click 'Next' button to continue with default option. 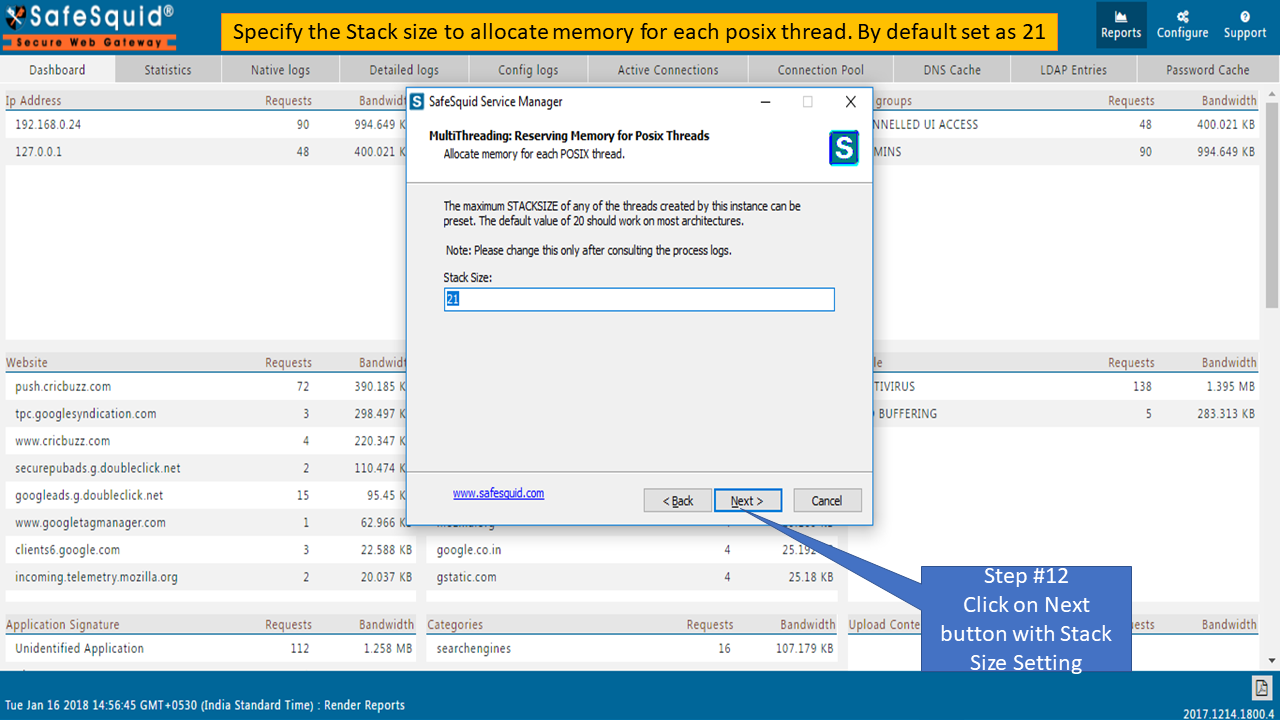 |
|
13. Specify the Overload factor value. Click on 'Next' button to continue with default option. 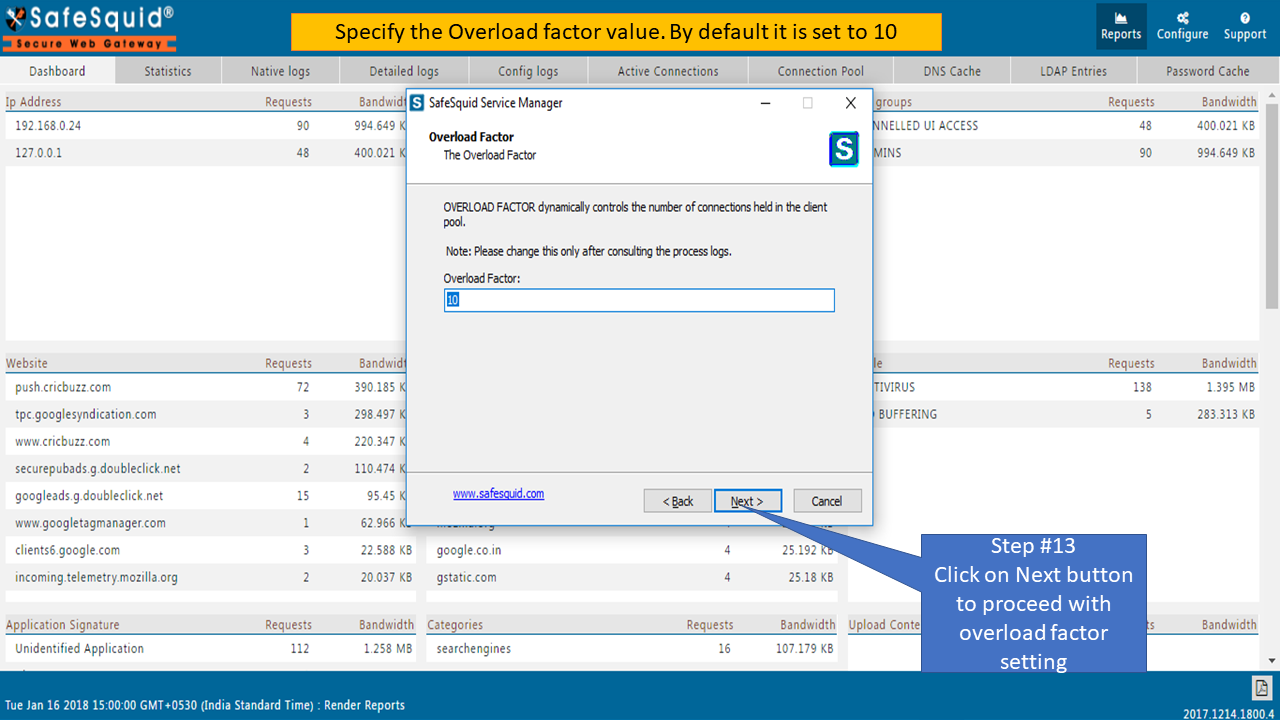 |
|
14. Specify the socket Timeout value. Click 'Next' button to continue with default option. 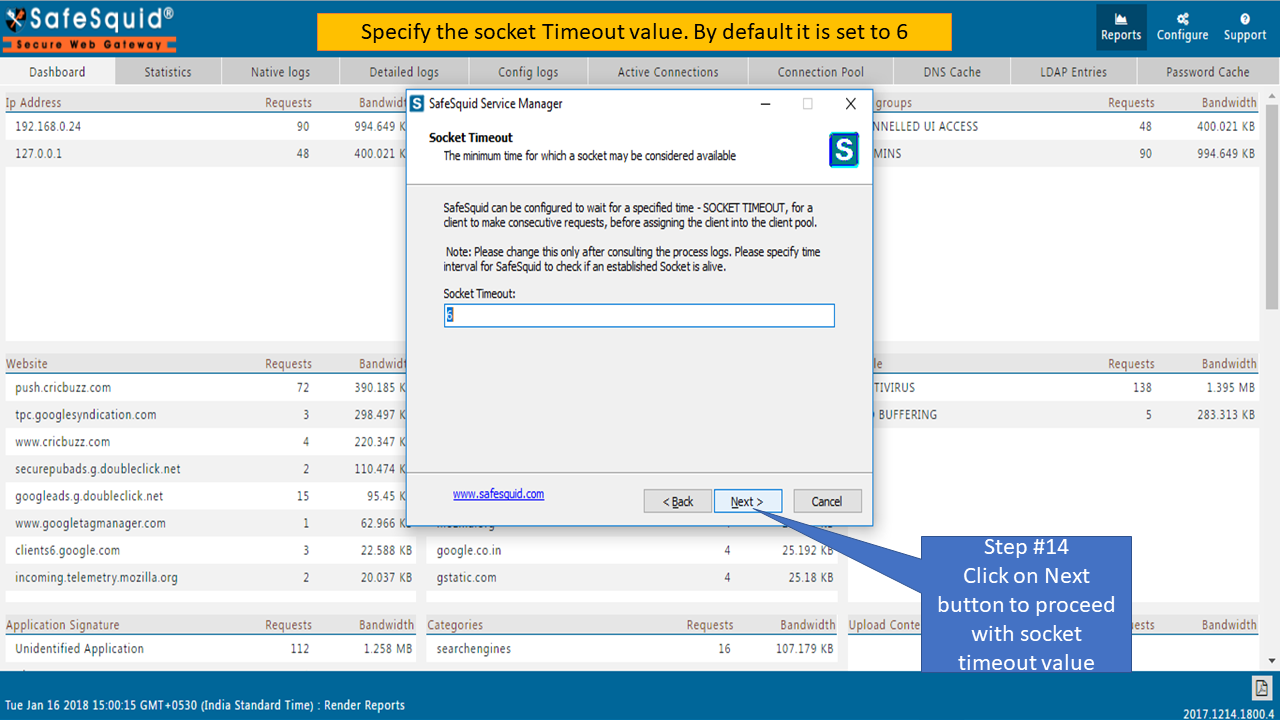 |
|
15. Specify the Thread Timeout value. Click 'Next' button to continue with default option. 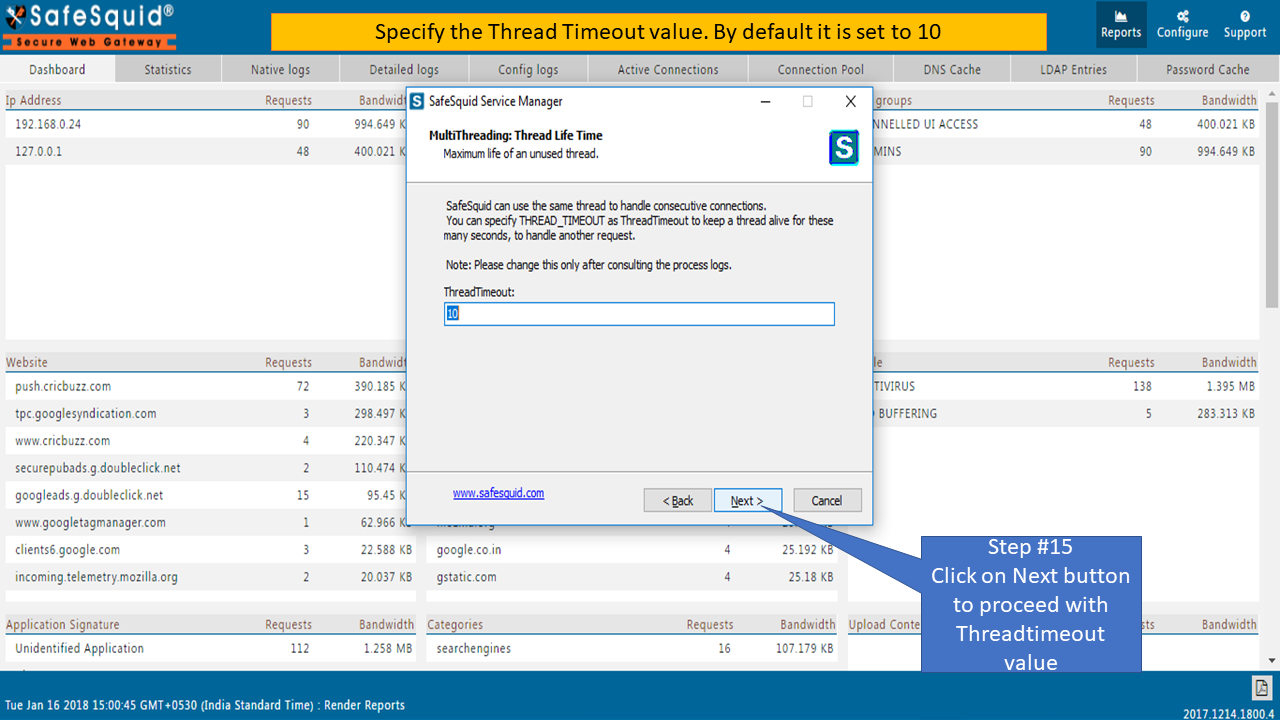 |
|
16. Enter a different HOSTNAME to identify this proxy host. Hostname is the name by which the proxy host or service name is referred to in the profile section. Click 'Next' button to continue. 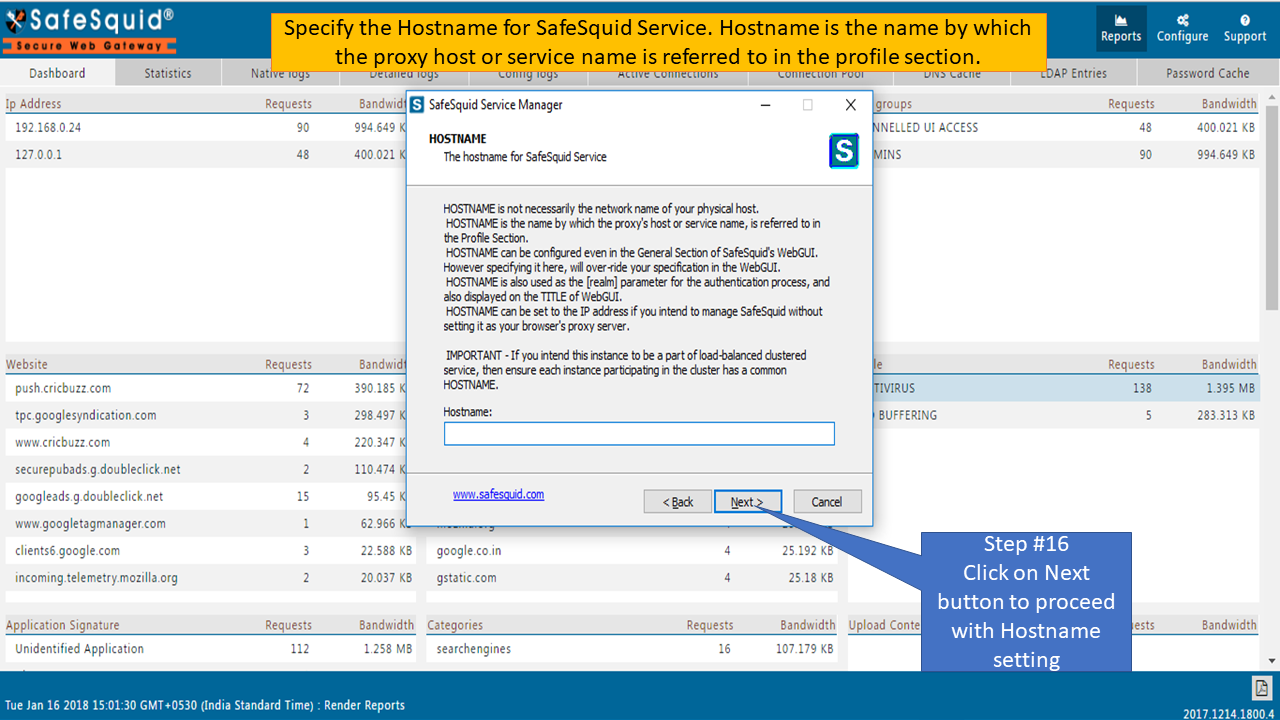 |
|
17. Specify the Domain name for SafeSquid server. Click 'Next' button to continue. 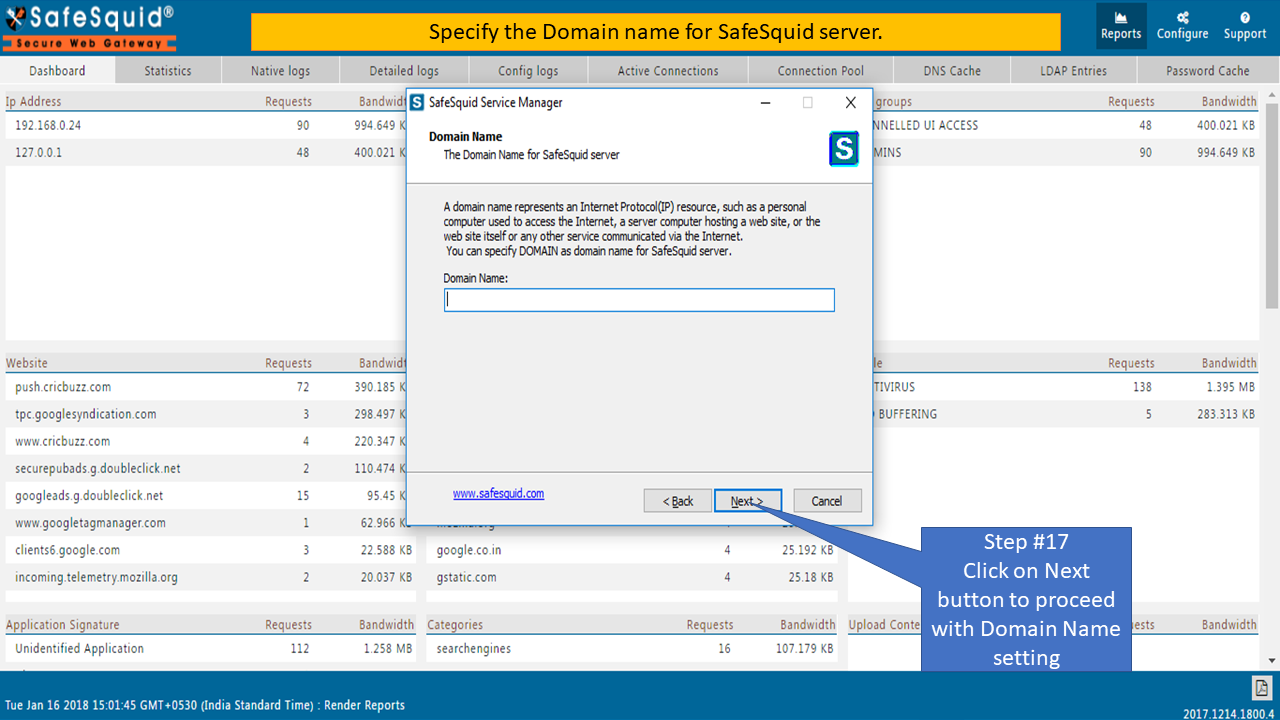 |
|
18. Specify the maximum concurrent requests ad maximum number of handles, to preserve the system stability. Click 'Next' button to continue with default option(Recommended). 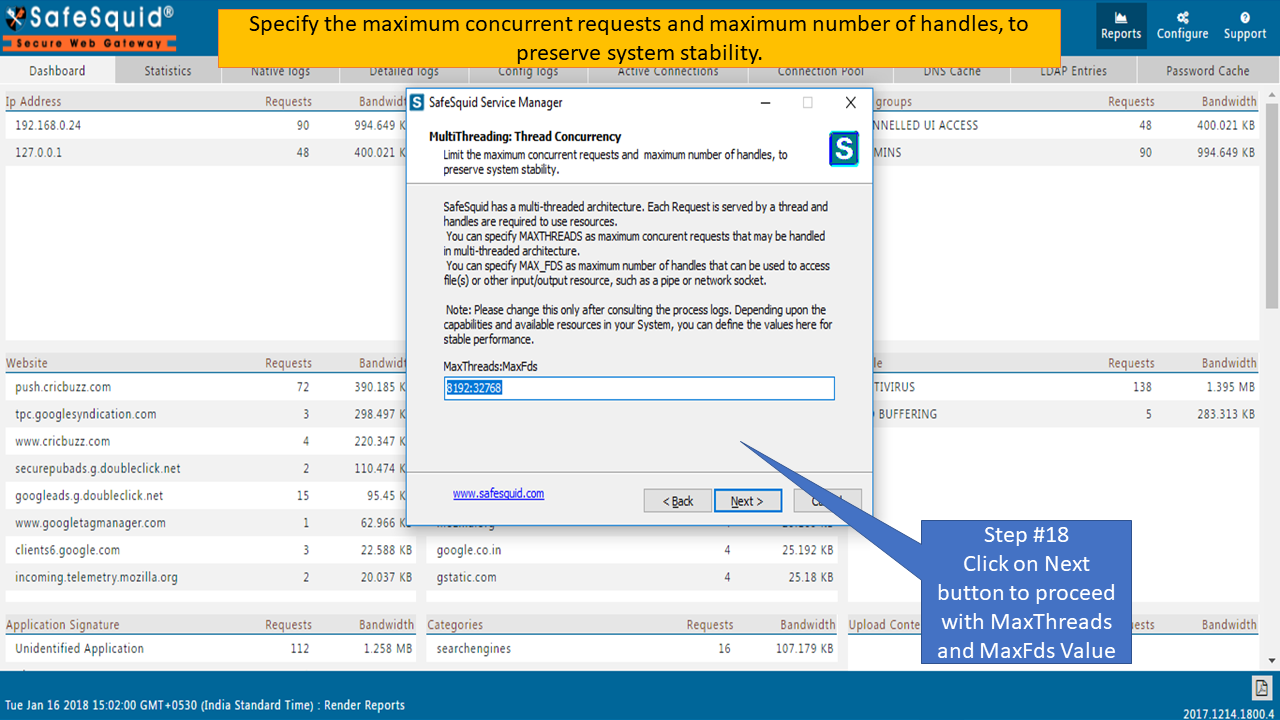 |
|
19. Specify the UDP Sockets to write logs on UDP server. Click 'Next' button to continue. 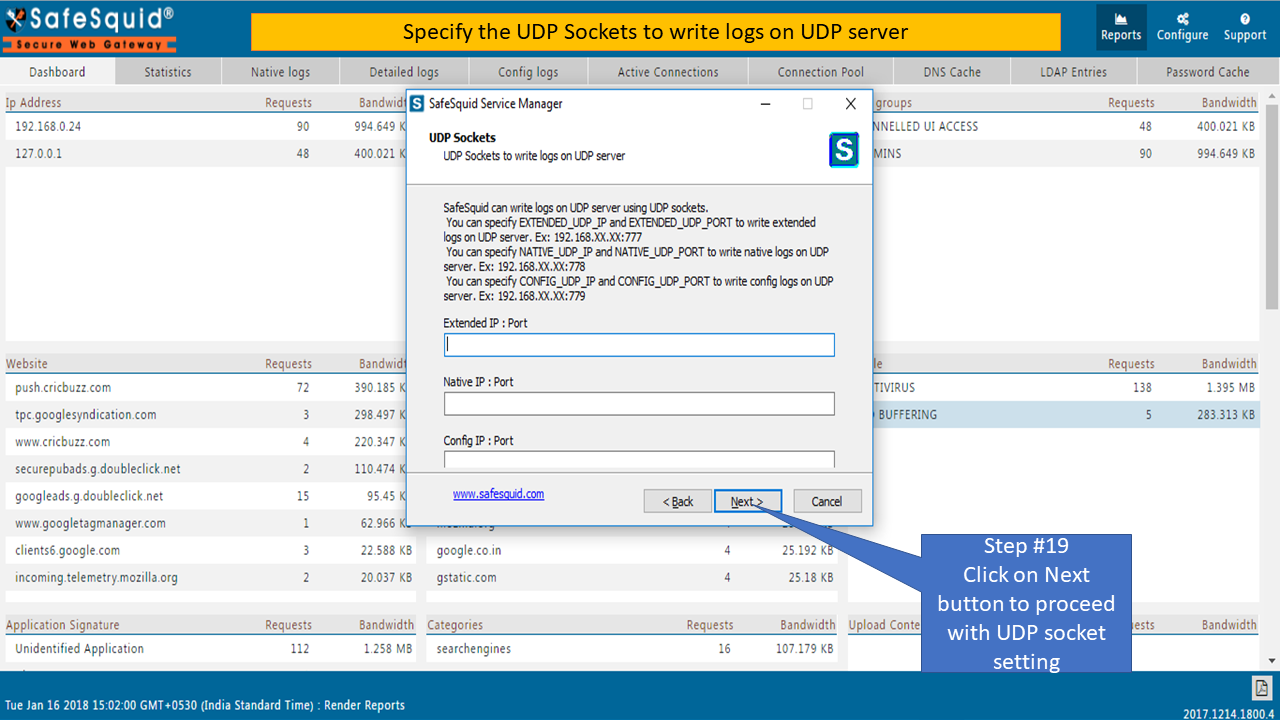 |
|
20. Specify the System Proxy which will be used or Forwarding. Click 'Next' button to continue. 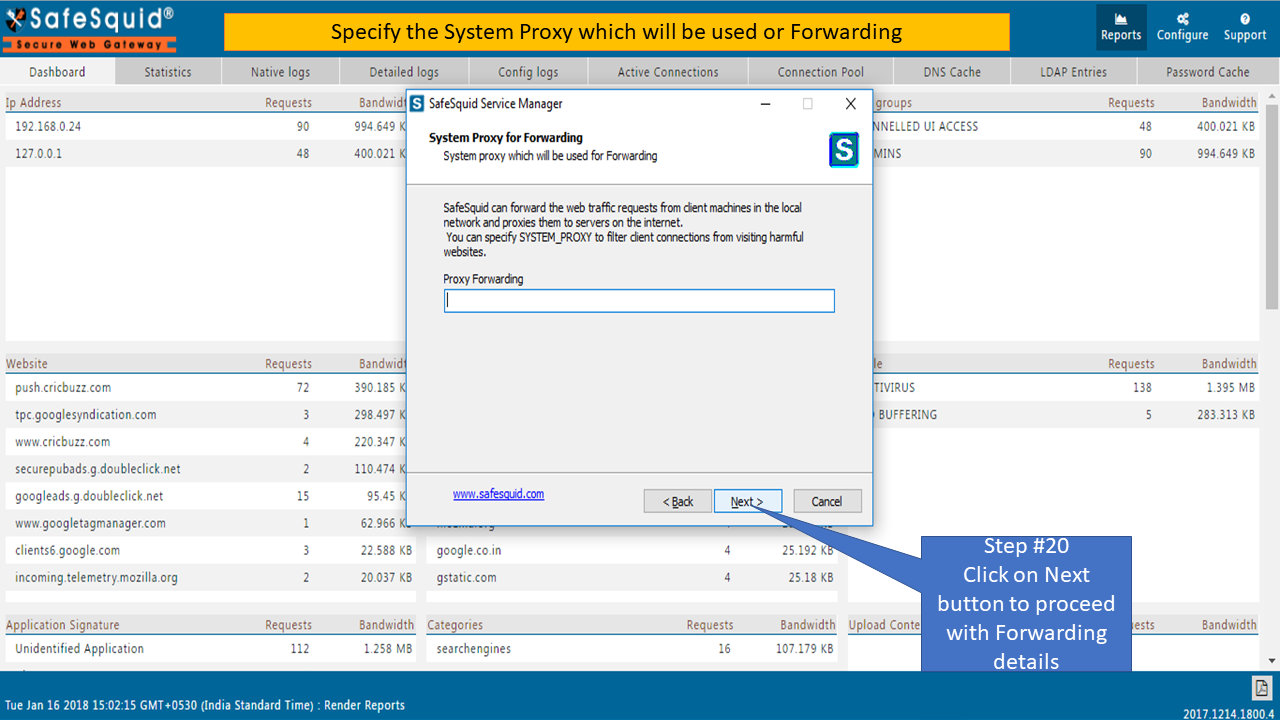 |
|
21. Select “Select to Save” checkbox to Save modified Startup parameters. Click 'Next' button to continue. Note: You will have to Restart SafeSquid Service for the changes to take effect. 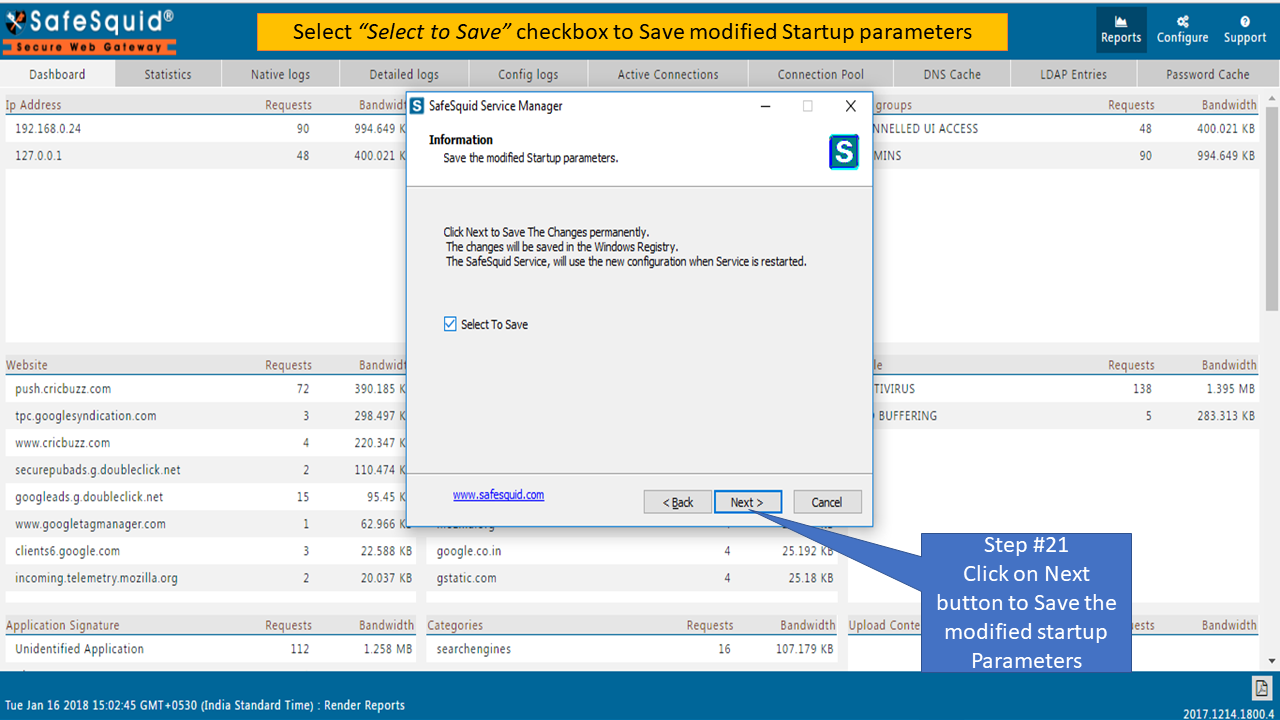 |
|
SafeSquid Support Tar-Ball Generator 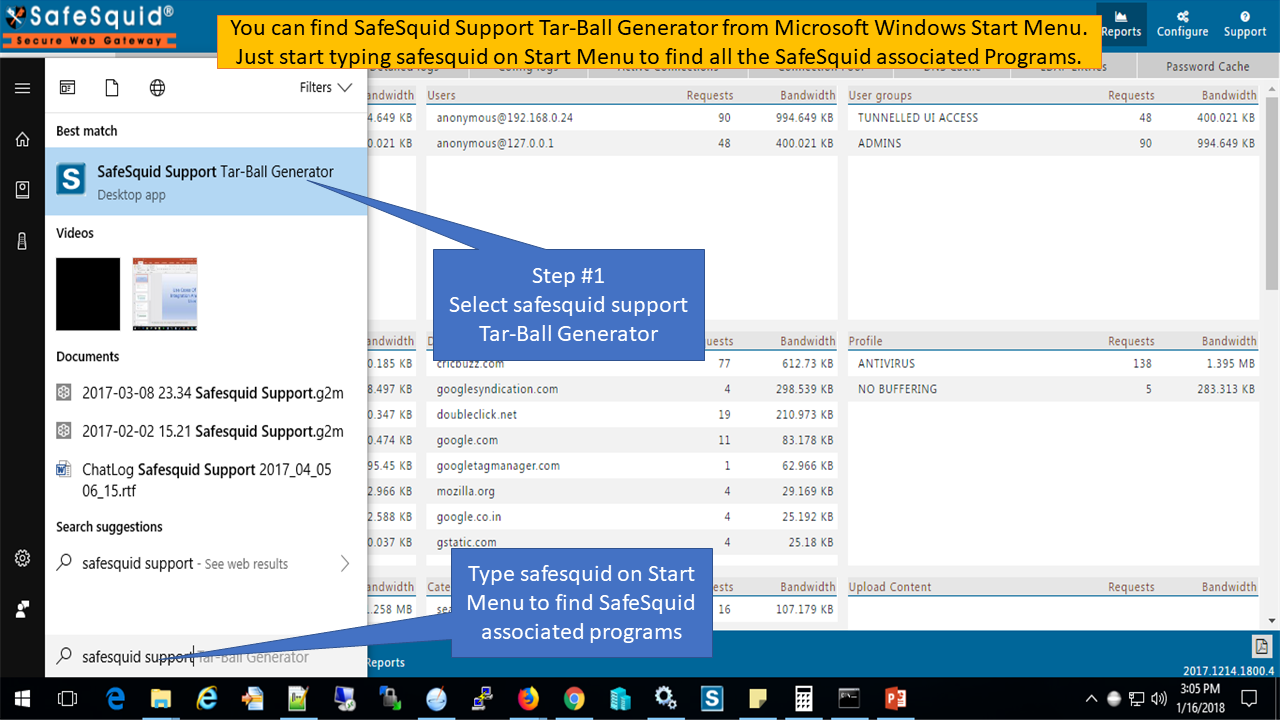 |
|
2. Read the Consent Agreement. Select I consent and click on 'Next' button to continue. 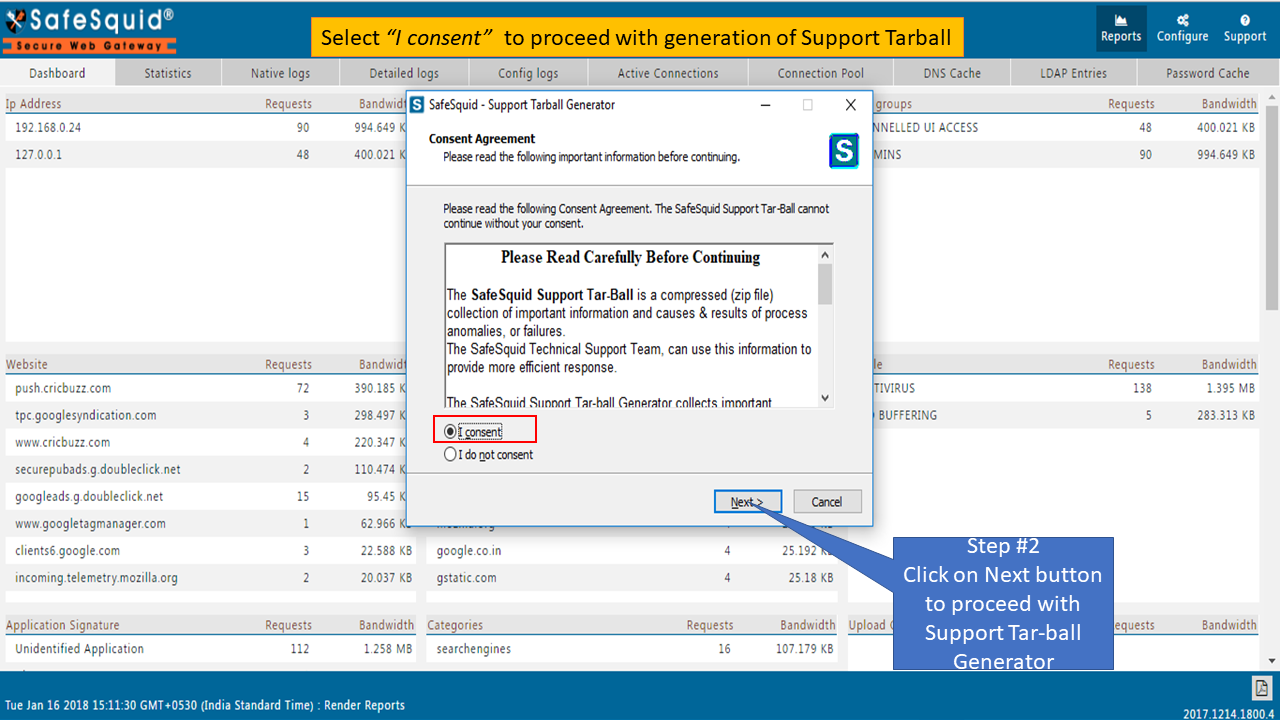 |
|
3. Select the different location where SafeSquid Support Tar-Ball should be created. Also select the Action to be taken when SafeSquid Service terminates abnormally. Click 'Next' button to continue with default option. 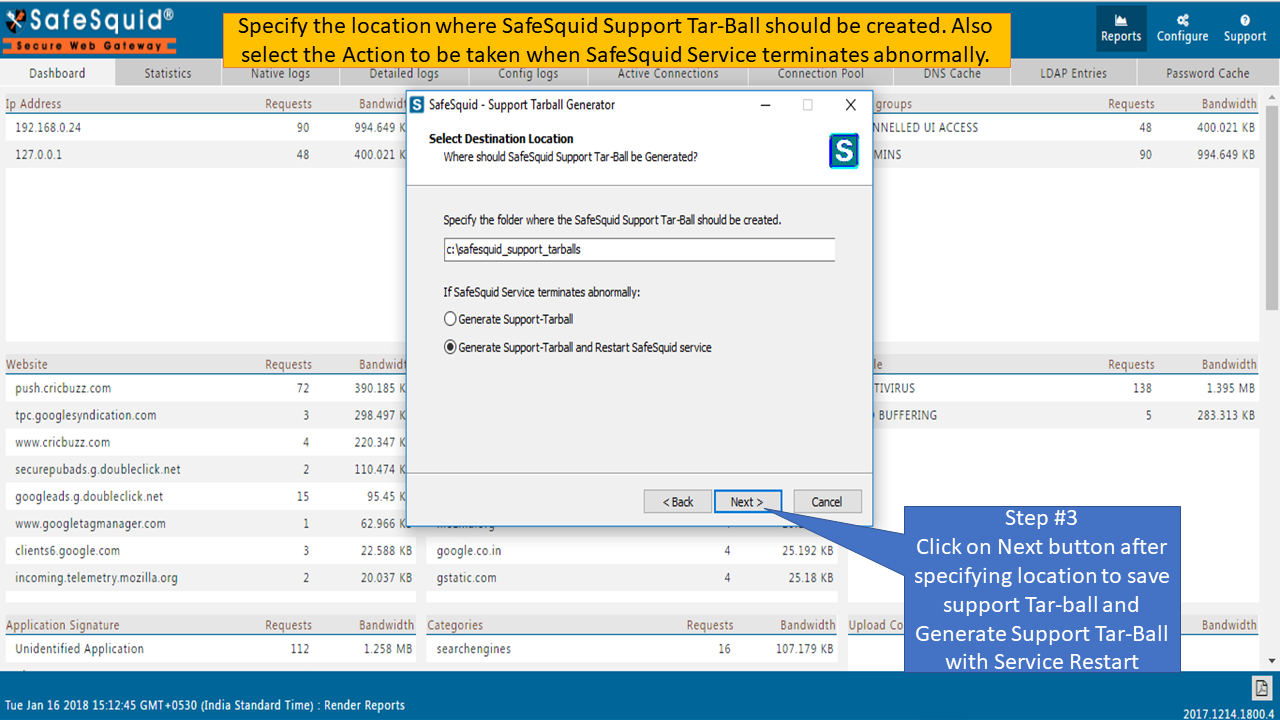 |
Support Tar-Ball Generator collects important information of the causes and result of process anomalies or failures. You can interrupt the Tar-Ball generation in between.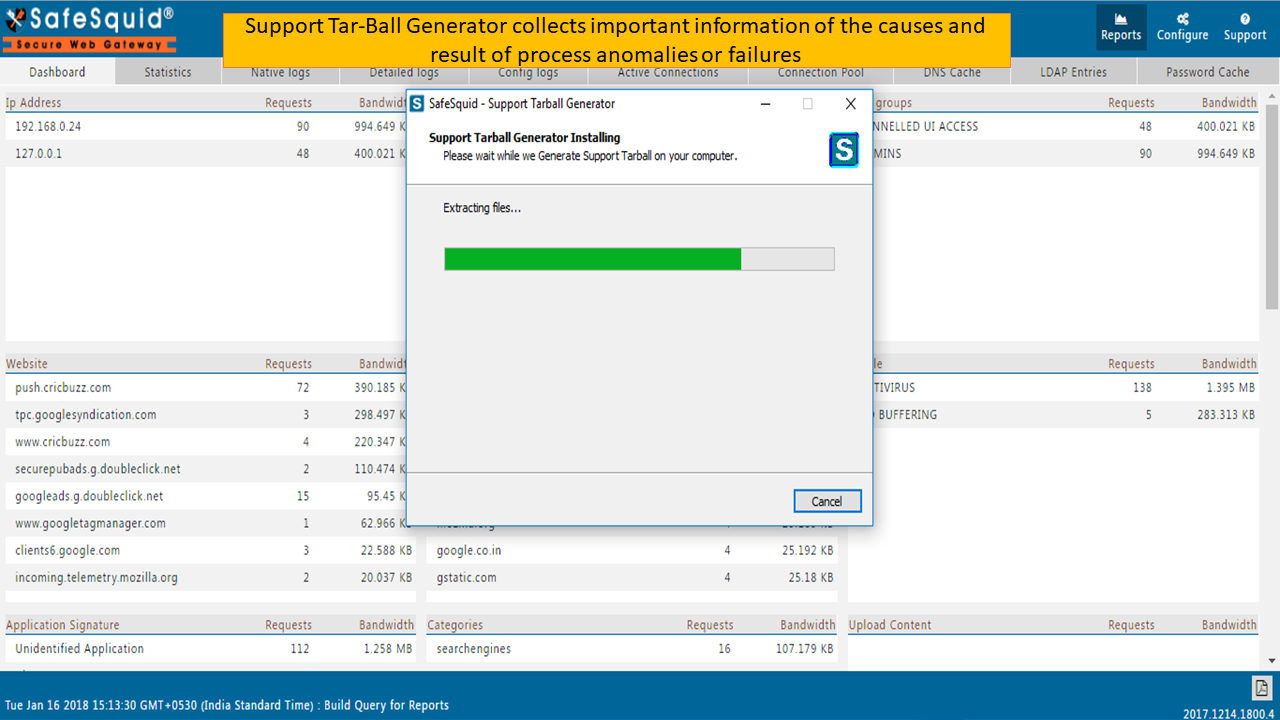 |
|
4. Support Tar-Ball Generated is saved at location “C:\safesquid_support_tarballs”(default). 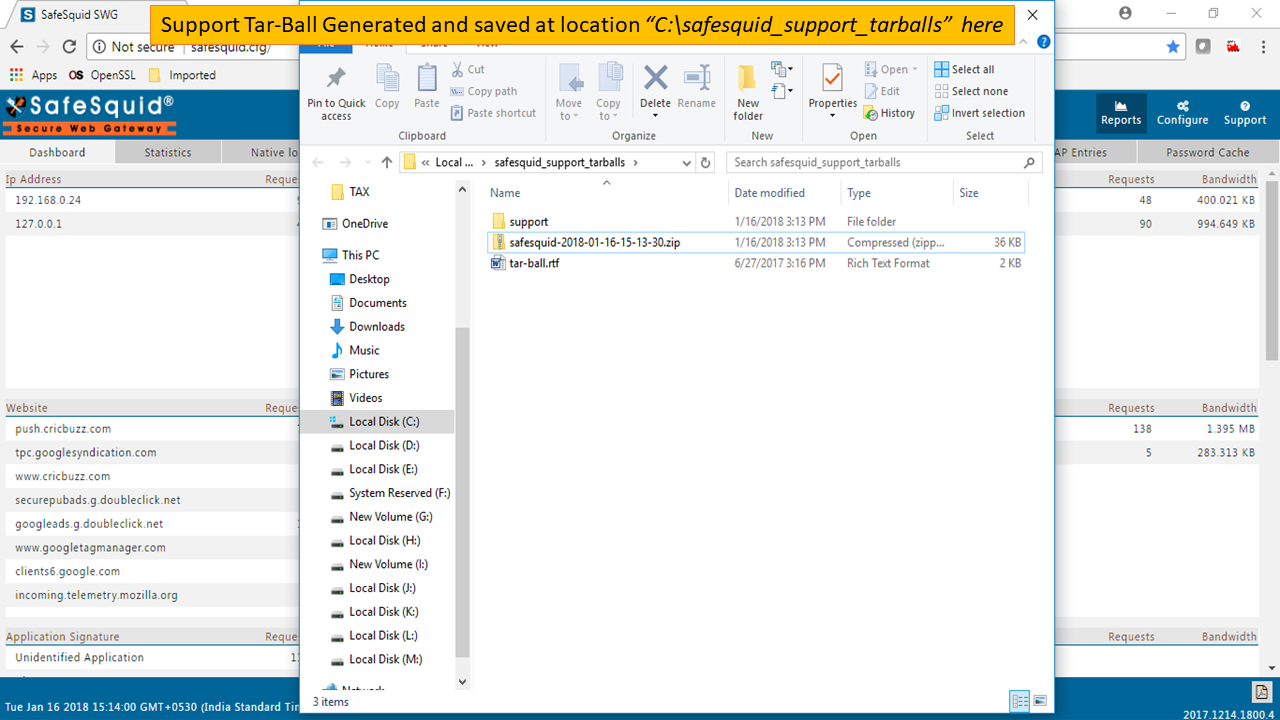 |
|
You can check the uncompressed support tar-ball. You will find extracted Log files and System information stored in a Support folder. 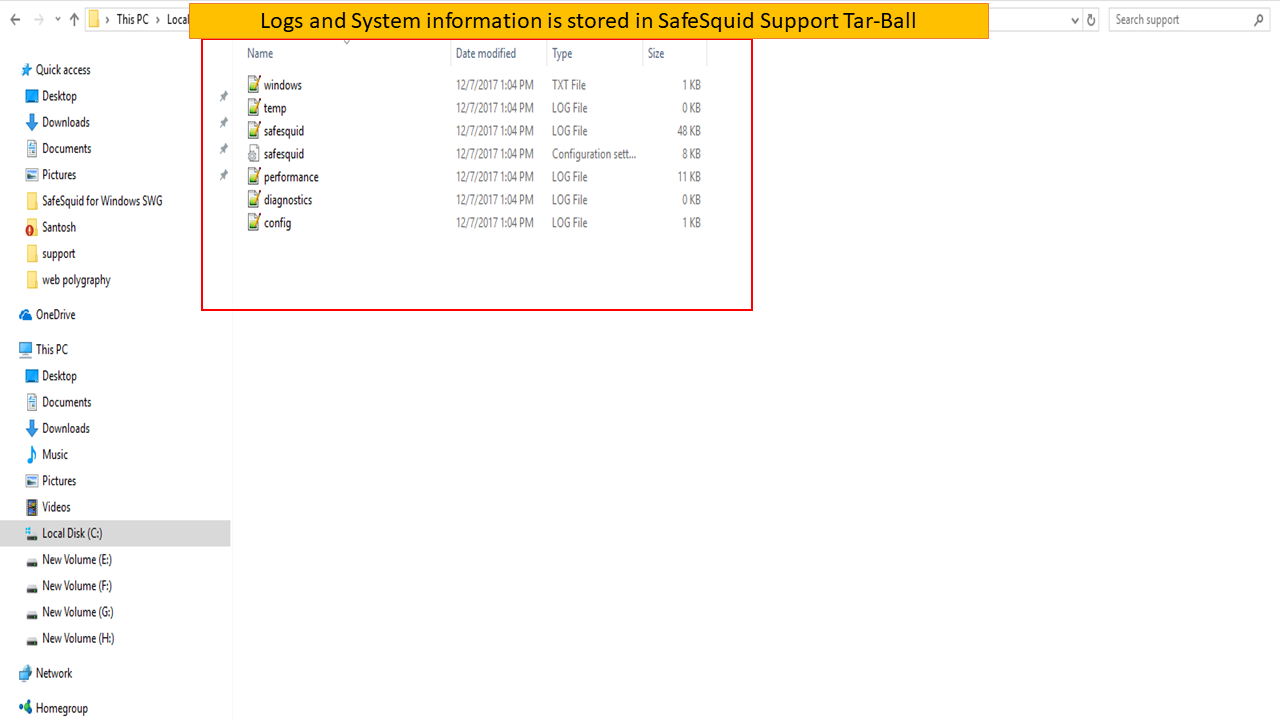 |
Post-Installation Information
- You will need Activation Key to activate SafeSquid for Windows SWG.
If you are a new user, open http://www.safesquid.com from browser and click on Get Activation Key tab. You have to fill registration form to obtain an Activation Key. - You may discover SafeSquid Service is not running due to some of Microsoft Windows DLL files either missing or corrupt. You have to download and restore missing DLL files to fix DLL errors manually.
- SafeSquid for Windows SWG, by default, has been configured to listen on '0.0.0.0:8080' to listen on all the IPs on the system. You can change the 'Listen Sockets' parameter using SafeSquid Service Manager to 'IP:8080' (e.g. - 192.168.0.1:8080) to listen on the specified IP only.
- SafeSquid can be managed via it's browser-based GUI after installation. To access the Interface, set the proxy settings of your browser to use <SafeSquid_IP:PORT> and access the URL - http://safesquid.cfg
- SafeSquid Service Manager is a simple application that merely helps you to Start, Stop, Restart and Modify/View SafeSquid startup parameters. You can refer to SafeSquid Service Manager section above. You will have to restart SafeSquid service for the changes take effect.
- SafeSquid Support Tar-Ball Generator is another application that helps you to collect important technical information, without altering any existing process or information, from your computer system. The collected information will then be compressed into an unencrypted zip file, that we generically refer to as "Support Tar-Ball". You can refer to SafeSquid Support Tar-Ball Generator section above.