

Secure proxy access with WireGuard VPN
Directly exposing a SafeSquid proxy in the cloud to office or remote users is insecure. A dedicated, encrypted WireGuard VPN tunnel enables secure transport from enterprise networks or remote endpoints to the cloud without public exposure. This isolates the proxy, limits attack surface, and supports zero-trust connectivity with SafeSquid inspection and access control. The following diagram depicts the VPN tunnel: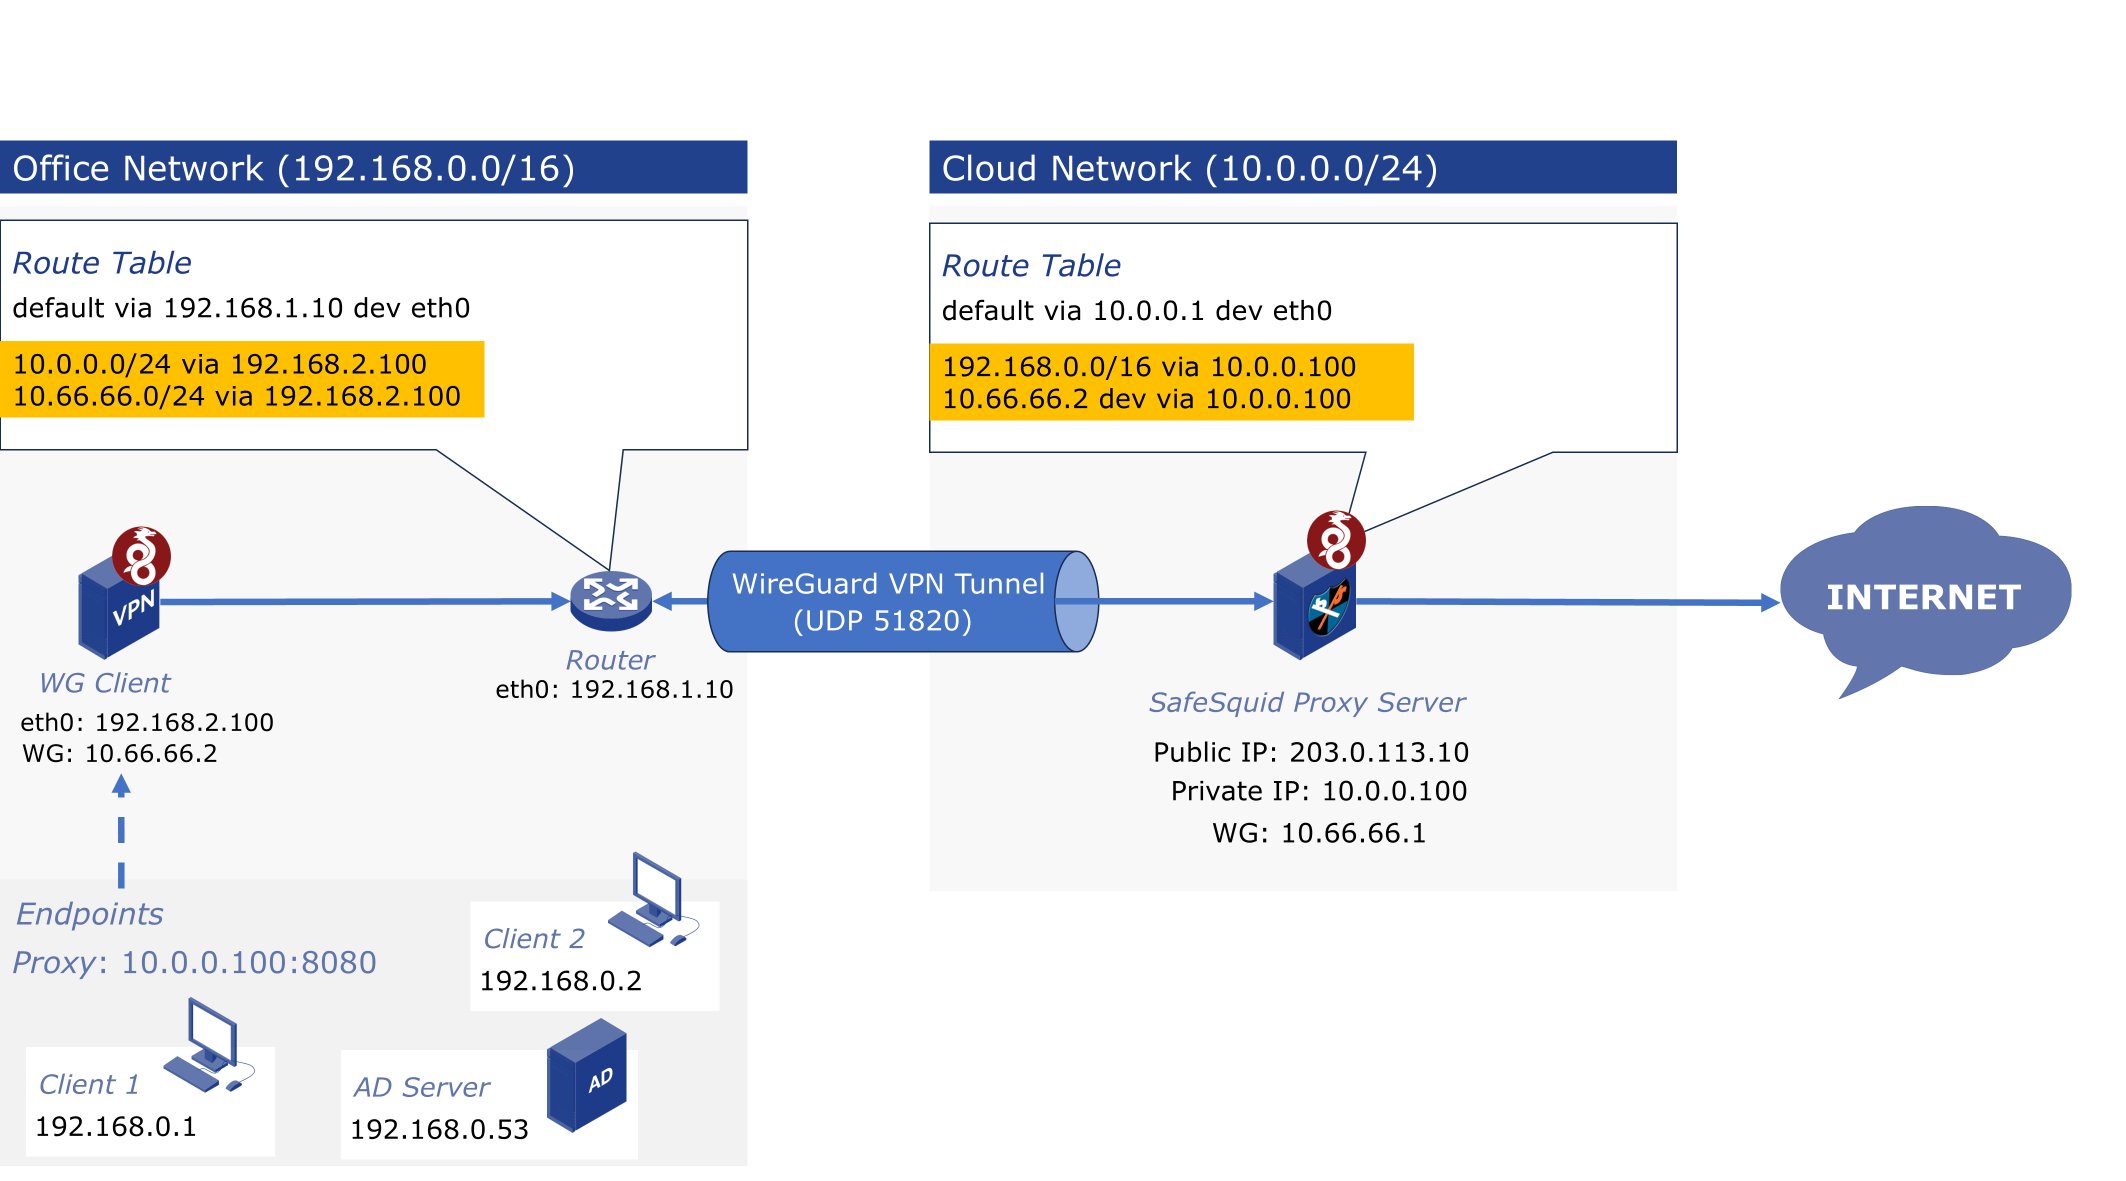
Prerequisites
- Cloud VPS
- Office LAN or Remote Endpoint
Cloud VPS (WireGuard + SafeSquid Host)
- Ubuntu 24.04 LTS
- Public IPv4 address (e.g., 203.0.113.10)
- UDP port 51820 open in the cloud firewall
- Root or sudo privileges
- curl utility installed
Example cloud and office network topology
- Cloud Environment
- Office Environment
Setup Procedure
1. Deploy WireGuard on cloud VPS
Download Setup Script
Fetch the automated installation script provided by SafeSquid to simplify WireGuard server setup.Execute Script
Run the script to initiate the WireGuard server configuration.- Public IP: 203.0.113.10
- Port: 51820
- VPN Subnet: 10.66.66.0/24
- Peer Name: Client1
- Server config: /etc/wireguard/wg0.conf
- Client config: /etc/wireguard/wg0-client-client1.conf
2. Install WireGuard on the office endpoint
Install WireGuard on the office client to enable VPN connectivity.3. Configure office endpoint
Retrieve Client Configuration from Server
Display the client configuration generated by the cloud-side script.Save Configuration Locally
Create the required directory and apply the configuration on the office client.4. Set peer routing rules
On Cloud VPS
Modify the peer section in wg0.conf to allow routing to the office subnet and the client’s tunnel IP. AllowedIPs = 10.66.66.2/32,10.200.2.0/24- 10.66.66.2/32: IP assigned to Client1
- 10.200.2.0/24: Entire office LAN behind Client1
On Office Client
Ensure routing towards the server and internal cloud subnet. AllowedIPs = 10.66.66.1/32,10.0.0.0/24- 10.66.66.1/32: Server tunnel endpoint
- 10.0.0.0/24: Internal cloud LAN accessible via VPN
5. Restart and enable services
Cloud VPS
Restart the interface to apply changes and enable persistence at boot.Office Client
Restart the VPN tunnel with updated config and ensure service autostarts.6. Enable IP Forwarding
Edit the system control file to enable IPv4 packet forwarding.7. Configure Routing
Cloud VPS Route
Route traffic destined for the office LAN via the WireGuard server’s internal IP.Office Router Configuration
Direct cloud-bound traffic from office LAN through Client1 (WireGuard client).8. Enforce One-Way Tunnel Security
Block Unsolicited Traffic from Cloud to Office
Insert a firewall rule to drop unsolicited packets targeting the office subnet from the tunnel.Persist Firewall Rules Across Reboots
Install the persistence utility and save the current rule set.Validate VPN Connectivity
- Cloud VPS Ping Test
- Office Client Ping Tests
- Tunnel Status Inspection
Confirm tunnel and office endpoint reachability.
Post-Deployment Considerations
1. Multi-Client Deployment (Office & Remote Users)
If you plan to support remote employees, not just a single office, you must:On the WireGuard Server:
- Generate separate peer configurations for each user or location
- Assign unique tunnel IPs to each client (e.g., 10.66.66.3/32, 10.66.66.4/32, etc.)
- Use a separate AllowedIPs per peer
On the Remote User
- Use AllowedIPs = 0.0.0.0/0 if they want all their traffic routed through the VPN
- Or use 10.0.0.0/24 if they only need access to internal cloud resources
2. Directory Server Integration
SafeSquid requires directory services (e.g., Active Directory) for identity-based policy enforcement. Ensure:- Proxy initiates LDAP/LDAPS requests from its WireGuard tunnel IP
- Directory server accepts and routes responses to VPN subnet (e.g., 10.66.66.1)
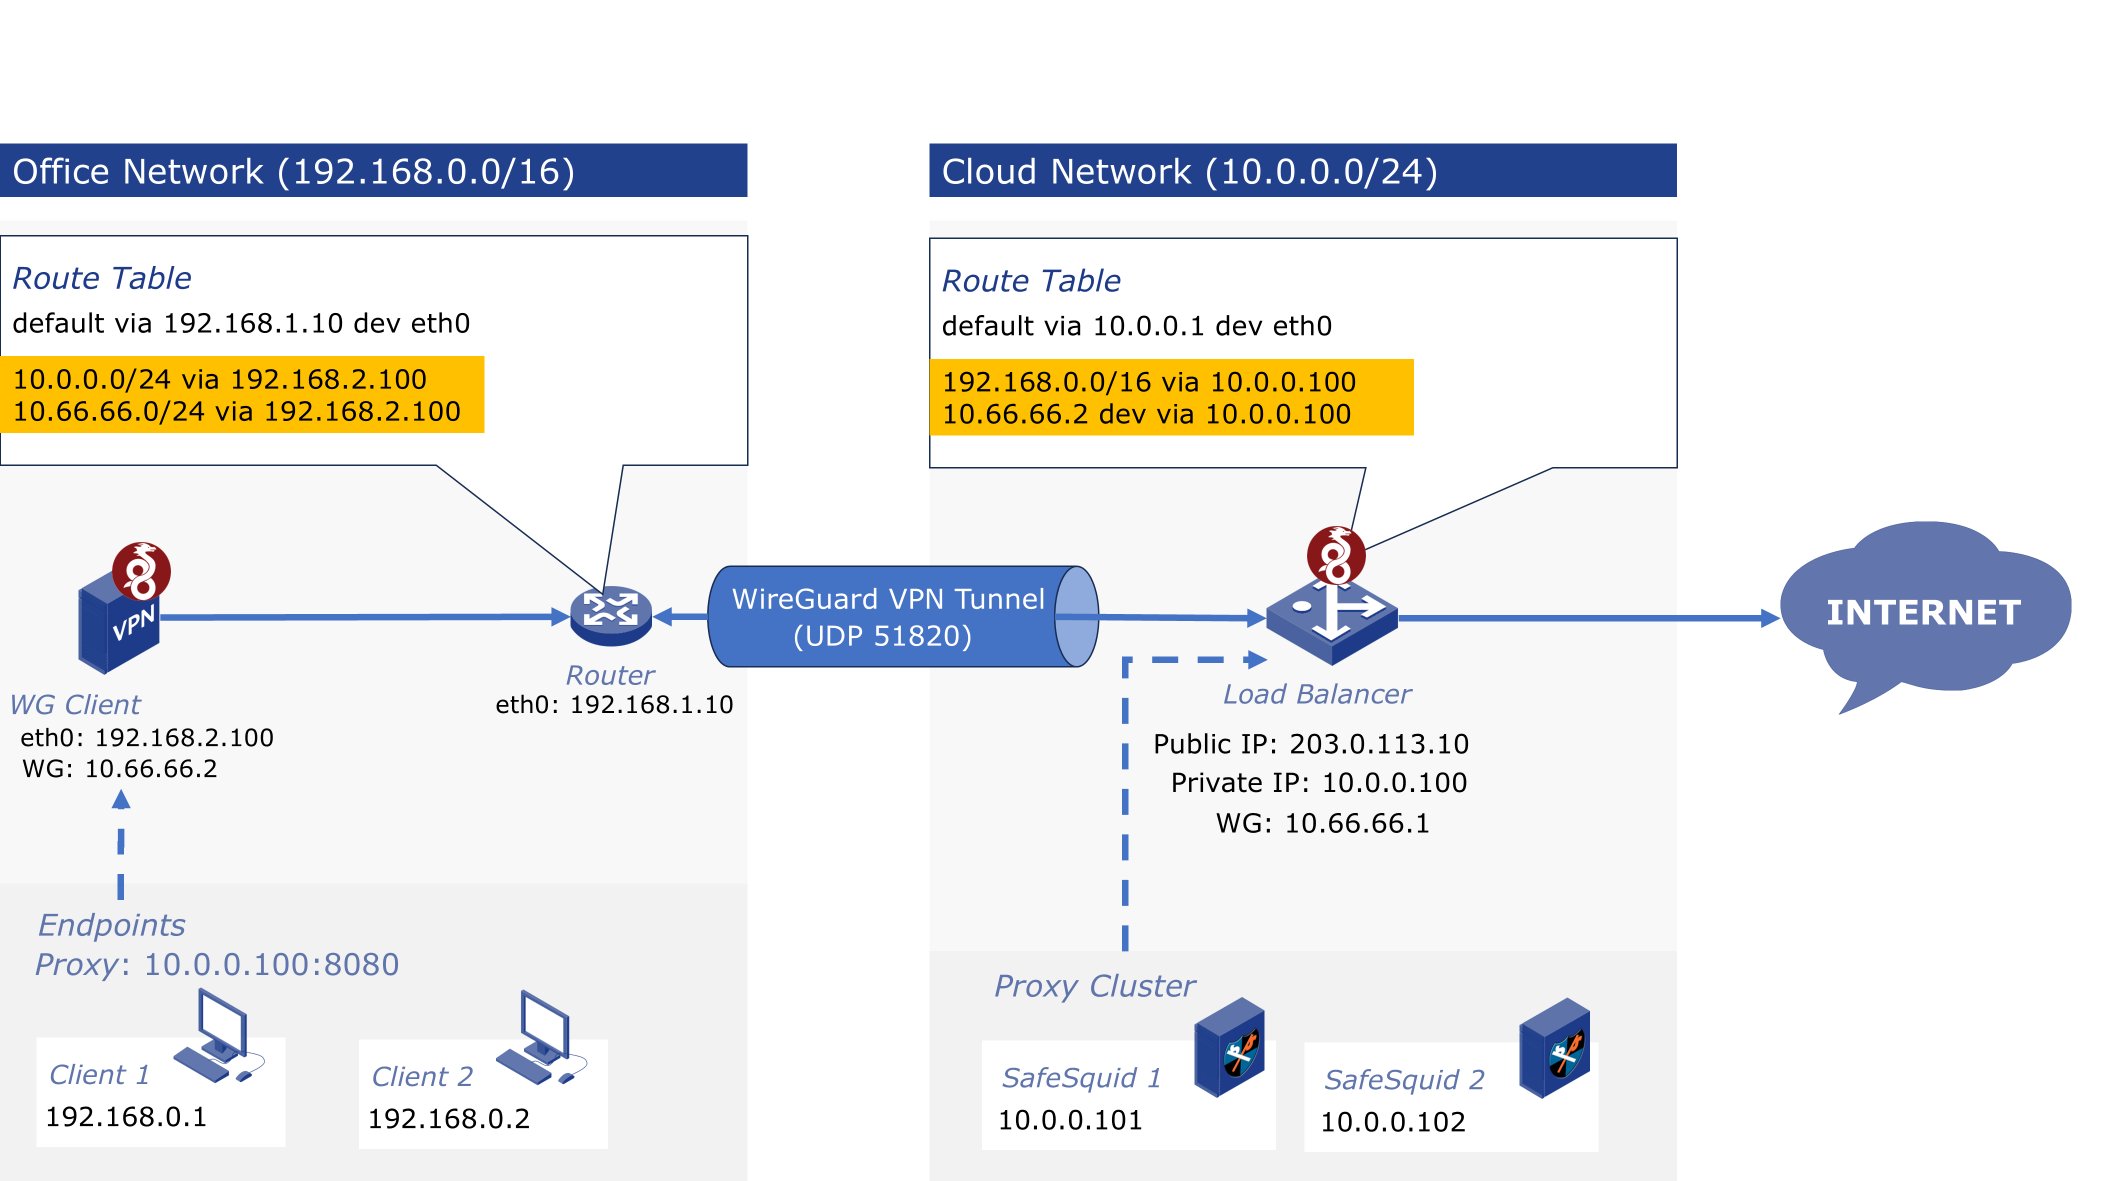
3. Proxy Cluster with Centralized Load Balancer
When deploying multiple SafeSquid instances as a cluster:- Place a central load balancer between the office VPN ingress and the proxy layer
- The load balancer handles all incoming WireGuard traffic
- Distributes requests to proxy nodes for inspection and filtering
- Routes sanitized output to the internet
4. Key Pair Management
Each peer device must independently generate cryptographic keys:- Only the public key is shared with the server
- The private key is stored securely on the client system
- Key rotation is recommended for long-term deployments
Verification and Evidence
- Interface Checks: Confirm WireGuard interface is up (
wg show); SafeSquid listens on the expected ports and is reachable over the VPN tunnel from clients. - Log Analysis: VPN peer handshakes and traffic appear in system logs; SafeSquid access logs show requests from VPN client IPs when traffic is routed through the proxy.
- Performance Validation: From a client connected via VPN, browse through SafeSquid; traffic is inspected and policies apply. Load balancer (if used) distributes connections correctly.